Estimate Substantial Damage
A structure is determined to have Substantial Damage when the total repair costs amount to at least 50% of the structures pre-disaster market value and the structure is also in a Special Flood Hazard Area (SFHA)/100-year floodplain.
Local floodplain management ordinances require communities participating in the National Flood Insurance Program (NFIP) to determine Substantial Damages. Once a local building official or floodplain manager determines that a structure has Substantial Damage, the structure must be brought into compliance with local floodplain management regulations.
Substantial Damage Estimation (SDE) assessments should be conducted after your initial damage assessment so that you identify the structures that are in a 100-year floodplain are at least 50% damaged, having a damage level of major or destroyed. The SDE assessments are a more detailed damage assessment that will then only be conducted on those structures identified as being significantly damaged.
This workflow will walk you through the process of estimating Substantial Damage for residential and commercial properties. FEMA has a Substantial Damage Estimator (SDE) Tool, which helps communities more quickly determine Substantial Damages of residential and non-residential properties in an effort to begin reconstruction soon after a disaster, while also meeting the minimum NFIP requirements.
Using Crisis Track's SDE entry form and SDE document, you can easily import entries into FEMA's SDE Tool to create Substantial Damage Estimation assessments and calculate damages.
-
On the Crisis Track homepage, select your incident from the Existing Incident list.
-
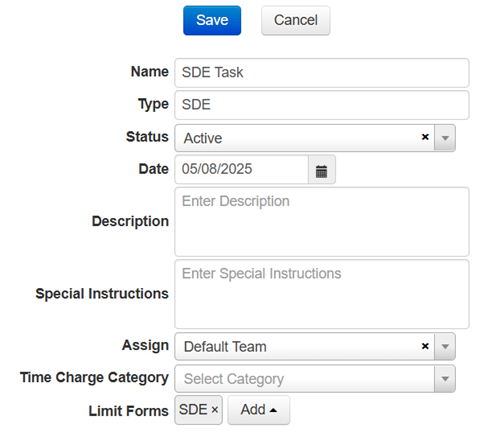
Once in the incident, create an SDE Task by selecting the Tasks module. Click Add and select New Task from the menu. Fill in the details using the definitions below.
-
Name: Name of the task.
-
Type: The type of task using your own terminology.
-
Status: "Request" initially. Other statuses are appropriate throughout the life of an incident.
-
Date: Start date of the task.
-
Description: A description of the task.
-
Special Instructions: Any instructions that may be helpful for the team that completes this task.
-
Assign: The team to which to assign this task.
-
Time Charge Category: Choose the FEMA time charge category for the work being performed for this task.
-
Limit Forms: Allows you to specify which forms will be available for this task. Select SDE from the list. If this is left blank, then all forms will be available.
-
-
Click Save.
Your Substantial Damage Estimation assessments will be based on structures located within a flood zone that have undergone damage assessments and have been identified as having major damage or have been destroyed.
-
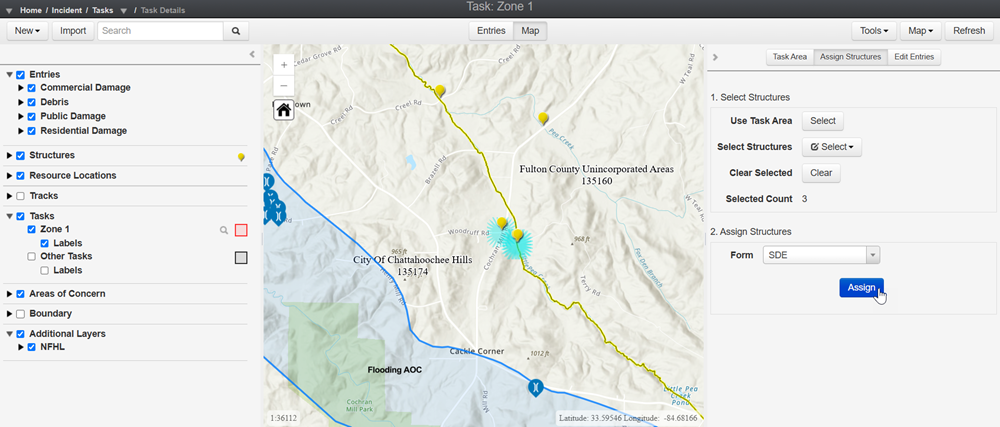
Click Tasks near the top left corner of the screen to go back to your Tasks list. Select View next to your Damage Assessment task.
-
Select the Map tab. Under Additional Layers in the side panel, select the NFHL checkbox to turn on the National Flood Hazard Layer. Position the map to the desired area of structures with damage levels of major (red icon) or destroyed (dark red icon).
-
Create SDE Entries.
-
Click the Assign Structures tab then Select Structures and choose Freehand Polygon from the menu.
-
Draw around major and destroyed structures in the flood zone. Change the Form to SDE.
-
Click Assign.
-
-
Move SDE entries from the Damage Assessment Task to your SDE Task.
-
Click the Edit Entries tab then Select Entries and choose Freehand Polygon from the menu.
-
Draw around major and destroyed structures in the flood zone. Change the task in the Change Task menu to your SDE task then click Change.
-
To see the newly assigned SDE assessments, navigate back to the tasks list and click View next to your SDE task.
Assigned assessments will appear as blue icons. Any completed SDE assessments will appear as red icons.
-
-
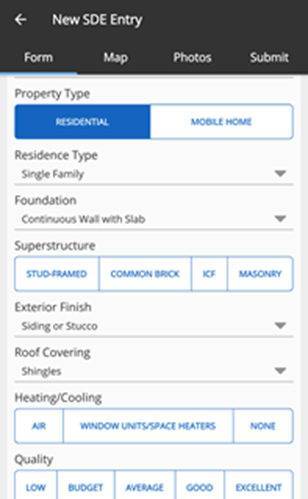
Select an SDE assessment, input damage information, and add photos for the assigned structures.
The FEMA SDE Tool caps photo size limits at 3MBs per entry, which should allow 20 to 30 photos to fit per entry. If an entry has more than 30 photos, you can choose the photos you want to use once in the FEMA SDE Tool.
-
To edit structure information while in the task map view, select an SDE structure and click Edit.
-
To see a list of assigned SDE structures, select the Entries tab and edit the damage information for the entries.
-
Once an entry has been updated, save its Status as Complete.
-
Follow the steps below for when you are in the field and have already been assigned structures to conduct SDE assessments on through the Crisis Track mobile app.
-
After logging into your account, select your SDE Incident and click on Collect Data.
-
Select your Team and your Task then click:
-
Start if you're the Team Lead
-
View if you're a team member
-
-
Select an entry from the list with the status of Assigned, input damage information, and add photos.
Follow the steps below for when you are in the field and need to add a new SDE structure through the Crisis Track mobile app.
-
On the Entries screen, select the + button in the top right corner then choose SDE.
-
On the SDE form, select Locate to bring up the 10 closest addresses. Select the address you want to use and update the information for the entry. Add Photos.
-
Click Submit, review the information, and select Save/Upload if you have a data or WiFi connection, or Save Locally to your device and information will be uploaded to Crisis Track servers once an internet connection is established.
-
After SDE entries have been completed, go back to the incident homepage and select Documents, then click Add and select SDE (FEMA P-784 Substantial Damage Estimator).
Only completed SDE Entries appear here.

-
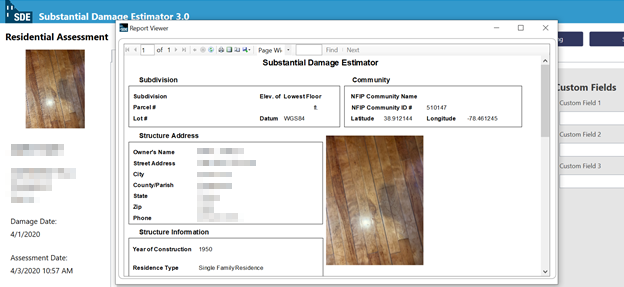
Click Edit next to an assessment to open the SDE document for that assessment. The fields in the SDE document were developed based on the fields included in the FEMA SDE Tool.
-
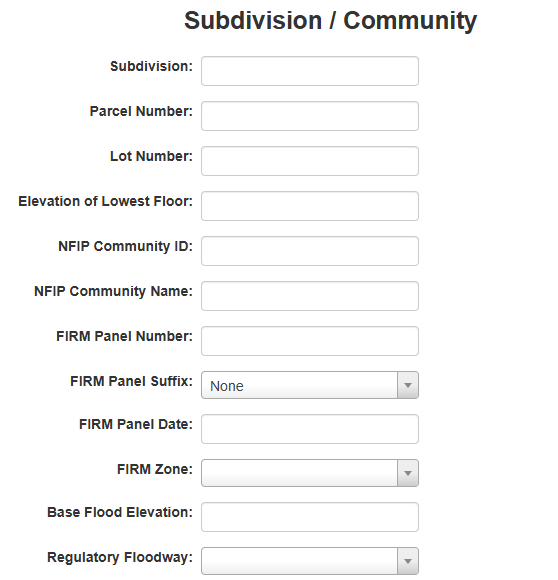
Go through the document and include information for the incomplete fields.
This is where you can add the NFIP Community ID, FIRM Panel Date, Regulatory Floodway, Mailing Address, Inspector Name and Phone, Date Damage Occurred, and Cause of Damage, which are required in the FEMA SDE Tool.
-
Once you've updated all necessary information, click Update in the top left corner of the screen. Select Update again on the confirmation dialog.
-
Repeat the steps above for each additional assessment then continue to the next step.
-
Once all SDE Documents for all of your SDE assessments have been updated, click Save in the top left corner of the screen.
-
Enter a name for your completed SDE Documents in the Save As window then click Save.
-
Your saved SDE Document with all of your updated SDE assessments will now appear on the Documents home screen. Click View next to the saved document and then click Export. Download and extract the zip archive.

-
Download and install the FEMA SDE Tool Version 3.0 using instructions from the SDE Tool Installation Guide.
-
Open the FEMA SDE Tool.
-
Under Reports, Imports/Exports, and Geofiles, select Import/Export Functions. You can also import SDE data by selecting Import/Export then Import SDE on the menu bar and skipping to step 10c.

-
Select Import SDE Data.

-
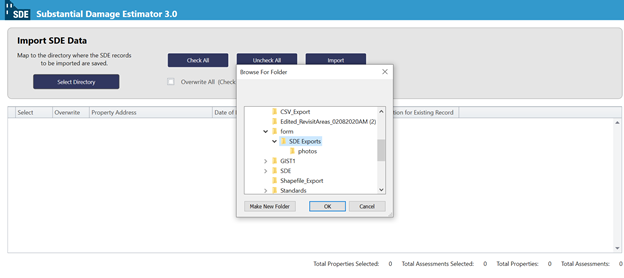
Select Directory then locate your SDE Exports file folder and click OK.
-
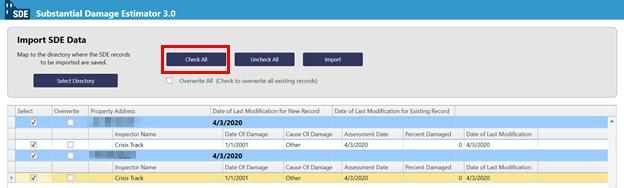
Select Check All to select all properties and assessments.
Only click Overwrite for assessments you are re-uploading.
-
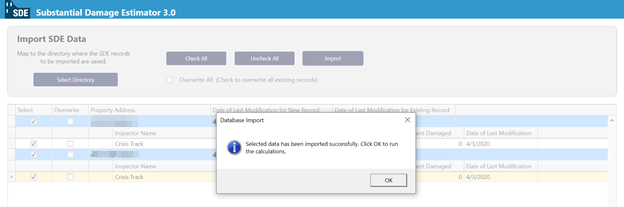
Click Import. You will receive confirmation messages when data imports successfully and calculations run successfully.
-
In the SDE Tool Main Menu, select View/Search All Records then Filter. Your imported SDE assessments will now appear. If you need to further narrow your search results, you can use the optional search fields.

-
Open an assessment and select View/Edit Assessment Info to make sure all property information, cost data, and elemental percentages are correct.
-
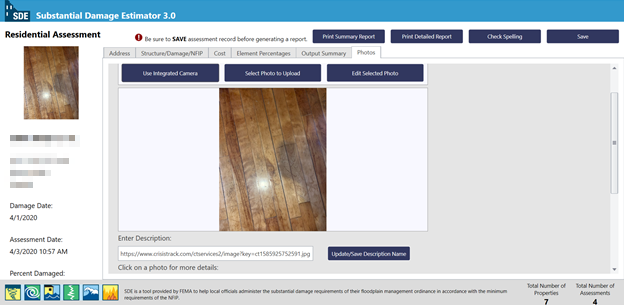
Select the Photos tab to choose a default image for the entry, which can help make it easier to differentiate the entries. The description box will populate a link to the image's location in Crisis Track. Update the photo description as needed.
-
Click Save. If any information is missing, the SDE Tool will alert you. Select Address Errors/Warnings to correct the information then save the assessment again.
-
Print a Report Summary or Detailed Report for the assessment.
-
Repeat Steps 10g-j for additional assessments.
-