Welcome Conference Students! You’ve reached the help topic linked from your student materials. Explore the content below to get started.
Plan File and Response Guide Management
This topic provides an overview of how plan resources are organized and maintained to support incident response. It covers how plan files, depth charts, Incident Response Guide (IRG) and Incident Command System (ICS) associations and objectives work together to ensure accurate documentation, continuity of operations, and readiness for any event.
Manage Plan Files
The Plan Files section serves as a centralized location for accessing all files associated with a specific plan. Each file includes its name, the Incident Response Guides (IRGs), and the Incident Command System (ICS) positions it is linked to, providing clear context for its purpose and relevance. While the files in this section are view-only, their associations play a key role in determining whether the files are considered active parts of the plan.

Adding a File to a Plan
To add a file, it must be associated with at least one IRG or ICS position, and to remove a file, all associations must be cleared. These adjustments can be made by navigating to the Plan Summary, selecting the relevant plan, and managing the file’s IRG or position associations. This process ensures that each plan consistently maintains the correct supporting documents and resources.
Best Practices
Plan files are an important way to ensure documents are ready and available for anyone assigned to a position during a response. These might include Job Action Sheets that outline responsibilities for a specific role, or reference documents that provide useful guidance for the type of incident at hand. Files can be added in advance as part of the IRG template or they can be uploaded after an incident has been activated, giving you flexibility to prepare ahead of time or adapt in the moment.
For example, in a fire response you may want quick access to the fire response plan and a chart showing the location of all fire extinguishers. For other IRG responses, it may be helpful to include a priority phone list or other reference materials that support the response. The range of possibilities is broad, and the goal is to make sure the right information is accessible when it is needed most.
Edit Depth Charts
The Depth Chart supports continuity of operations by identifying qualified backups for ICS positions. It enables planners to assign alternates who can step into roles if the primary contact is unavailable, ensuring that critical functions are not disrupted. By maintaining an accurate Depth Chart, agencies can be confident that response positions will always be staffed with capable personnel.
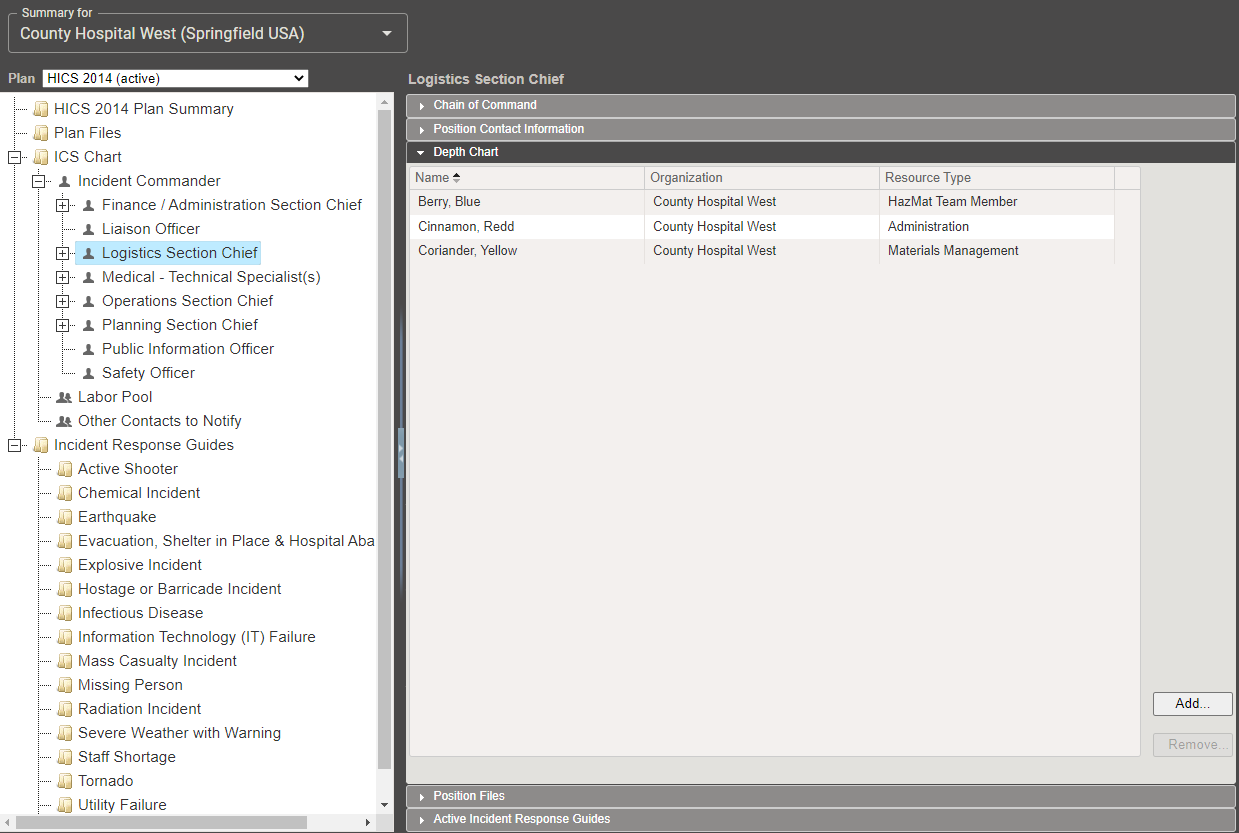
Managing Contacts in Depth Charts
Users can manage contacts in the Depth Chart by selecting a position in the ICS Chart, opening the Depth Chart, and assigning individuals from the contact list. If a contact is no longer appropriate for a role, they can be removed to keep assignments accurate. Regularly reviewing and updating the Depth Chart ensures that each role is filled by qualified personnel and strengthens the overall readiness and resilience of the incident command structure.
Best Practices
In Emergency Management, a key principle is to activate only the positions you need, when you need them, and deactivate them when they are no longer required. This ensures the response remains lean, efficient, and focused.
When working with the IRG, think about the type of response the IRG is designed to support. From there, identify the minimum essential positions that should be activated automatically. This creates a strong starting point without overcommitting resources. As the incident escalates, additional positions can be activated as needed, giving you both structure and flexibility.
Manage IRG and ICS Position Associations
Administrators can link Incident Response Guides (IRGs) to ICS positions during the planning process. These associations ensure that when an incident occurs and positions are activated, the appropriate guides and notifications are automatically triggered for the individuals assigned to those roles, supporting a timely and effective response.
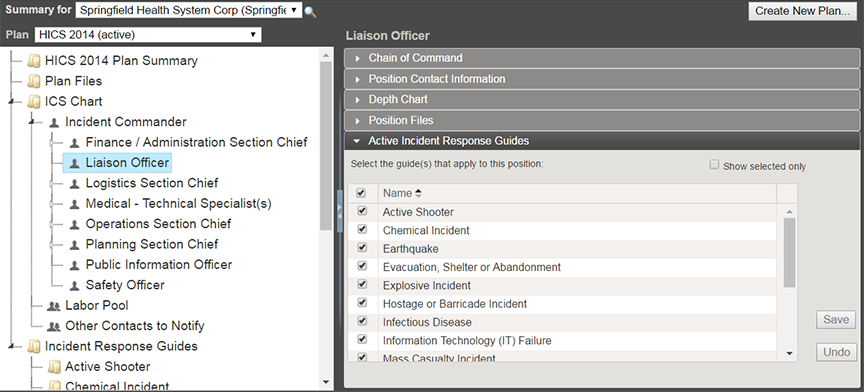
Mapping Response Guides
In the planning module, users can open the Active Incident Response Guides drawer for each position to select or deselect the appropriate IRGs. Once saved, these associations are locked into the plan, ensuring that each role is aligned with the correct response materials. This process streamlines responsibilities and improves efficiency when the plan is activated.
Best Practices
Another important emergency management principle is to plan for at least three people deep in every position. The duration of an event is never certain, and identifying key individuals ahead of time ensures continuity if staff need to rotate, take breaks, or are unavailable. Just as important, this approach allows for training and education to be provided in advance, so each person is prepared to step in and perform effectively when needed.
For some positions, such as Labor Pool or when building out hospital departments in the command chart, it may be useful to designate a larger pool of candidates. In these cases, you can use the position depth chart to select multiple people in bulk, ensuring flexibility and readiness across your organization.
Add Objectives to an IRG
Objectives define the critical tasks or responsibilities associated with an IRG and may be assigned either to a specific ICS position or to the incident as a whole. Each objective can include a name, description, priority, and operational period, allowing planners to clearly communicate expectations. By assigning objectives to specific operational periods, tasks can be introduced at the appropriate stage of response, ensuring a more organized and effective incident management process.
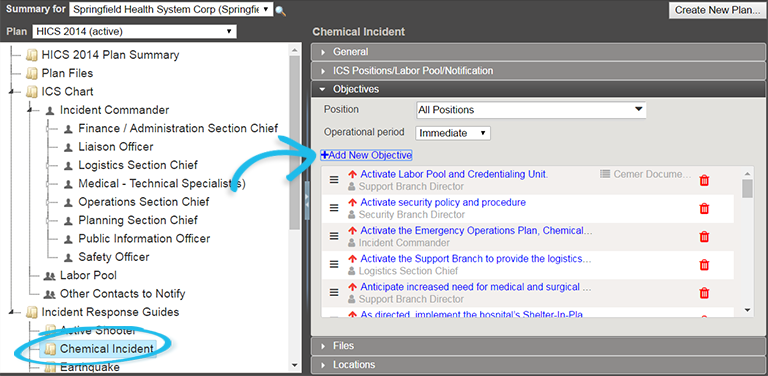
Creating Objectives
When creating an objective, planners can apply templates that add structured question-and-answer fields to promote consistency and ensure objectives are clearly documented. To add an objective, navigate to Planning > Plan Summary, select the appropriate domain or facility from the summary list, choose the IRG, open the Objectives section, and click Add New Objective. Well-defined objectives strengthen response coordination and accountability across all positions involved in the IRG.
Best Practices
When adding Objectives to an IRG, use this as an opportunity to remind participants that they can pre-plan objectives and tasks directly in the IRG template. Doing this creates a ready-made checklist that staff can rely on when they are assigned to a position. This is especially valuable in hospitals, where incident command is not part of most staff members’ day-to-day responsibilities. Clear objectives give them a starting point and help reduce uncertainty in the early stages of a response.
Another key point is that objectives are not limited to what is pre-loaded in the IRG template. Once an incident is underway, new objectives can be created at any time as needs emerge. In practice, these objectives function like tasks: they can be assigned to positions, tracked for progress, and automatically documented. For the person receiving them, objectives serve as a dynamic task list, helping them stay organized, prioritize effectively, and ensure nothing falls through the cracks, even when the workload becomes extensive.
Further Information
-
Training Center - Continue your training journey and elevate your skills through instructor-led and on-demand training.
-
Ask an Expert - Have questions after training? Connect directly with Juvare experts for real-time guidance from our team.
-
Juvare Events Page - Your hub for Juvare webinars, training, and trade shows.