Create Incidents
Authorized users can create incidents in EMTrack by designating details such as the Incident Type and whether participant staging is allowed, as well as the location Generally refers to the region or to a division, such as a provider facility or mobile provider. Every user is granted access to at least one location., contact information, incident sites A specific location at the scene of an incident or that is associated with an incident., and provider settings.
When you create an incident, the system automatically fills in certain information, which you can add to or change. This information includes:
-
Contact fields, such as your name and email.
-
Settings, such as the start date and time.
-
Default incident sites (depending on the incident type
Incidents of the same type can share basic information.). -
Default providers and their access level.
Refer to Incidents for details on default information, and the user roles that can create and edit incidents.
This video demonstrates the steps below.
To create an incident
-
Click the Incidents tab.
-
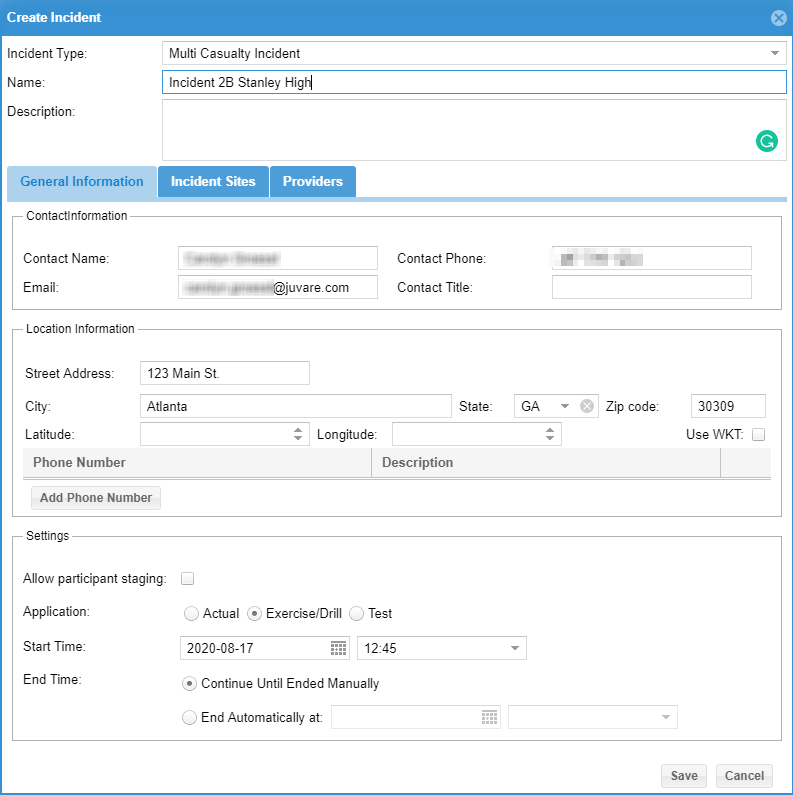
Click Create Incident. The Create Incident window opens.
-
In the Incident Type menu, select the type of incident you want to create.
-
If appropriate, select the Allow participant staging checkbox.
-
Click Next. Dynamic fields in the Create Incident window appear.
-
For Name, enter the name of the incident.
-
For Description, enter basic details about the incident.
-
Follow the steps in the expanding headings below for more information on fields in the General Information, Incident Sites, and Providers tabs.
Specify general information
-
If it is not already selected, within the Create Incident window, click the General Information tab.
-
In the Contact Information panel, enter and/or edit the Contact Name, Contact Phone, Email, and Contact Title.
- In the Location Information panel:
Enter the Street Address, City, State, and ZIP Code of the incident, as appropriate.
Click Add Phone Number then enter the phone number and a description, for example cell number. Repeat this step for additional phone numbers.
-
In the Settings panel:
-
Select the Allow participant staging checkbox if you did not before and want to enable it.
-
For Application, click Actual, Exercise/Drill, or Test to specify what type of incident application this follows.
-
Add or change the Start Time.
-
Change the default value to the appropriate date and time if one is listed, otherwise enter the date and time that the planned event will start.
-
Remove the default date and time if you don't want to proceed with a start date and time.
You do not have to specify a start date/time for pending incidents.
-
-
- Set the End Time by clicking either:
Continue Until Ended Manually
End Automatically at then specify the date and time.
Specify incident sites
- Within the Create Incident window, click the Incident Sites tab. Depending on the selected incident type, some sites may be provided by default.
-
To add or edit an incident site, take these actions:
-
Click Add Site to enter a new site, otherwise to edit existing sites continue to the next step.
-
Click the Name to add or modify the site name.
-
Click the Address to add or modify the site address.
-
To find the site Latitude and Longitude, click the map
 button. The map opens.
The map opens unless the address was incomplete or more than one location was returned for the address. In that case, the Select Address window opens. Locate and select the correct address, then click OK.
-
Verify that the address marker is correctly located on the map. If necessary, drag the marker to reposition it.
-
In the upper right, click the close button to dismiss the map. The Latitude and Longitudehave been entered for the mapped location.
-
Click Status, then select Not Started, In Progress, or Complete from the menu.
Repeat these steps to add or edit other sites.
-
-
To delete an incident site, click the delete
 button on the relevant incident row.
 -
To view a map that shows all incident sites, click Map Sites.
- To add or edit a sub-location, take these actions:
Locate the site and on that row, click the edit sub-locations
 button. The Edit Sub-Locations window opens.
Click Add Sub-Location to add a new sub-location, otherwise to edit an existing sub-location continue to the next step.
Enter the Name of the sub-location.
Repeat for as many sub-locations as you want to add.
Click OK. The Edit Sub-Locations window closes.
Click the + button to the left of a site name to view its sub-locations.
- To delete a sub-location, take these actions:
Locate the site and on that row, click the edit sub-locations
button. The Edit Sub-Locations window opens.On that row, click the delete
button.Click OK. The Edit Sub-Locations window closes.
Work with providers
Use the search field at the top of the Participants tab to quickly locate a particular participant. Enter all or part of the participant name in the field. The system automatically returns all matching providers.
-
Within the Create Incident window, click the Providers tab.
- To add or change providers, take these actions:
Click Add Provider. The Search Providers window opens.
On the left, select the checkbox for all or each individual Provider Facility and Mobile Provider Organization.
If you select Unspecified, enter the Provider Name, City, and/or ZIP Code.
Click Search Providers. The right pane displays the results.
On the right, select the checkbox for all or each individual provider you want to include in the incident.
On the lower right, click Add Provider.
If necessary, repeat these steps to add more providers.
-
If you want to change a provider's access, click their current access and select a different level from the menu:
-
Involved: For Provider Facilities, the division can be involved in the incident and has full access to clients and their PHI when the clients are en route to, arrived at, or are encountered by the facility.
For Mobile Providers, the division can be involved in the incident and has full access to clients and their PHI while the clients are at their incident site. After the client leaves the site, the mobile provider has access to only the clients it encounters.
-
Full: The division can be involved in their incident and has full access to the incident and all clients associated with it, no matter where the client is physically or where they are in the tracking process. That is to say, the division can search for and view the incident's clients and their PHI, even when this division has not directly encountered the client.
-
Full with Command: The division has full command rights for the incident and has full access to all clients associated with it, no matter where the client is physically or where they are in the tracking process. Command rights include being able to edit incident details. By default, the provider creating the incident has this level of access.
-
-
To delete a provider, click the delete
button for that provider row. -
Click Save.
-
Related Concepts