Patient Custom Report
Use the Custom Report to generate a comma-separated values (CSV) file that contains specific data elements Fields and values as they appear in EMTrack Web and Mobile. for one or more patients. As described in Patient Reports, you can start the report generation process from either the Dashboard Comprised of groupings of data, called gadgets. or the Filters tab. After searching for and selecting patients, go to Views and choose Custom Report. Then, select the data elements you want to include in the report. Each data element appears as a column in the report.
Refer to Form Elements and Fields for descriptions of the available elements.
Use the right arrow to move columns from the Available to Selected Columns panes. All details you add to the right pane will be included in the report. To remove a column, use the left arrow. Use the other arrow buttons to move a selected column up or down in the right pane. This defines the order in which the data elements appear as columns in your report. The report can be opened and viewed using a text editor or spreadsheet application, such as Microsoft Excel®.
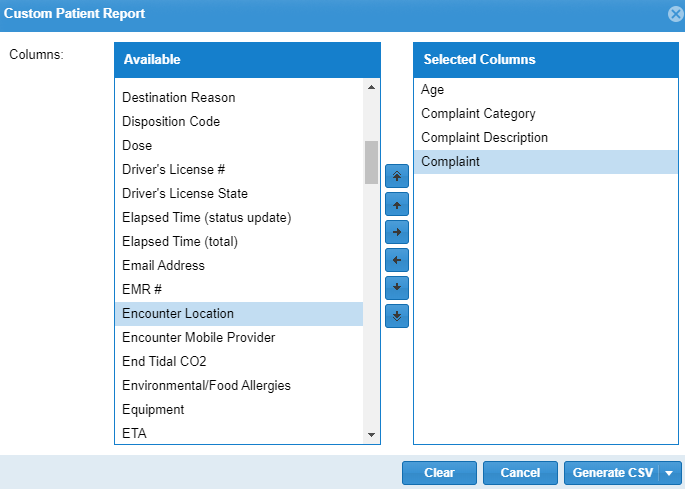
To generate the Custom Report for one patient
-
Find the patient or client record:
-
In a client list gadget.
-
By clicking the view icon in the client list gadget to open the patient list.
-
By clicking an area in a client summary gadget to open the patient list.
-
By using the Filters tab.
-
-
In the gadget, patient list, search results or dashboard, click the view icon for the patient. The Detailed Patient Information window opens.
-
Click More, point to Views, and select Custom Report. The Custom Patient Report window opens.
-
To add data elements (and columns) to the report:
-
Click an element in the Available pane.
-
Click the right arrow to move it to the Selected Columns.
-
Repeat these steps for each column you want in the report.
-
-
Use the arrow buttons to define the order of the columns.
-
Click Generate CSV. The file is generated and downloaded according to your browser settings.
To generate the Custom Report for one or more patients
-
Find the set of records by:
-
Clicking the view icon in the client list gadget to open the patient list.
-
Clicking an area in a client summary gadget to open the patient list.
-
Using the Filters tab.
-
-
In the patient list or search results, select the checkbox for each patient or client you want to include in the report.
-
Click Views and select Custom Report. The Custom Patient Report window opens.
-
To add data elements (and columns) to the report:
-
Click an element in the Available pane.
-
Click the right arrow to move it to the Selected Columns.
-
Repeat these steps for each column you want to appear in the report.
-
-
Use the arrow buttons to define the order of the columns.
-
Click Generate CSV. The file is generated and downloaded according to your browser settings.
To save a Custom Report Template
-
In the Reports tab, click Custom Report Templates. The Custom Report Templates window opens.
-
Click New Template then specify:
-
The Name of the template.
-
The Filter you want to apply to the template.
-
Whether you want to share the template with others.
-
-
Use the arrow buttons to specify the selected columns and the order of the columns.
-
Give the template a description to explain what it should be used for or what data it captures.
-
Click Save. The custom report template is saved in the Custom Report Templates window and you can access or manage the template at any time.
To manage a Custom Report Template
-
In the Reports tab, click Custom Report Templates. The Custom Report Templates window opens.
-
Select the checkbox for the template you want to manage.
-
Click one of the following at the bottom of the Custom Report Templates window:
-
Edit - opens the Edit Custom Report Template window to allow you to modify the report template.
-
Generate CSV/Excel - generates a CSV or Excel file (depending on which you selected) of the report. This report will appear in Completed Reports for seven days.
-
Delete - prompts you to confirm if you want to delete the selected report template.
-
-
Click Done when you have finished managing your custom report templates.
Related Concepts