Vaccination Tracking Guide
As Juvare’s people and patient tracking solution, EMTrack can be configured to support vaccination tracking. Vaccination tracking features enable the entry and update of vaccinations across multiple locations, improving real-time situational awareness and offering historical reporting.
This guide is geared toward both EMTrack administrative users and vaccination clinic personnel tasked with capturing and updating a variety of information that is required for vaccination recipients’ records. It describes the EMTrack components that can be configured to support vaccination tracking operations and provides examples that can be adjusted and adopted to best meet your needs.
The key configurable components that support vaccination tracking include:
You can access the data entry and update forms by either logging on to EMTrack Web or via the EMTrack Mobile App.
It is important to understand that the data capture tools provided can be configured to support your specific workflow. Clinic personnel, please contact your EMTrack Regional Administrator to discuss revisions that might better meet your needs, including patient entry form and dashboard component configuration.
For administrative users, it is recommended that configuration decisions follow a thorough workflow analysis to ensure that all components support the identified end-user experience. Different sets of components can be configured to support the unique workflow needs of jurisdictions.
Incident Types
This sections is for administrative users only.
Incident types Incidents of the same type can share basic information. enable you to pre-identify the appropriate attributes and participants for specific tracking needs for an incident by establishing:
-
Incident sites
A specific location at the scene of an incident or that is associated with an incident. that are common for each instance of this type of patient tracking activity. In the case of vaccination tracking, these will be the progressive stations (for example, registration, screening, administration, observation, and discharge). -
Specific providers that are involved in vaccination tracking. These are selected from existing EMTrack Provider Facilities.
Multiple incident types can be created to support different Incident Sites and Provider combinations.
To create a new Incident Type:
-
On the upper right, click System Settings.
-
On the left, under Other Settings, click Incident Types.
-
Click Create incident type. The window opens.
-
Enter a Name and Description.
-
On the Incident Sites tab, click Add Site to enter each vaccination station. For example, Registration, Screening, Administration, Observation, and Discharge.
-
On the Providers tab, add the locations that will be administering vaccinations.
Providers are the same as Provider Facilities
A standing facility, which can be a hospital, long-term care facility, or shelter., which are key to associating personnel. Once established, when this type of EMTrack incident is started, it will already include the appropriate providers and stations.
Patient Forms
Custom configured patient forms A set of questions that guide users through collecting and entering data to create records in EMTrack. support the data collection required for each vaccination tracking data set. While the specific fields are likely identical, the fields grouped together in discreet forms should support the prescribed workflow and mirror the identified stations (stations are the same as incident sites).
EMTrack enables you to track specific information for each vaccination instance, including:
-
Point of distribution site
-
Vaccine recipient demographic information
-
Pre-screening and screening questions
-
Vital signs
-
Vaccine type and lot number
-
Administration information
Form Examples
The following are examples that can be used to support the various stages of vaccination tracking data collection needs. Each of these can be made available to your clinic staff and revised as needed.
While these represent discreet data sets, your users’ unique workflows may require that multiple sets be combined on a single form. Additional EMTrack fields can be added to the forms as needed, and your region can include multiple combinations of fields that can be assigned to specific user types.
Patient forms can be accessed by both the web and the EMTrack mobile app.
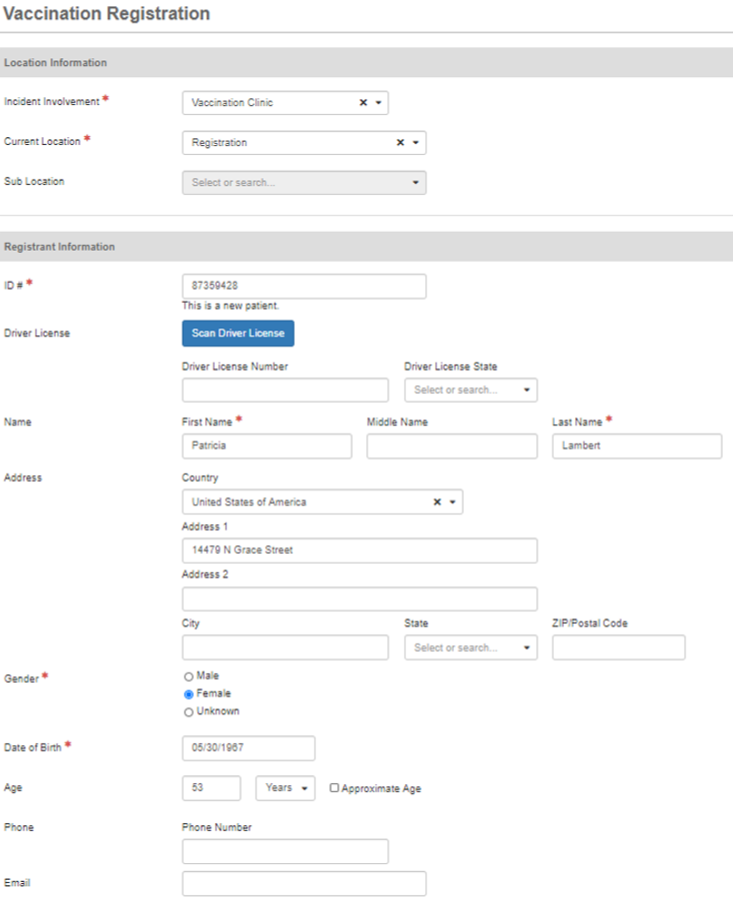
Registration
The point of entry data collection would typically include demographic information, much of which can be scanned in with a single driver license scan. Use the EMTrack Mobile App or attach a tethered scanner to your computer to take advantage of this feature.
Screening
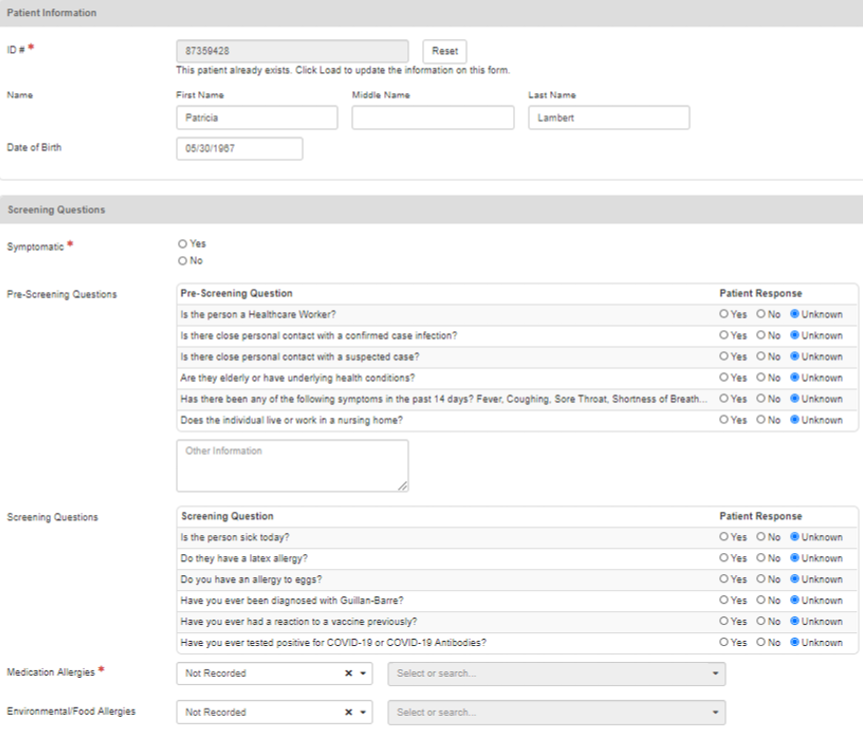
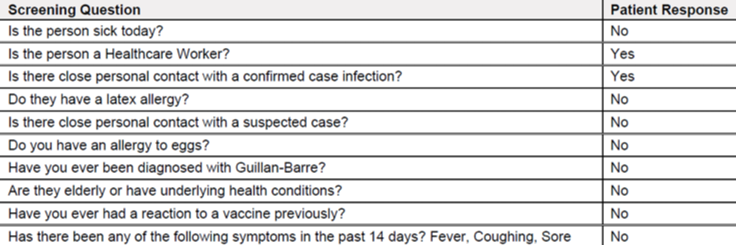
The Screening form provides the opportunity to update the record with pre-screening and screening questions, as well as additional health information such as allergies and symptoms.
Administration
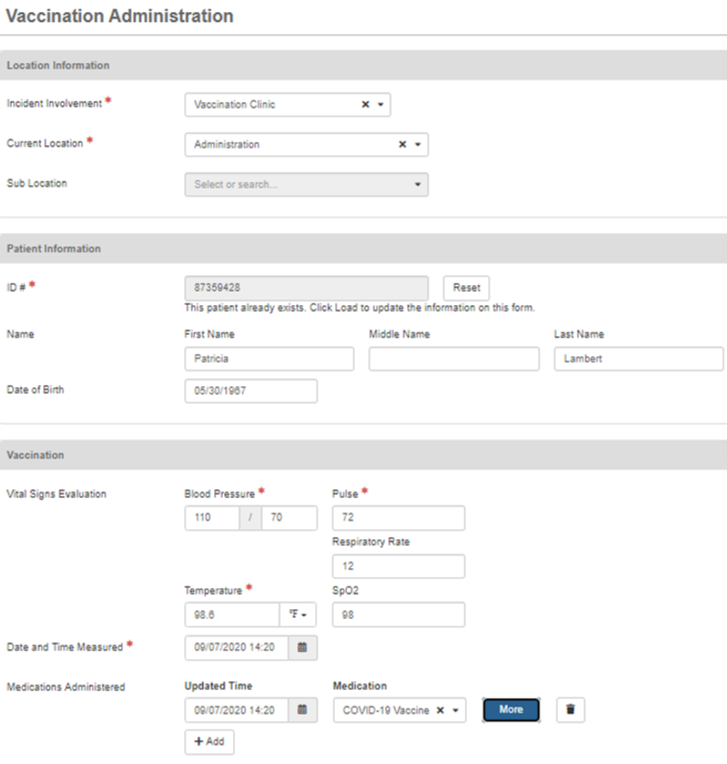
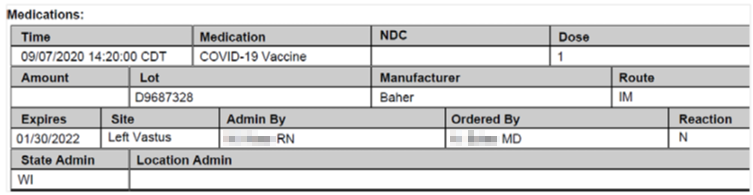
The site, route, lot number and expiration, and time administered fields are updated for each dose administered.
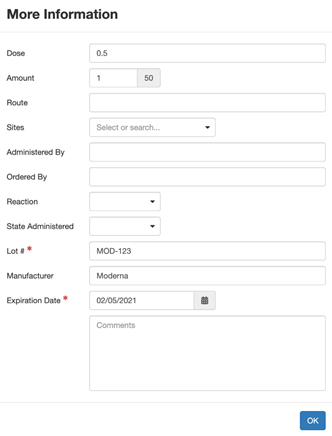
When you enter medication, EMTrack enables you to enter additional information.
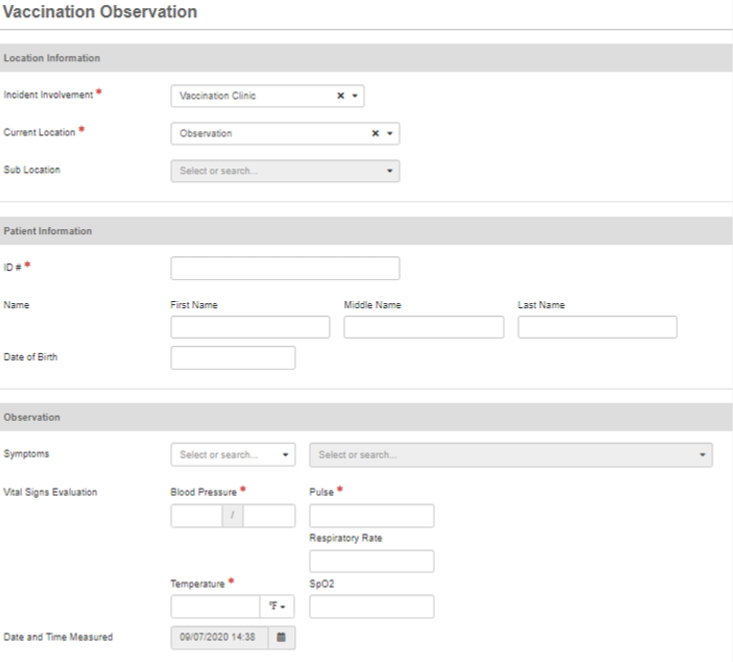
Observation
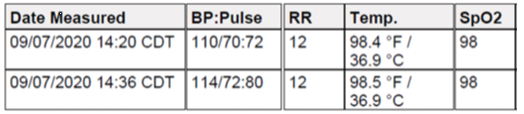
A Vaccination Observation form supports the entry of additional vital signs if required.
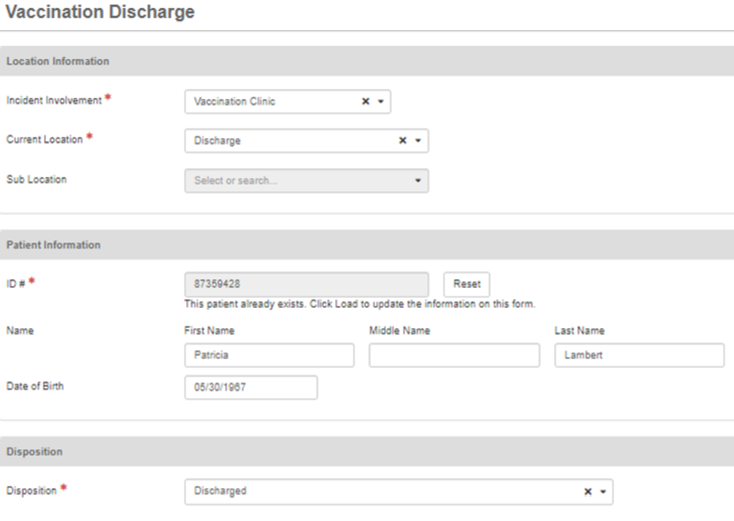
Discharge
A Vaccination Discharge form prompts you to enter a disposition, which ends the tracking instance.
Working with Forms
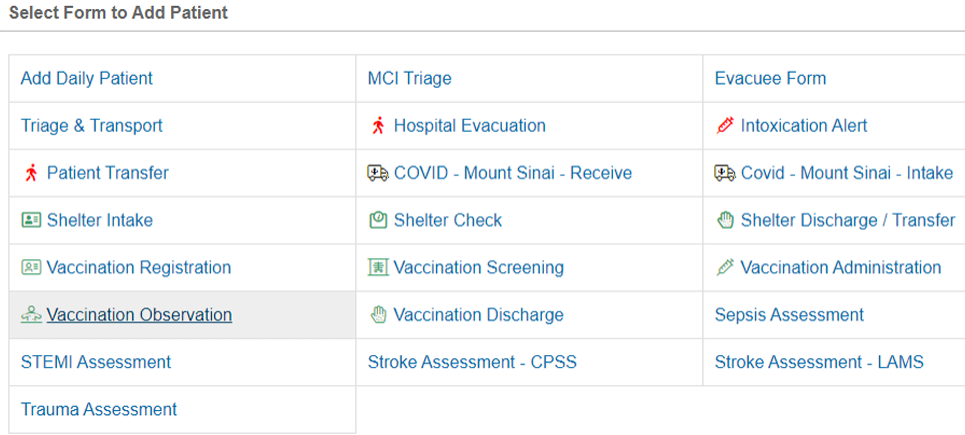
Access data entry forms
Select the Patient tab to access the forms assigned to your user type and select the form that includes the required data set. This list is specific to your region so the names and quantity will differ.
Record identifier
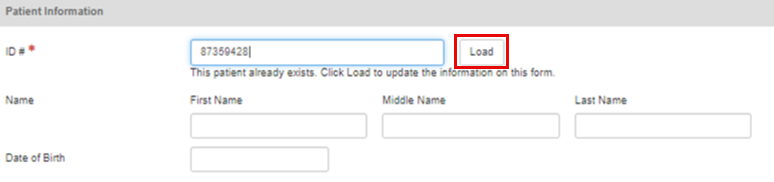
Each vaccination tracking instance requires a unique identifier that is scanned or typed into the ID field. The initial entry is at registration. Once entered, the ID can be used to access the record for updates.
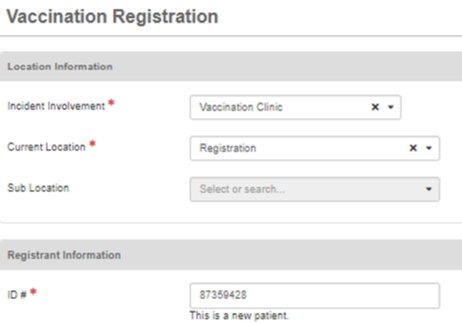
Enter a unique identifier for each new vaccination tracking instance to ensure the data is linked to the correct record. Enter the identifier again for subsequent forms and the system will recognize that the record already exists.
Click Load to update the form:
Revise or copy patient forms
-
Once configured or added to your region, patient forms can be revised by navigating to System Settings then Patient Forms.
-
Select Edit for the specific form to assign form availability based on provider and role.
-
To revise a form field, select Design for the specific form to add, revise, re-order, or remove form fields.
For more information about designing forms, refer to Design and Publish a Form.
-
To copy a form, select Copy for the specific form to create another instance that can be modified and assigned as needed. Provide a name, choose a different icon, if needed, and select Save.
Additional data information
A few important things to keep in mind about the data:
-
When entering details in the Medication Administered field, click More to access the medication details entry page (for example, dosage, route, site, and lot number).
-
Entering a disposition indicates the completion of the vaccination encounter. This is a key step in providing accurate situational awareness.
-
Access to the data, both current and historical, is dependent on a user’s role and provider affiliation.
Historical reporting
All entered information is available to authorized users via historical reporting.
Vital Signs
Screening Questions
Administration Information
Dashboards
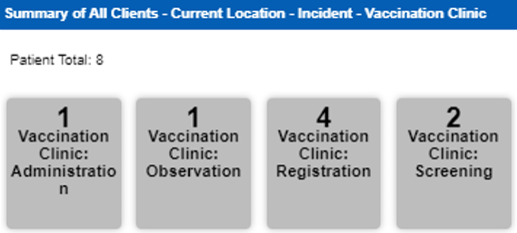
Dashboards Comprised of groupings of data, called gadgets. offer a visual representation of tracking activities, providing situational awareness about the individuals currently at the clinic. For example, your dashboard might include the number of patients waiting in the registration area or those in the observation area.
They are highly configurable to meet the needs of various stakeholders, which can be either provider specific or across a state or region.
It is recommended that you take advantage of the Incident Mode button to filter Search criteria that allow you to pinpoint the clients and details you need. the information on your vaccination tracking activity.
Dashboard components provide at-a-glance situational awareness and access to details as needed. For example, this component provides summaries of each station. Display a station’s list by clicking on the specific counter box.
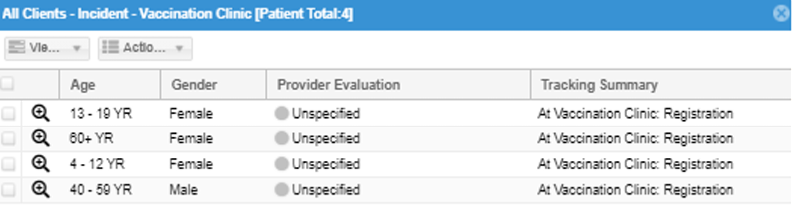
Click the magnifying glass button  to access details.
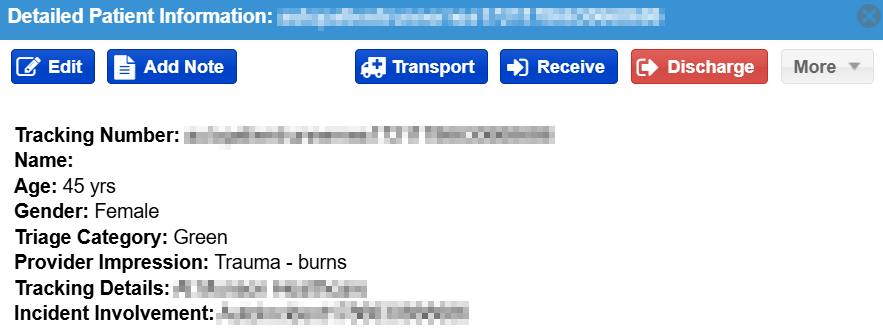
Dashboard gadgets
Dashboard gadgets are the separate components within the dashboard that display specific information in various format options. The following are examples that administrative users can utilize to support gadget configuration for vaccination clinics.
Lists
Lists identify all those being tracked, along with selected general information such as age and current location.
Station Summary
The Station Summary displays the patient count for each station.
Attribute Summary
The Attribute Summary is a bar chart that displays patient counts by an attribute, such as age.
Dashboard configuration
It is recommended that administrative users create a divisional vaccination tracking dashboard, which can be copied and customized to meet specific stakeholder groups’ needs.
-
On the upper left, click Dashboard.
-
On the right, in the Configure menu, click Add Division Dashboard. The dashboard appears with two placeholders.
-
On one placeholder, click add a new gadget. The Gadget Directory window opens.
-
Locate and click one of the client gadgets (for example, Client List or Client Summary). The gadget opens.
-
In the Filter list, click All Clients.
Summary gadgets include additional configuration options, such as:Group By, which determines the display grouping (for example, age or location).
Sort By, which determines the order of the groupings.
Summary Type, which determines the type of graphic representation (for example, pie chart, bar chart, table, or counter box).
-
Repeat steps three through six to populate all placeholders.