ECM: Email Importer Administration Quick Reference Guide
The External Content Manager (ECM): Email Importer plug-in automatically imports emails to WebEOC Nexus boards, creating a record for each message. This helps ensure that incident information communicated through email is available to everyone who needs it and stored with other incident documentation.
The ECM: Email Importer periodically checks for new emails and automatically imports them. The plug-in includes a preconfigured board that is designed to store and display imported emails. You can also map email addresses to boards. A single email address can be mapped to multiple boards and multiple email addresses can be mapped to a single board by creating an import rule. The rule must be applied for every board and email address combination.
The creation of a specific Email Importer user and position is recommended for use with this plug-in. Further, the following email fields are required: Subject, Date Received, and Body.
About Mapping Fields
For the standard board that comes with the ECM: Email Importer plug-in, the following email and attachment fields are automatically selected during mapping. For other boards, you can use these tables as a guide to identify the appropriate mapping.
Email Mapping
|
Email Field |
WebEOC Nexus Board Tag |
|---|---|
|
Sender |
email_sender |
|
Recipient |
email_recipient |
|
CC |
email_carbon_copy |
|
Subject |
email_subject |
|
Date Received |
email_date_received |
|
Body |
email_body |
|
Body is HTML |
email_is_html |
Attachment Mapping
Attachments must be added as children of the email record.
|
Attachment Field |
WebEOC Nexus Board Tag |
|---|---|
|
File Name |
email_attachment_filename |
|
Attachment Reference |
email_attachment_file |
To create an email import rule
-
In the main menu, click the integrations icon
 . The Integrations page opens.
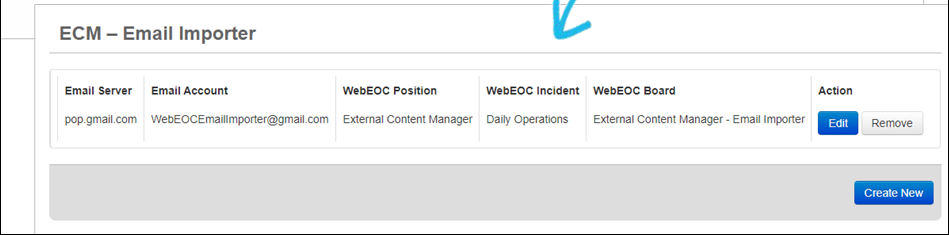
-
Click Create New. The Email Import Settings page opens.
-
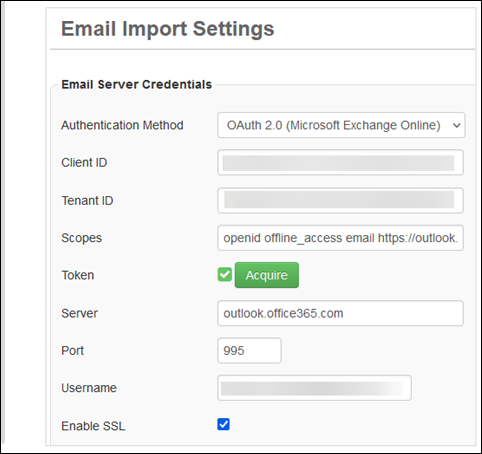
If your email server is using Office 365, update the authentication to OAuth 2.0, if you have not already updated it. To verify if this update has already been done, click Edit, and then verify the Authentication Method. If it does not display OAuth 2.0 (Microsoft Exchange Online), perform the following steps:
-
For Authentication Method, select OAuth 2.0 (Microsoft Exchange Online). The fields below your selection update with associated information.
-
Enter your Client ID and your Tenant ID in a valid GUID format. Contact your SMTP provider for this information.
-
Click Acquire. A token code is generated and the first in a series of Microsoft and Juvare windows appears.
-
Copy the token code (only the code), paste it into the Code field, and then click Next.
-
If additional information is required, respond to the windows that appear.
-
At the “Are you trying to sign in to <ApplicationName>?” prompt, click Continue, and then close the last window in the series. Juvare acquires and authenticates the token.
After the successful completion of the authentication, a confirmation message, highlighted in green, appears above the Authentication Method field.
-
In the Username field, enter the email address that you used to authenticate.
-
Click Save.
-
-
In the Board Mapping area, for Board Name, click the name of the board to which you want to import the emails.
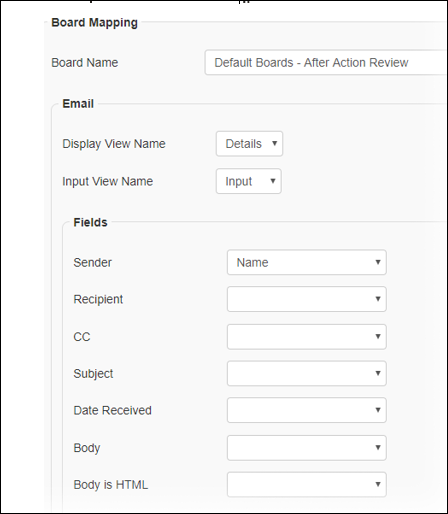
The board must be assigned to the defined user, position, and incident.
-
In the Email area, click the Display View Name and Input View Name.
-
In the subsequent Fields area, map the email fields to the appropriate board fields.
Refer to the standard email import board for additional information on mapping fields.
-
In the Attachment area, click the Display View Name and Input View Name.
-
In the subsequent Fields area, map the attachment fields to the appropriate board fields.
-
In the Processing Options area, enter this information.
Completing the Processing Options arear Field
Description
Include Emails by Keyword in Body or Subject
Enter keywords that, if contained within the email Body or Subject, mean the email will automatically be imported.
Exclude Emails by Keyword in Body or Subject
Enter keywords that, if contained within the email Body or Subject, mean the email will not be imported.
Exclude Attachments by Extension
Enter extensions that identify the attachment extensions you do not want imported with the email.
Server Post-Processing Action
Click Delete Message to clear the message from the server after importing it. Otherwise, click Do Nothing.
Some email servers do not allow messages to be cleared.
Convert Email Body to Text
Select this check box if you want imported emails formatted as plain text. HTML formatted emails will be converted.
Attachment File Size Limit
Specify the maximum file size for email attachments.
Typically, 20 MB is the default. The max size cannot exceed the available size limit for your solution.
-
Click Save.