Edit a Custom View
A custom view A personal view that displays information about specific resources. can be created to display information about specific resources. This view can be accessed through the View menu, or it can be made to open as your default view. You can edit your customized view at any time following the steps below.
For more information about creating a custom view, refer to Create a Custom View.
You may include resources from neighboring regions in your custom view, but only if a Mutual Aid Agreement has been put in place or you have been granted access to multiple regions.
To edit a custom view
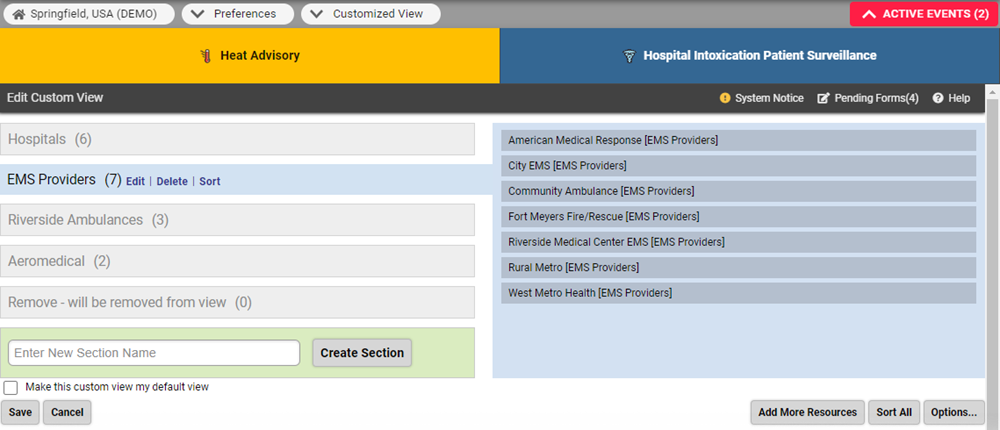
- In the main menu, click Preferences then Customized View. The Edit Custom View page opens.
-
Take one or more of these actions:
Add more resources to the custom view
-
Click Add More Resources. The Find Resources page opens.
-
Enter search criteria in one or more fields and click Search. The search results open.
-
On the left, select the checkbox for the resources you want to include in the view.
-
Click Add to Custom View. The Edit Custom View page re-opens.
Create a new section on the view
On the lower left, enter the section name and click Create Section.
Move a resource to a new section
-
In the left pane, select the section where the resource currently resides.
-
In the right pane, drag the resource to the left pane and drop it on the appropriate section.
Change the order of sections
Do one or both of the following:
-
Drag the section headers up or down in the left pane.
-
Click Sort All.
Change the order of resources within a section
Do one or both of the following:
-
Drag and drop the resource to its new location in the list.
-
Click Sort in the section header.
Edit a section name
-
On the left, click the section name. The section is highlighted.
-
On that row, click Edit. The name appears in a new field entitled New name.
-
Edit the section name and click Submit.
Delete a section
-
On the left, click the section name. The section is highlighted.
-
On that row, click Delete. The section is removed.
Change the standard statuses (columns) in your custom view
-
On the lower right, click Options. The Edit Custom View Options (Columns) page opens.
-
Select or clear the checkboxes for Standard Statuses.
-
If appropriate, in the Options section, select or clear these checkboxes.
-
Click Save.
-
-
If appropriate, select the Make this custom view my default view checkbox.
-
Click Save. Your customized view opens.
In your saved custom view:
-
Click a status column header to view a short description of that status type
Custom fields that track information about resources. This is region-specific and are unique fields.. Column cells that contain an N/A (in gray font) indicate that resource is not currently reporting Provides specific information about statuses and details, notifications, forms, templates, snapshots, and roles/rights in EMResource. that status type. -
Click show map to show the map in your custom view. To return to the table view, click view table. See also Map View.
-
Click print to print the view. To return to editing your view, click the customize button in the upper right corner of the view.
-
Click refresh to show the most up-to-date information in your view. Keep in mind that the system automatically refreshes the information every three minutes and whenever you perform any action in the system.
In the Search page, click a column header to sort the search results by that data element.
When you add a resource to your custom view, the system automatically adds that resource's Resources Type to your view as a section header. You can move the resources within that type to another section, delete the section, rename a section, and so forth.
The Sort All button sorts all resources alphabetically within their section. A section's Sort link sorts the resources in that section alphabetically.
Related Concepts