Bulk Status Upload
If you have access to update statuses, you can use the Bulk Status Upload tool. It allows you to update statuses for multiple resources and status types Custom fields that track information about resources. This is region-specific and are unique fields. at once by uploading the information in an Excel or CSV file.
-
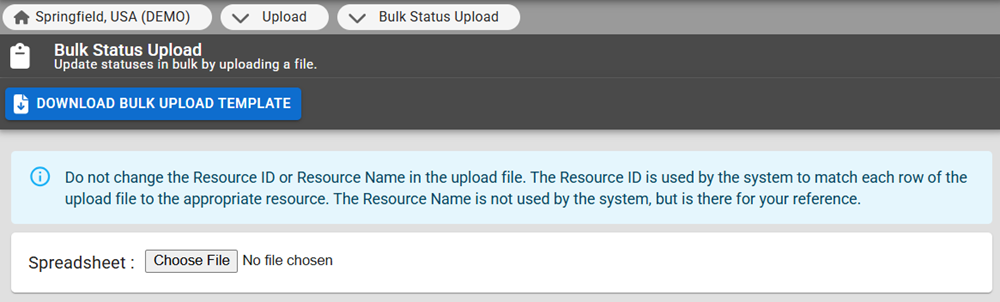
Download the Bulk Upload Template to populate the resources and status types that you have access to update.
-
Any status types that you do not want to update can be left empty and the current value will be retained.
-
You must have access to update statuses for at least one resource and status type.
To get started, follow the steps in the expandable headings below.
Download the template
-
In the main menu, click Upload, then click Bulk Status Upload. The Bulk Status Upload page opens.
-
On the upper left, click the blue button that says Download Bulk Upload Template.
If the template does not download, verify that pop-ups are allowed for this website through your browser.
-
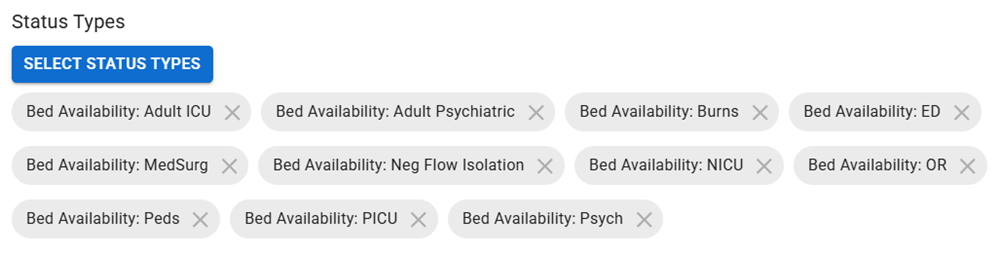
Select the status types you want to appear on the Bulk Upload Template. You can select as many as you have access to edit.
-
Click the Advanced Options checkbox if you want to Use XML Names for Columns, where available. Refer to XML Tags for more information.
-
Click Execute to create the Bulk Upload Template with the selected status types. This opens the Jobs List page.
-
Download the XLSX file and open it.
-
Continue with the steps in Edit the template for more information about how to update the template.
Edit the template
Data in the first 3 columns of the template should not be modified. The Resource Name and Resource Type columns are populated for your reference. The Resource ID column is required to match the status types to the appropriate resource.
Available status types are displayed as column headers. If you have access to update multiple resources, each resource will be on its own row. Status types that are shared between resources will occupy the same column. Status types that are not available to edit for certain resources will be grayed out, indicating you cannot update them.

Status types that you do not want to update can be left empty and the current value will be retained. Similarly, you can remove the column for any status types that you do not want to update. If a status type is a multiple choice, when you click in the cell, the template will automatically populate a dropdown menu with the correct values.
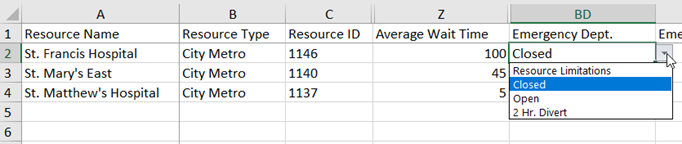
If a status type includes status reasons, those reasons appear as additional columns to the right of the status type, and the column header indicates both the status type and reason. If the reason is applicable, it is indicated on the spreadsheet by selecting the X in the dropdown menu.
Example If an emergency department updates their status to closed, a status reason is required. In the spreadsheet, the available status reasons are listed in the subsequent columns. In the image below, you can select an X in the dropdown menu for both Emergency Dept: ED at capacity and Emergency Dept: Surgeon not available reasons.
Comments can be added to any cell in the spreadsheet to update the comment for the corresponding resource and status type in EMResource.
Comments can only be added to Excel files, as CSV files do not support commenting.
XML Tags
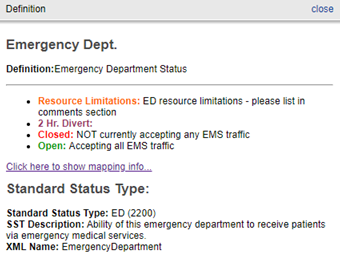
You can also bulk upload data for status types that contain XML tags. These tags, known as the XML Name, can be found on the status type definition. Click to show mapping information and the Standard status type details appear.
One of the details is the XML Name. On your internal system generated reports, you can use the XML name as a header, instead of a status type.
This allows you to repurpose HHS and NHSN reports. For example, in the case of the HHS and NHSN reports, you can bulk upload this data by adding the Resource ID as a column and then populating the corresponding rows in that column in the file.
If you selected the Use XML Names for Columns, where available advanced option when you downloaded the Bulk Upload Template, this prevents upload errors if a status type name was changed. This is because the status type names can be changed, but XML Names are immutable.
To upload the spreadsheet
-
In the main menu, click Upload, then click Bulk Status Upload. The Bulk Status Upload page opens.
-
Click Choose File.
-
Through the browser window, locate and click the name of the file you want to upload.
-
Click Open.
-
When the spreadsheet is attached, a green checkmark appears next to the file name.
-
To begin the upload, click Submit Values. When the file is uploaded, the resources and status updates appear below. The information is available on this page until you navigate away. After that, you can find the information for the last 90 days through the Jobs tab.
In the event that one of your status updates fails, an error message appears and none of the updates for that resource are submitted.
While the spreadsheet is processing, you can continue to navigate around the application. To view the file status when you are ready and for the next 90 days, point to Jobs and, in the menu, click Jobs List.
Related Concepts