Notifications Administration Quick Reference Guide
The Notifications plug-in allows WebEOC Nexus users to subscribe to status boards and receive messages in the form of emails and desktop notifications when new records or updates are posted to those boards. WebEOC Nexus administrators can enable the Notifications feature on any status board.
 To manage notification settings
-
In the main menu, click the integrations icon
 . The Integrations page opens.
 -
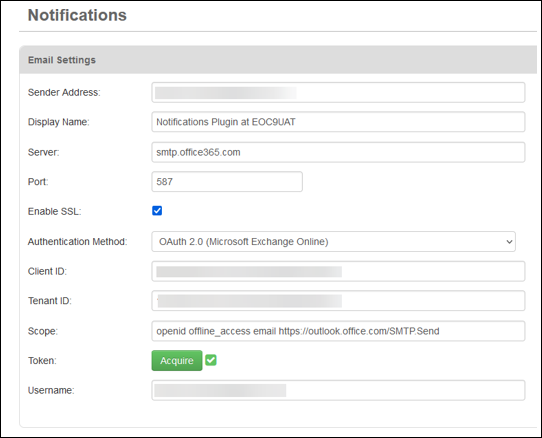
Click the Notifications tab. The Notifications page opens.
-
If your email server is using Office 365, update the authentication to OAuth 2.0, if you have not already updated it.
To verify if this update has already been done, click Edit, then verify the Authentication Method. If it does not display OAuth 2.0 (Microsoft Exchange Online), perform the following steps:
-
In the Server field, delete the server information.
-
Select the Use SSL checkbox.
-
For Authentication Method, select OAuth 2.0 (Microsoft Exchange Online). The fields update with associated information.
-
Enter your Client ID and your Tenant ID in a valid GUID format. Contact your SMTP provider for this information.
-
Click Acquire. A token code is generated and the first in a series of Microsoft and Juvare windows appears.
-
In the next Microsoft account window, select the account that you want to authenticate.
-
At the “Are you trying to sign in to <ApplicationName>?” prompt, click Continue, then close the last window in the series.
Juvare acquires and authenticates the token. After the successful completion of the authentication, a confirmation message, highlighted in green, appears above the Authentication Method field.
-
In the Username field, enter the email address that you used to authenticate.
-
Click Save. Authentication is complete.
-
-
If you are not already there, return to the Admin window. Navigate to the Plugins: Notifications: Email Settings section and, in the Sender Address field, enter the email address that appears on the notifications.
-
In the Display Name field, enter the name to appear in the From field for messages sent using this tool.
-
In the System Settings section, in the WebEOC API URL field, enter the appropriate URL address.
The URL must be configured for the plug-in to operate correctly.
-
Click Save.
To manage the default notifications icon
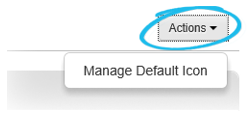
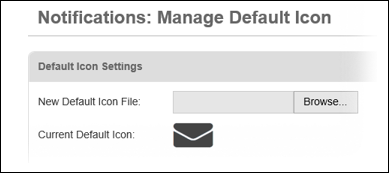
An icon is shown on Notifications-enabled boards, allowing users to quickly identify boards configured for notifications. Initially, an envelope icon is automatically set as the default icon. You can change this icon through the Actions menu on the Notifications page.
To set a new default notifications icon
-
In the main menu, click the integrations icon
. The Integrations page opens. -
Click the Notifications tab. The Notifications page opens.
-
In the upper right corner, click Actions and select Manage Default Icon.
-
On the Notifications: Manage Default Icon page, click Browse.
-
Locate the appropriate image and click Open.
-
Click Save.
You can change the default icon at any time. If you want to revert back to the system’s default icon:
-
Navigate to the Notifications: Manage Default Icon page and click Actions in the upper right corner.
-
Select Use System Default Icon from the menu.
-
In the pop-up window, click Yes.
The envelope icon is once again shown as the current default icon on both the Notifications: Manage Default Icon page and in the Icon section of the Notifications page.
To add notifications to a board
To enable the Notifications plug-in, you must add it to a board’s Input and Display views.
-
In the main menu, click the workflows icon
 . The Workflows page opens.
 -
On the Boards tab, locate the appropriate board and click its name.
-
Select the Notifications check box in the Include section, then click Save.
-
Locate the same board and click its name again.
-
In the Tools section, click Board Editor. The Board Editor page opens.
-
Click the input view of the board you want to add Notifications to.
-
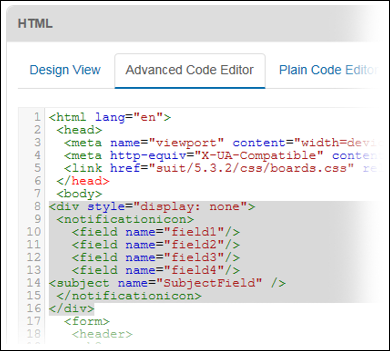
In the HTML section, click either the Advanced Code Editor or Plain Code Editor tab.
-
Locate the
<body>tag, and paste the following code directly below it:Copy Code
                    <div style="display: none">
                        <notificationicon>
                            <field name="field1" />
                            <field name="field2" />
                            <field name="field3" />
                            <field name="field4" />
                        <subject name="SubjectField" />
                        <body name="BodyField" />
                        </notificationicon>
                    </div>
Make sure to replace field names in the code with the actual board fields you want included in the email. The order of the fields in the code determines the order in which they appear in the email. If necessary, add or remove fields in the <notificationicon> tag. Field and body tags are mutually exclusive; if a body tag is present, field tags are ignored.
-
Click Save.
Customize the subject and body for notification emails and desktop pop-ups
When adding notifications to a board’s Input view, the following tags can be useful in customizing the subject and body of notification emails and displayed desktop notification pop-up messages.
| Subject |
|
When not defined, emails and desktop pop-ups are sent with the board’s name as the subject.
|
| Body |
|
When not defined, emails are sent with the field name and value pairs listed in the body.
|
Record field values are taken from the record, triggering a notification. Field names surrounded by double curly brackets are replaced with actual field values. Empty strings are used when actual field values do not exist in the Input View.
For example, such a notification may read “Downtown Public Shelter is now Open.”
Add notifications to a board’s Display view
Adding the <notificationicon/> tag to a board’s Display view places an icon on the board. WebEOC Nexus users can use the icon to access and modify their notification subscriptions settings.
To add notifications to a board’s Display view
-
In the main menu, click the workflows icon
. The Workflows page opens. -
On the Boards tab, locate the appropriate board and click its name.
-
In the Tools section, click Board Editor. The Board Editor page opens.
-
Click the Display view of the board you want to add Notifications to.
-
In the HTML section, click the preferred Editor tab and paste the
<notificationicon/>tag in the desired location.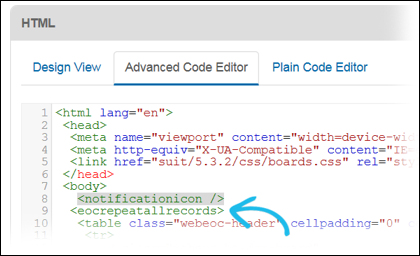
Do not paste inside the
<eocrepeatallrecords>tag; doing so results in one icon being shown per displayed record. -
Click Save.
Users can only subscribe to a board that has the Notifications plug-in enabled using the processes described above.
Be sure to let users know which boards support Notifications when you finish adding the plug-in to a board’s Input and Display view.
You can enable Notifications for multiple Input and Display views of a board. Additionally, subscriptions are table-based. Therefore, settings are shared between all views that use the same table.
The board permission tag can be used to limit Notifications access to only certain system users with access to a given display view. To enable this, add <boardpermission name="Notifications"> <notificationicon/></boardpermission> to the display view and ensure the permission is assigned when making the group assignment.
Set icon size
For the Display view, you have the option to set an icon’s size. Adding width and height attributes to the <notificationicon> tag overrides the icon’s original dimensions (54px by 32px).
For example, <notificationicon width="70px" height="50px"/>.
Any size, in pixels or percent, can be specified. However, it is recommended you use icons of the correct size to avoid large scale changes or icon distortion. If width and height attributes are not defined, the size of the original icon is used.
Insert notifications into the Actions drop-down menu
You can easily inject Notifications into the Actions drop-down menu, a feature standard for all WebEOC version 8.0 boards. If a board has an Actions drop-down menu, the process for adding Notifications to the menu is the same for each instance.
To insert notifications into the Actions drop-down menu
-
In the main menu, click the workflows icon
. The Workflows page opens. -
On the Boards tab, locate the appropriate board and click its name.
-
In the Tools section, click Board Editor. The Board Editor page opens.
-
Click the display view containing the Actions button you want to add notifications to.
-
In the HTML section, click either the Advanced Code Editor or Plain Code Editor tab.
-
Insert the <notificationicon action=""> tag just before the
<ul>tag.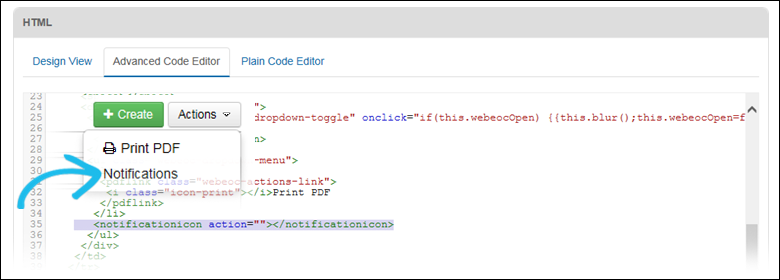
-
Click Save. In this instance, Notifications appears as the last item in the drop-down list.
Related Concepts