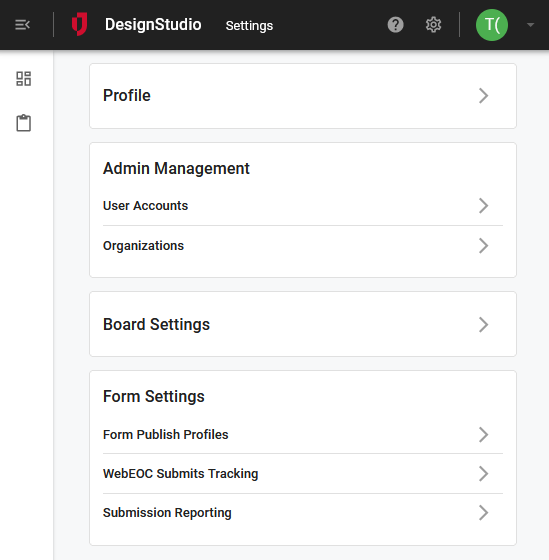
Form publish profiles are the connections you establish to WebEOC that direct form submissions to your boards. Parallel in nature to board connections, form publish profiles are displayed in a list of linked WebEOC environments with the option to create new ones. For example, you might have links to one or more of the following environments: development, quality assurance (QA), training, production, and/or Fusion because, just like with boards, you want to test your form before linking it to your production environment.
Prerequisite: To perform this procedure, you must be a WebEOC Administrator with Service Account type permissions. Configure this account in WebEOC.
To add a form publish profile
-
On any page, click the Organizations Settings icon
 .
. -
Under Form Settings, click Form Publish Profiles.

-
In the Form Publish Profiles window, click +, and then enter the following information.
Form Publish Profiles fields Field Description Procedure Name The name of the WebEOC instance. Between 2 - 50 alphanumeric characters, excluding special characters. URL The URL of the WebEOC instance. A valid https format that ends in /api/rest.svc/.
For example, if the URL is https://www.yourdomain.com/eoc7, add /api/rest.svc/ to the end. The URL would be: https://www.yourdomain.com/eoc7/api/rest.svc/
Username A WebEOC Administrator's Service Account username. The WebEOC Administrator's credentials must be set up as a Service Account type in WebEOC. Password The password for the WebEOC Administrator's Service Account username. Varies. Position The WebEOC position that is associated with the board. Important Guidelines
-
The position must exist in WebEOC.
-
The WebEOC Administrator's Service Account must have permissions to use this position.
-
The name must exactly match how it appears in WebEOC (for example, case-sensitive, spaces, and so on).
Timestamp Format The timestamp format used to display the date and time of actions. A valid timestamp format (for example, mm/dd/yyyy hh.mm.ss).
Perform one of the following actions.
-
Click the field to display a list of suggested valid timestamp formats from which you can select.
-
Enter the timestamp directly in the field.
We recommend using the MM/DD/YYYY HH:MM:SS format in Coordinated Universal Time (UTC).
Time Zone The time zone you want to reference through your instance. A valid time zone format (for example, UTC-5, America/Denver, and so on).
Perform one of the following actions.
-
Click the field to display a list of suggested valid time zone formats from which you can select.
-
Enter the time zone directly in the field.
-
-
After you complete your selections, click Test Connection to verify the connection.
-
If the connection is successful, a green checkmark appears on the button.
-
If the connection fails, a yellow circle appears on the button. A description of the error displays above the button.
-
-
Click Save.
If the connection is unsuccessful, the Save button changes to a Save Anyway button. To save the profile with errors, click Save Anyway. Otherwise, correct the information and test the connection, again.
You return to the main Form Publish Profile window. The following icons indicate the status of the profile connections:
-
A green checkmark indicates that the connection is valid.
-
A yellow triangle indicates that the connection is not valid.
If you move the pointer over the triangle symbol, a description of the error is displayed.
-
The next step is to:
-
Method 1: If you are creating a form based on a published board, create and publish the board. See Create a Board Workflow, and then continue to step 3: Add a WebEOC Instance to a Form.
-
Method 2: If you are creating a form without a published board, add a WebEOC connection to direct your form submissions. See Add a WebEOC Instance to a Form.