Customize the Detail View
When a user clicks a resource's name in a View menu page, the resource's Detail View page opens. This view shows all details associated with the selected resource or sub-resource Secondary resources that are considered attributes of resources. These are often objects, services, or functions that belong to resources.. Authorized administrators can customize this view as needed. This configuration is applied to all resource detail views Shows all details associated with the selected resource or sub-resource. in the region.
Customizing this view is an opportunity to specify an appropriate order to your resources and statuses.
The layout and statuses you specify here affect many areas of the application. This includes the Update Status and Status Change Preferences pages, among others. In addition, the order you specify dictates the order in which details appear in the Event Status page.
Customization features also include sub-resources.
Users access sub-resources from the parent resource's details page and from the sub-resources list. Sub-resources and their status types Custom fields that track information about resources. This is region-specific and are unique fields. do not appear in the resource's details until you add them to that view. For that reason, detail customization features encompass sub-resource configuration.
When you add a new resource type Categories used to divide and distinguish resources. for sub-resources, the new type appears in the left pane of this page. These are the headers for each table section in the Sub-resources section of the detail page. Any status types associated with the selected sub-resource type Categories used to divide and distinguish sub-resources. Sub-resource types belong to resource types. appear in the right pane.
To customize the detail view
-
In the main menu, click Setup and then click Views. The Region Views List opens.
-
Click Customize Resource Detail View. The Edit Resource Detail View Sections page opens.
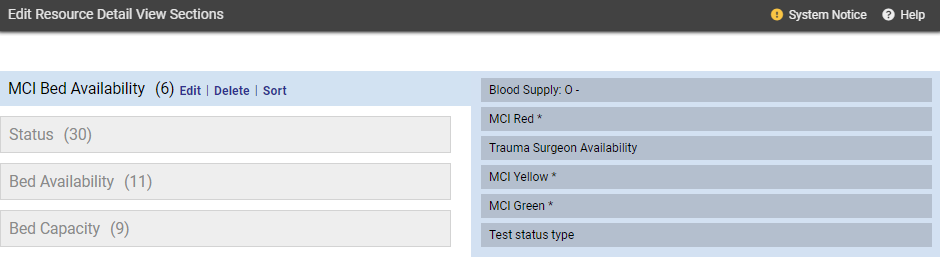
The section pane on the left shows the order in which sections appear in the resource's detail page and includes the number of details currently appearing in the section in parentheses.
-
Take one of the actions listed:
View sections and their detail
Click a section in the left pane to view the section's current statuses in the right pane. An asterisk (*) next to a status type indicates this is used only for events.
 Edit a section name
-
Click the section in the left pane.
-
Click the Edit link to the right of the name. The field is enabled.
-
Make your changes.
-
Click Submit.
Delete a section
There is no confirmation or undo for this action.
-
Click the section in the left pane.
-
Click the Delete link. The system removes the section. In addition, the system moves all status types that were in the deleted section to the No Section Assigned area.
Sort details in a section
-
Click the section in the left pane.
-
To sort, do one or both of the following:
-
Click the Sort link to the right of the section name.
-
In the right pane, click a detail and drag it to the appropriate spot in the list.
-
Add or move a detail to a section
-
Click the name of the section that contains the status type, or click No Section Assigned.
No Section Assigned and its details do not appear in the resource's detail view visible to the user. This grouping contains the status types that are not currently included in any section of the detail view. You can move these to existing or new sections or leave them as is. In addition, if you delete a section that contains statuses, the system automatically moves them into No Section Assigned.
-
In the right pane, click the status type and then drag and drop it on the name of the section to which you want to add/move it.
-
Click the section name to see the newly added detail.
The sections and details that appear in an individual resource's detail page depends on the status types specified for that resource. If a resource does not report a status type listed (in the right pane), this section does not appear to the user in the resource's detail view.
In addition, if a section includes only event-related statuses, that section will not appear in the detail view.Create a section
-
Scroll to the bottom of the Edit page.
-
Enter the name of the new section.
-
Click Create Section. The new section appears at the bottom of the sections (and above No Section Assigned).
-
Use the steps in the add or move procedure above to add details to this section.
Sort all sections
To sort the details for all sections in alphabetical order, scroll to the bottom of the page and click Sort All.
Work with sub-resources
-
Click Sub-resources. The Edit Sub Resource Details View Sections page opens.
-
Click a resource type's name (in the left pane) to view associated status types (in the right pane).
-
To include a sub-resource type, select its checkbox in the left pane.
-
In the right pane, select the checkbox for each status type you want to include, or clear the checkbox to exclude it.
-
To re-order the status types list (right pane), click and drag a status type to the appropriate spot in the list.
-
To re-order the sub-resource types (left pane), click and drag a type to the appropriate spot in the list.
-
To sort all sub-resources and status types in alphabetical order, click Sort All.
-
Click Save.
-