

The Pie Chart component allows you to drag and drop a pie chart on the canvas. The pie chart displays data from any field that is added to the Dashboard view. This component is available when you create or select a Dashboard view.
Dashboard views are available in DesignStudio Pro. Contact your Client Success Manager (CSM) for additional information.
The Pie Chart component is found in the Data Visualization section of the Components tray.
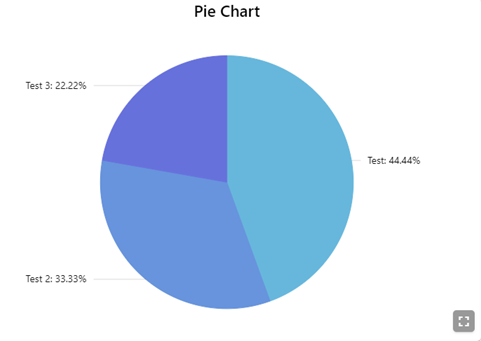
See Add Dashboard View Components for details about adding components to a Dashboard view.
Settings
If you use the Classic Styling, these settings are set in a dialog that opens after you drop the component on the canvas. If you are using the Nexus Component Styling, these settings are set on the Properties tab after you drop the component on the canvas.
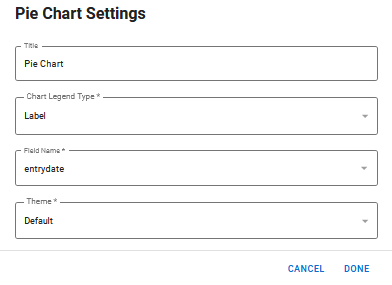
The following settings are available.
| Field | Description | Procedure |
|---|---|---|
|
Title |
The title that appears above the pie chart, on the top left. |
Enter between 2 - 50 alphanumeric characters, excluding special characters. |
|
Chart Legend Type |
The legend configuration. See Legends and Labels.
|
Select one of the chart formats. |
|
Field Name |
The WebEOC field that is used to render the chart data. Currently, only single fields, not expressions, are supported. |
Select one of the fields. |
|
Theme |
The color theme to use in the pie chart. |
Select one of the following options.
|
Actions Toolbar
The following actions are available when you select any component on the canvas in the Board Workspace when working with Classic Styling.
| Icon | Name | Description | Procedure |
|---|---|---|---|

|
Settings |
Opens the Settings dialog. You can modify the component’s settings, such as label, database field name, help text, style, and conditional settings. |
|

|
Move |
|
This icon is not used. To move the component, click and drag it to its new location. |

|
Clone |
Copies the current component and its settings, then pastes it after the current component. |
|

|
Delete |
Deletes the selected component. |
|
Actions Toolbar
The following actions are available when you select any component on the canvas in the Board Workspace when working with Nexus Component Styling.
| Icon | Name | Description | Procedure |
|---|---|---|---|
|
|
Settings |
Opens the Properties tab next to the Components Tray. You can modify the component’s settings, such as label, database field name, help text, style, and conditional settings. |
|
|
|
Move |
|
This icon is not used. To move the component, click and drag it to its new location. |
|
|
Clone |
Copies the current component and its settings, then pastes it after the current component. |
|
|
|
Delete |
Deletes the selected component. |
|