Patients
The Patient tab allows you to add patients, clients, and evacuees as records in your EMTrack solution. Depending on your region, as well as your particular role and rights, you should have access to default and/or custom forms that allow you to add and edit patients.
 Run Clock
The run clock appears as a bar near the top of the Patients tab, on the Web, and all screens on the Mobile app.
Run clock options include:
-
Start Run
-
Cancel Run
-
End Run

The clock controls Daily Tracking and indicates the duration of a patient run. When you click Start Run, the list of forms available for adding patients is limited to daily tracking forms. After you enter and save a patient record on one of these forms, the tracking number for that patient persists across all forms you access until the run is ended. Clicking End Run opens a window that also allows you to mark the patient delivered, indicating the run has been completed in full.
Daily Tracking
Daily Tracking allows you to control how tracking numbers are generated when adding patients. In general, it is assumed you do not need to generate tracking numbers when there are a large number of patients, such as during mass casualty incidents, flu clinics, or large-scale events, because you use triage tags or bracelets. However, on routine, individual runs, daily tracking options determine which forms automatically generate tracking numbers.
To use daily tracking, it must be enabled through Regional Settings. Then, when you create Web - Add and Mobile - Add forms, you decide whether to make the form a Daily Tracking form. If designated as such, you configure daily tracking options during form design. Daily tracking options apply on the form you open to first enter a patient and do not apply when opening additional forms within a run. During a run, once a patient has been entered and a tracking number generated, the patient's tracking current patient persists across all forms.
Three daily tracking options can be configured through the Tracking Number element on a form:
-
Always: Tracking numbers are generated automatically when these forms are opened. Unless you started a run and already entered a patient, opening one of these forms always generates a tracking number. This means the ID # field will contain a number and it cannot be edited.
-
Only for daily tracking: Tracking numbers are generated automatically only when these forms are opened after starting the run clock. From the Patients tab, if you open these forms directly, the ID # field is blank and you are required to enter a tracking number. However, if you start the run clock and then select one of these forms, the ID # field contains a number and it cannot be edited.
-
Never: Tracking numbers are not generated when you open these forms. Unless you started a run and already entered a patient, opening one of these forms never generates a tracking number. This means the ID # field will be blank and you are required to enter a number.
Daily tracking forms, along with other forms, are available when you land on the Patient tab. However, when you start the run clock, only daily tracking forms appear on the page. During a run, after you enter and save information about a patient, the ID # field defaults to and is locked on that patient's tracking number. This allows you to add and update information about that patient throughout the run.
Patient Records
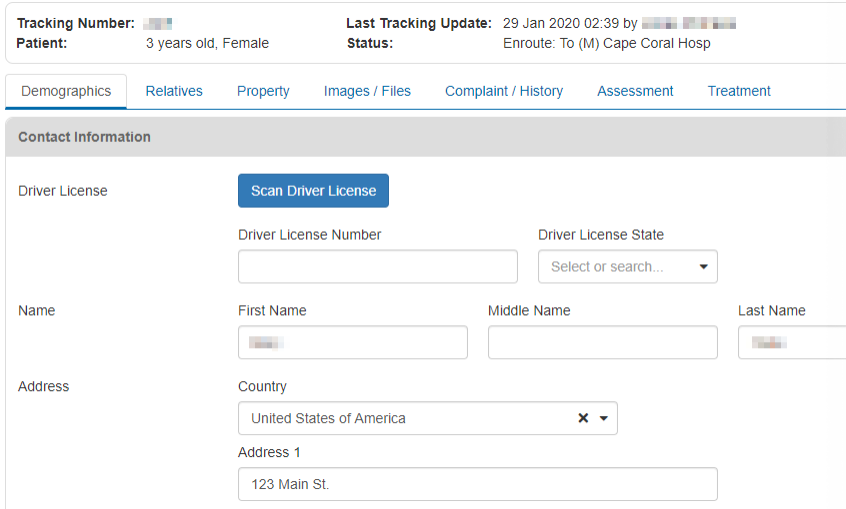
Landing on the Patient tab, you are presented with a list of available forms. Depending on your region, as well as your role and rights, you may have access to default and/or custom forms. Select a form to open it.
The list of available forms moves to the left, which allows you to navigate between forms as needed. The layout and order of questions on this form varies depending on the form you selected. The name of the form appears at the top and the fields in which you enter information appear below and possibly on other tabs.
Tables
When you see a section that contains a table, for example with the Files, Properties, and Relatives components, you can likely add, edit, and delete entries in the table. These sections allow you to manage multiple entries, but otherwise, they function the same as other fields in that they must be added to forms. For more information, go to the article Configurable Form Fields.
MCI Triage and Daily Patient
If the patient is at your facility or in your unit due to being part of a disaster (such as a mass casualty incident), you are likely to use the MCI Triage tab to collect the individual's data. This tab calls for evaluating the patient's health situation. You can also indicate the patient's involvement in a specific incident and record transportation information.
You may also have access to the Add Daily Patient tab.
Evacuee
Use the Add Evacuee tab to record data about a client who presents at your location for care or your vehicle for transportation to safety. This individual may not be injured in any way. However, you can still use EMTrack to track this client's location and status. As appropriate, you can note the incident, transportation information, and any associated special needs.
Vaccination
Your organization may be using the Vaccination tab, which is specifically designed to support vaccination clinics and the rapid response of dispensing medications in a pandemic situation. This tool can also be used in other higher-volume and rapid response situations, such as seasonal flu clinics. For more information, refer to Add a Patient.
Record Removal
There are two ways to remove client records from tracking and your dashboard: archiving and deleting. If you are authorized to perform these tasks, the Search button in the Filters and Locate tabs contains the options you can select. In addition, if you are authorized to work with incidents, the archive icon appears next to an ended incident in the Incidents tab.
Authorized administrators can do the following:
-
Archive client records - removes the record from incidents and dashboards, and clears the tracking ID so that it can be used again. Client data is retained for reporting purposes. For more information, refer to Archive Patient Records.
-
Delete client records - removes clients from views and reports. You can find these patients only when you use the Filters or Locate tab to search specifically for deleted patients. For more information, refer to Delete Patient Records.
-
Reinstate an archived or deleted record - restores an archived or deleted record, which returns the record to active status. For more information, refer to Restore a Record.
You can also learn how these removed records relate to views and reports. The following is a summary of how active, archived, and deleted client records and their associated tracking IDs are treated in EMTrack views and reports:
|
Feature |
Active |
Archived |
Deleted |
|---|---|---|---|
|
ID may be used by other active patients/clients |
No |
Yes |
Yes |
|
Included in Reports |
Yes |
Yes |
Some* |
|
Included in active views: Dashboards, Incident details |
Yes |
No |
No |
|
Included in Quick Searchfeature |
Yes |
No |
No |
|
Available via advanced searches (Filters or Locate tab) |
Yes |
Yes |
Yes |
|
*Since records are usually deleted only when they were created by mistake, they are not included in most reports. You can include these records in your manifest report by selecting that option in the report parameters page. You can also run patient reports that include these records. |
|||
Related Concepts
Related Tasks