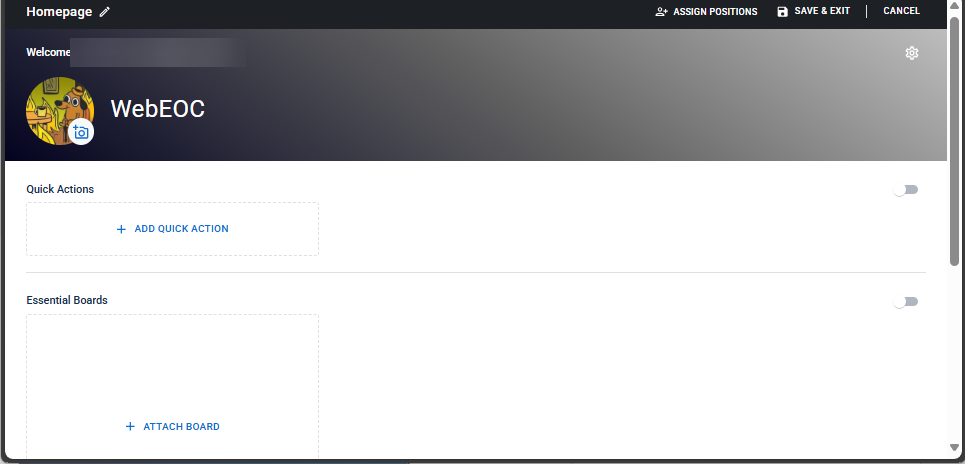
Create a Homepage
When you create a homepage, you configure what a user sees when they log on to WebEOC Nexus based on position. For more information about homepages, see Homepages and Navigating the WebEOC Nexus User View.
To create a homepage
-
-
In the main menu, click the homepage builder icon
 . The Homepage Builder page opens.
 -
On the Homepages landing page, click + Create Homepage. A template homepage displays.
-
To customize the page, do any of the following actions.
 Rename the homepage
-
On the top left, click the pencil.
-
In the Rename Homepage window, modify the name.
-
Click Rename.
Modify the welcome message and tagline
-
On the header, click the gear.
-
In the Header Settings window, modify any of the following:
-
Title: The text that appears beside the logo. The default title is WebEOC Nexus.
-
Enter up to 500 characters.
-
-
Tagline: The text that appears under the title.
-
Enter up to 500 characters.
-
Turn on/off the toggle to show/hide the tagline.
-
-
Background Color: The color that appears in the header.
-
-
Click Apply.
Upload a logo
When you add a logo to the default homepage, it becomes the default logo. Homepages that do not have custom logos inherit the default logo.
-
On the homepage banner, next to the logo, click the camera icon
 .
. -
From the Upload Image window, click Upload. A file explorer dialog displays.
-
Navigate to the PNG or JPEG file you want to upload, and then click Open (or the equivalent depending on your browser). A preview of the image is displayed in the Upload Image window.
To upload a different image, click Upload; to remove the image, click Clear.
-
(Optional) To edit the image, do the following:
-
Click Edit.
-
(Optional) To zoom in or out on the image, move the Scale slider right or left.
-
(Optional) To reposition the crop selection area over the picture, use the cropping tool:
-
To resize the crop selection area, move the sizing handles in or out.
-
To move the crop selection area, click inside the circle and drag it where you want.
-
-
Click Save.
-
-
Click Apply.
Add/Remove quick actions from the Quick Action widget
You can add up to 24 quick actions to the Quick Action widget.
To add a quick action
-
Below the banner, click + Add Quick Action to open the Quick Actions wizard.
-
In the Add Quick Action window, select one of the following types of Quick Actions.
- Open a Board: A board opens in an Input view.
-
Open Pinned Notification Templates: alerts opens. The side panel displays templates that you have pinned.
-
Open an External URL: The external website opens in a new tab in your browser.
-
Open a Map: A map opens.
-
Click Next.
-
Enter and select the following information.
-
If you selected Open a Board:
-
For Board, select a board to display. The list contains all the boards (including subscription boards) that are available for the WebEOC Nexus instance. To quickly find a board, start typing the name in the Board field.
-
For Board View, select from the list of display views and assignable input views.
-
For View Filters, optionally select a specific filter if the board view has filters defined.
-
For Permission Tags, optionally select permissions that will apply to users in that position when they interact with records for the board (for example, edit or delete).
The permissions that you set in this list override any permissions previously set in WebEOC Nexus.
-
For Device Type, select the Desktop, Mobile, or Desktop and Mobile to set which device this board will be used on.
-
For Label, enter the name that appears at the top of the board.
-
Select an icon to appear on the board’s thumbnail.
-
Select a color to appear on the board’s thumbnail.
-
Review the Preview, then click Apply.
-
-
If you selected Open Pinned Notification Templates:
-
for Label, modify the name for the shortcut or accept the default.
-
Click Apply.
-
-
If you selected Open an External URL:
-
In the URL Link field, enter the URL of the external website.
-
For Label, enter a name for the link.
-
For Color, select the color of the icon that appears to the left of the Label. The Preview area displays how the action will appear for the user.
-
-
If you selected Open a Map:
-
For Select Map, select a map from the list.
-
For Annotation Permissions, select the level of interaction that the position has with the map annotations.
-
for Permission Tags, select which permissions the position has in the map.
-
For Label, modify the field to provide a new name, or accept the default name that is auto-populated from your Select Map choice.
-
For Color, select the color of the icon that appears to the left of the Label. The Preview area displays how the action will appear for the user.
-
-
-
Click Apply.
-
To the right of the Quick Actions area, turn on/off the toggle to show/hide the Quick Actions widget.
To remove a quick action
-
On the quick action that you want to remove, click the
 icon. A confirmation dialog appears.
 -
Click Remove.
Rearrange quick actions on the homepage
-
On a Quick Action that you want to move, click and hold the
 icon.
icon. -
Move the Quick Action into a new position.
-
Repeat steps 1 and 2 until the Quick Actions are arranged as you want them.
Show/Hide the Essential Boards widget
To the right of Essential Boards, turn on/off the toggle to show/hide the Essential Boards widget.
The Essential Boards widget displays on a user's homepage below the Quick Actions. This widget provides users with easy access to their boards.
Users can always access the boards for which they have permission using the Boards option in the main menu.
Attach/Remove boards from the Essential Boards widget
The Essential Boards widget can hold up to 24 boards.
-
If the position did not have permission to access a board, view any data (based on filters), or perform any actions on the board prior to attaching the board, it receives the permissions that you select when you attach the board (in the Essential Boards section and on the Board's landing page.
-
When you remove a board from the Essential Boards widget on the homepage, the permissions associated with it are also removed for that position. The board is also removed from the Boards landing page for that position.
To add a board to the widget
-
In the Essential Boards area, click Attach Board.
-
In the Attach Board Settings window, select the following information from the drop-down lists:
-
For Board, select a board to display. The list contains all the boards (including subscription boards) that are available for the WebEOC Nexus instance. To quickly find a board, start typing the name in the Board field.
-
For Board View, select from the list of display views and assignable input views.
-
For View Filters, optionally select a specific filter if the board view has filters defined.
-
For Permission Tags, optionally select permissions that will apply to users in that position when they interact with records for the board (for example, edit or delete).
The permissions that you set in this list override any permissions previously set in WebEOC Nexus.
-
For Device Type, select the Desktop, Mobile, or Desktop and Mobile to set which device this board will be used on.
-
For Label, enter the name of the board that will display on the homepage and on the Boards landing page.
-
Click Apply.
To remove a board
-
In the Essential Boards area, under a board, click Remove Board. A confirmation dialog appears.
-
Click Remove.
Rearrange Essential Boards on the homepage
-
On a board that you want to move, click and hold the
icon. -
Move the board into a new position.
-
Repeat steps 1 and 2 until the boards are arranged as you want them.
Modify board information that appears in the Essential Boards widget
-
To the right of Essential Boards, click the more actions icon
 .
. -
Select Edit.
-
In the Attach Board Settings window, modify the fields as needed.
-
Click Apply.
Show/Hide the Latest Messages widget
To the right of Latest Messages, turn on/off the toggle to show/hide the Latest Messages widget.
The Latest Messages widget displays the three most recent messages that appear in a user's Inbox.
Users can always access their Inbox using the
 icon.
icon. -
-
Click Save & Exit.
For users to access this homepage, you must assign one or more positions to the homepage. See Assign Positions to a Homepage.