Enable the Rave Alert Extension in a WebEOC Nexus Board
Note that the Rave Alert Extension does not make use of standard WebEOC Nexus board notifications. Instead, it relies on code written in your WebEOC Nexus views to populate Rave Alerts.
Download the Rave Alert Extension Board 2.0.0.web,, a basic Rave Alert board that you can then import as a new board to get you started. This board is an example board, and not the definitive template for building this type of board.
To enable the Rave Alert Extension on your board
Ensure that the Rave Alert Extension is Included in Your Board
-
Follow the steps outlined in Configure the Rave Alert Extension to set up the connection to Rave Alert.
-
In the main menu, click the workflows icon
 . The Workflows page opens.
 -
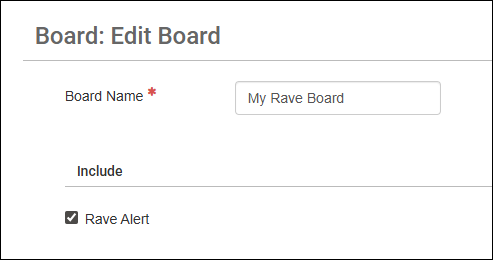
On the Boards tab, click the name of the board you want to check for Rave enablement. The Board: Edit Board page opens.
-
In the Include section, ensure that the Rave Alert checkbox is selected.
Enable Rave Alert on Your Input View
You can use the basic or advanced method to enable Rave Alert.
Enable Rave Alert on your Input view using the basic method
You must add three fields to your Input view inside the <form> tag to use the basic method of connecting to Rave Alert.
-
Short message field
-
Long message field
-
Alert trigger
These fields will be automatically mapped directly to the content of an alert if you configured them as directed below.
-
Add a short message field by adding an <input> tag with a name attribute set to “rave_short_message” and a template attribute set to “Rave Alert.” This will automatically map the short message field in your Input view to the short message field in an ad hoc Rave Alert.
Copy Code<input type="text" name="rave_short_message" template="Rave Alert" /> -
Add a long message field by adding a <textarea> tag with a name attribute set to “rave_long_message” and a template attribute set to “Rave Alert.” This will automatically map the long message field in your Input view to the long message field in an ad hoc Rave Alert.
Copy Code<textarea name="rave_long_message" template="Rave Alert" /> -
Add an alert trigger by adding an <input> tag with a type attribute set to “checkbox,” a name attribute set to “send_rave_alert,” a value attribute set to “Yes,” and a template attribute set to “Rave Alert.” When the user checks the checkbox and saves the record, a Rave Alert is launched.
Copy Code<input type="checkbox" name="send_rave_alert" template="Rave Alert" value="Yes"/>
Enable Rave Alert on your Input view using the advanced method
The advanced method of connecting to Rave Alert provides more flexibility, allowing you to combine multiple fields as well as static text to create a templated alert.
You must add three new elements to your Input view inside the <form> tag to use the advanced method of connecting to Rave Alert.
-
A short message span
-
A long message span
-
An alert trigger
-
Add a short message span by adding a <span> tag with a data-rave-short-span attribute set to “true.” This can contain text that will automatically map to the short message field in an ad hoc Rave Alert.
Include field values in the text by wrapping the name of the field in curly braces.
Hide this element so that it is not visible to users.
Copy Code<span style="display:none;" data-rave-short-span="true"/>Significant Event - {event_type}</span> -
Add a long message span by adding a <span> tag with the data-rave-long-span attribute set to “true.” This can contain text that will automatically map to the long message fields in an ad hoc Rave Alert.
Include field values in the text by wrapping the name of the field in curly braces.
All white space in the long message will be translated literally. This means that you should not enter any spaces, tabs, or line breaks that you do not want to appear in the message.
Hide this element so that it is not visible to users.
Copy Code<span style="display:none;" data-rave-long-span="true"/>
**A SIGNIFICANT EVENT RECORD HAS BEEN POSTED***
Description:
{description}
Address: {address}
REPORTED BY
Name: {real_name}
Phone: {session_phone}
Email: {session_email}
Position: {position_name}</span> -
Add an alert trigger by adding an <input> tag with a type attribute set to “checkbox,” a name attribute set to “send_rave_alert,” a value attribute set to “Yes,” and a template attribute set to “Rave Alert.” When a user selects the checkbox and saves the record, a Rave Alert is launched.
Copy Code<input type="checkbox" name="send_rave_alert" template="Rave Alert" value="Yes"/>
Enable Rave Alert on Your Display View
After sending a Rave Alert through a board record, that record will be associated with that alert. You can view a record’s associated Alert Report by adding a <rave_alert_report> tag inside the <eocrepeatallrecords> tag on a Display view. The text inside the tag will become the text of the link report in Rave Alert.
<rave_alert_report/>Alert Report</rave_alert_report/>Note that standard HTML attributes cannot be applied to the <rave_alert_report> tag. However, it can still be styled by using CSS that targets its parent element(s).
<style>
    span.rave-container a {
        color: red;
    }
</style>
<span class="rave-container">
    <rave_alert_report>View Report</rave_alert_report>
</span>