Create a Contact Account
|
|
Contacts procedure |
A contact account allows a non-WebEOC Nexus user to receive alerts.
If you have the proper permissions and role, you can set up contact accounts using either of the following methods.
Because the fields and pages can be customized to your needs, this procedure may not exactly match your instance.
To create an individual account
-
Click the Accounts tab.
-
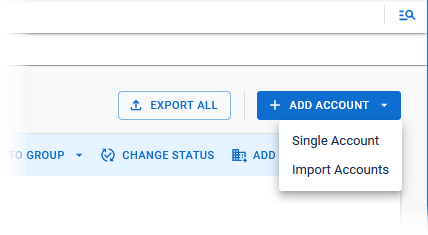
On the Accounts page, in the upper right, click + Add Account.

-
In the Add Account menu, select Single Account. The Account Creation Form page opens on the Basic Information tab.
-
For each tab, complete the fields indicated with an asterisk, and then click Next
Fields for accounts Field
Description
Email The email address that the contact will use to receive alerts. First Name
The contact's given name.
Last Name
The contact's last name.
System Role
The role assigned to the contact. Roles that do not have access to the solution are automatically assigned to the Contact role and you cannot change it.
A contact can receive alerts but cannot send them.
System Status Select Active. When a contact is Active, they receive alerts.
When a contact is Inactive, they do not receive alerts.
When a contact's account is Closed, they cannot log in or be selected for inclusion in organizations, notification groups, or notifications.
When a contact's account is Deleted, they cannot log in, and their account information is irretrievable.
For more information, see Change a Contact's Account Status.
-
Click Next The Personal Information page contains additional contact details. These fields are optional and you can enter the information or leave them empty.
-
Click Next. The Contact Information page contains additional contact details. These fields are optional and you can enter the information or leave them empty.
-
Click Next.
-
On the Membership page, if you want to add the contact to an organization at this time, do the following actions. Otherwise, click Next to continue. You can add organizations at a later date, and/or the contact can use the Self-Service Portal (if enabled) to request to join an organization.
-
Click + Add Organizations. The Select Organizations page opens.
-
Click the Select link to grant the contact membership in the organization. The link changes to Deselect for each selected organization.
-
When all organizations have been selected, click the Select button in the bottom right. You return to the Membership page and the organization appears on the page. Two fields appear to the right of the organization.
-
The first field displays Accepted. This status indicates that you, as an administrator, have approved the contact to receive notifications from the organization. For more information about this field, see Approve Requests to Join Organizations.
-
The second field displays Recipient. This permission field determines the contact's role in the organization. For more information, see Organization Roles.
-
-
-
Click Submit to complete the account setup.
Your organization may have added additional pages to the wizard. If this is the case, you may need to click Next and complete the remaining pages as requested by your organization. The final page contains the Submit button.
If you have more than one contact account to add, you may want to import the information. See Import Contacts.