Import Contacts
|
|
Contacts procedure |
When managing contacts, if you have the proper permissions and role, you can enter information for multiple contact accounts simultaneously by uploading their information in a comma-separated values (CSV) file.
You can download a template for this data from WebEOC Nexus. The template contains a header row with column titles corresponding to contact account details. The template also includes a row with example data that displays the type of data to include in each column.
Remove the example data before uploading your data.
Follow these general guidelines to upload contacts:
-
Download the template in the Accounts tab and use it to structure your contact data.
-
An asterisk in the import template column header indicates the field is required.
-
Field values you enter in the template overwrite existing data.
-
If you leave a field blank in the template, it does not overwrite existing data.
-
To delete a value in a field, enter [Delete] in the field.
-
Empty leading spaces in any field are disregarded.
-
Duplicate email addresses and phone numbers for a contact are disregarded.
-
An empty row is disregarded.
-
Save and upload your data as a CSV file.
-
You can only upload one file at a time. If the file contains invalid contacts, cancel the upload and correct the errors. Otherwise, if you import the valid contacts, remove the uploaded file and upload a new file with all data in the correct format.
To download the template
-
Click the Accounts tab.
-
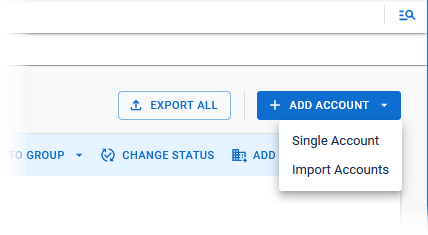
On the Accounts page, in the upper right, click + Add Account.

-
In the Add Account menu, select Import Accounts.
-
In the Import Accounts window, click Download. The ImportAccountsTemplate.csv file downloads according to your browser settings.
-
Through your file explorer, locate and open the template file.
-
Retain the header row, as is, without changes.
-
Select and delete the example data.
-
Enter the contacts’ information, as needed, including:
-
FIRST_NAME (required)
-
LAST_NAME (required)
-
EMAIL (required)
-
STATUS (required): Values are active, inactive, closed, and deleted.
-
ADDRESS 1
-
ADDRESS 2
-
CITY
-
COUNTRY
-
POSTAL_CODE
-
CONTACT_EMAIL
-
CONTACT_PHONE_NUMBER_TEXT
-
CONTACT_PHONE_NUMBER_VOICE
-
CONTACT_PHONE_NUMBER_FAX
-
PAGERS
-
ORGANIZATION PATH: To add this account to an organization or a child organization, enter the organization name or the organization name/child organization name.
The template file headings that you see may be different from the example above, if the fields have been customized for your instance.
-
-
Save the file in CSV format.
-
On the Accounts tab, click + Add Account > Import Accounts.
-
Drag the saved file into the window, or click Select CSV File to browse for the file.
-
Click Import. The file uploads. The Import Accounts window opens and a message indicates if errors are present.
-
If errors are present, click Download Report to correct the errors.
-
View the errors. Errors are displayed in the Status and Message columns at the end of rows.
-
Correct the errors and save the file.
-
-
Upload the file, again.