Export Accounts
On the Accounts page, you can export one or more accounts through the Export Account dialog. This dialog gives you options for using either the default export settings or an export template, if you've created one already.
The default export uses the fields that your solution has set up as the standard export fields.
By default, there are 52 standard fields, but this may have been modified to be specific to your solution and could be as many as 94 possible fields.
To export an account
-
On the main menu, select Accounts. The Accounts page opens.
-
Select the checkbox for each account you want to export or, if you want to export all accounts, do not select any accounts
-
Click Export. The Export Account dialog opens.
The preview shows how the information appears when exported.

-
Choose from one of these two options:
 Default
-
Click the Export button in the lower-right.
-
Click Download. Your browser downloads the file to your default location.
 Template Export
-
Select the template you want to use from the list shown.
You can search for a template by name if you have several templates to choose from.
-
Click the Export button in the lower-right.
-
Click Download. Your browser downloads the file to your default location.
-
To create an export template
-
In the Accounts page, select the checkbox for each account you want to export or, if you want to export all accounts, do not select any accounts
-
Click Export. The Export Account dialog opens.
The preview shows how the information appears when exported.
-
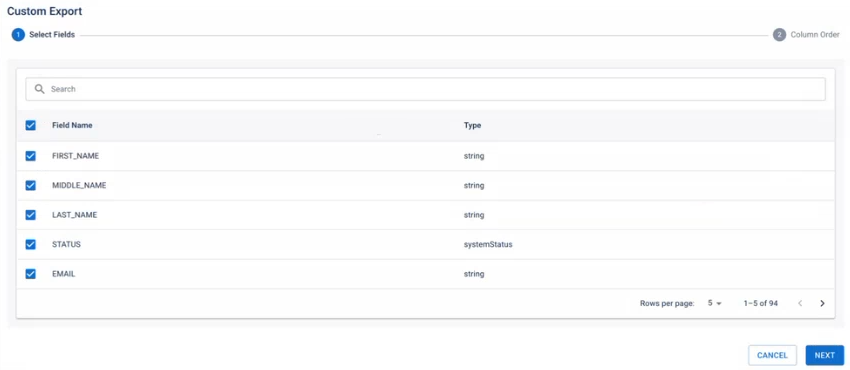
Click Custom Export. The Custom Export dialog opens.

-
Select the export fields you want to include in your template.
You can search for a field by name if you know it.
-
Click Next.
-
Specify the column order by dragging-and-dropping the field labels on the right side of the dialog. The preview window will update automatically to show the updated order.

-
Click Save as Export Template then enter the name of the template into the field that appears.
-
Click Export in the lower-right corner.
-
Click Download. Your browser downloads the file to your default location.
To edit an existing template
-
In the Accounts page, select the checkbox for each account you want to export or, if you want to export all accounts, do not select any accounts
-
Click Export. The Export Account dialog opens.
The preview shows how the information appears when exported.
-
Select the template you want to use from the list shown, then click the edit button
. The Edit Template dialog opens.
-
Edit the fields and order as you would during template creation, then click Save.
If you want to delete a template instead of editing it, click the delete button ![]() for the template and confirm the action.
for the template and confirm the action.