Configure Board Notifications
Configuration of board notifications is available for any WebEOC Nexus license, including WebEOC Nexus.
The configured board notifications’ wizard replaces the configuration of notifications through the board input view. You can continue to configure notifications for pre-existing channels (email and Inbox) through the input view; however, this method will not be upgraded or maintained in the future.
Board notifications are configured through a wizard, which allows you to not only send notifications on record creation or update but also to configure notifications to be sent under specific conditions. To improve your business processes, you can identify specific users and/or external contacts that you want to notify when a board record is created or updated.
This enhanced, wizard-based configuration also allows you to set up notifications from subscription boards because the configuration of board notifications are not shared through Fusion. As a result, the board publisher and board subscriber can configure and receive board notifications that are separate and independent of each other.
You can use the <notificationrecipientspicker> tag to allow board users to access a dialog where they can select custom recipient types to receive board notifications for an individual record. Any user associated with the board, even users who do not have WebEOC Nexus accounts or accounts set up in Contacts, can receive notifications using this method. See <notificationrecipientspicker> for details.
To configure board notifications
-
In the main menu, click the workflows icon
 . The Workflows page opens.
 -
On the Boards tab, locate and click the name of the board you want to map. The Board: Edit Board page opens.
-
Under Tools, in the Edit area, click Notifications. The Notifications page opens.
-
On the upper left, click + Create Notification. The Source page of the wizard opens.
-
Enter the following information:
Fields to create notifications Field Description Valid Values Input View
Part of the board where you add and edit information.
Available board input views.
Display View
Part of the board where information is presented and displayed.
Available board display views.
Event
Type of event that will trigger notifications.
-
Create
-
Update
-
Create or Update
Logical or Boolean combination of one or more fields and values that define when to send the notification.
To specify, do the following actions:
-
To create a new condition, click +Add. The Create condition window opens.

-
In the menu on the left, select ANY or ALL.
-
Click Add Group, and in the subsequent row, enter all criteria that you want met before sending the notification.
-
Click Add Criterion, and in the subsequent row, enter the input view field, operator, and value that must be met to send the notification.
-
To add more criteria, repeat steps a – c.
-
Click Save.
-
To edit an existing condition, click Edit.
-
-
To delete an existing condition, click Delete.
Description
Add a description of the notification.
500 alphanumeric characters
-
-
Click Next. The Schedule page opens. In this page, you can schedule your notification.

-
Select how you want the notification to be sent:
-
Immediate sends the notification when the record is created or updated.
-
Delayed sends the notification at a specified date and time.
This option is only available with the Alerts plug-in.
-
Recurring sends the notification more than once.
This option is only available with the Alerts plug-in.

-
| Field | Description | Valid Values |
|---|---|---|

|
A numeric field that works in association with the second field. | A numeric value |

|
Determines the time span to which the first field applies. |
|

|
Specifies if the notification should be sent before or after the values supplied in the first and forth fields. |
|

|
Provides a list of date or datetime type fields that appear on the board. The notification is scheduled according to this value. Example: In the graphic that appears above this table, the notification will be sent a day before the value that corresponds to the date_time_due on the board occurs. |
List of date or datetime type fields that exists in the selected input view. |

| Field | Description | Valid Values |
|---|---|---|
| Active From | Date from which the solution will send the notification. | mm/dd/yyyy, 1-12 hours, 0 – 59 minutes, AM/PM |
| Active Until | Date until which the solution should send the notification. | mm/dd/yyyy, 1-12 hours, 0 – 59 minutes, AM/PM |
| Count | The number of notifications that should be sent. | Numeric character |
| (frequency) |
How often the notifications should be sent.
|
Time must be specified in UTC. |
-
Click Next. The Channels page opens.
-
Select the checkbox for all channels through which you want the notification to be sent.
-
Inbox and Email are standard notification channels that are available with all WebEOC Nexus licenses. If sending email notifications, the From email address must be specified in the Admin View, through Notifications: Settings: Email.
-
Voice and Text channels are available if you acquired and configured the alerts service for the premium Alerts plug-in. You can verify this in the Admin View, through Notifications: Settings: Alert Service.
-
Microsoft Teams, Slack, and any other webhook-based channels are only available if you acquired and configured the webhooks capability for the premium Alerts plug-In. You can verify that you have the webhook license for WebEOC Nexus in the Admin View, through Systems: General by locating the Notifications Webhooks License and making sure a valid key has been entered. You can confirm the webhook(s) is configured in the Admin View, through Notifications: Settings: Webhooks.
-
Click Next. The Recipients page opens, unless the only channel you selected on the previous page was a webhook. In that case, the Messages page opens and proceed to step 11.
-
Recipients can be WebEOC Nexus users, positions, groups, or external contacts.
-
Configured notifications are sent to the primary email address and/or default phone number listed in the user’s profile.
-
Phone numbers should use any of the following formats. Any other format results in a validation error.
-
###-###-####
-
(###) ###-####
-
+###########
-
-
Phone numbers that do not include the country code are automatically assigned a +1, which is the code for the United States, Canada, and several Caribbean nations.
To add recipients, do any of the following actions:
 Add users
-
Click the Users tab.
-
Select the checkbox for all users that you want to receive the notification.
Add positions
-
Click the Positions tab.
-
Select the checkbox for all positions that you want to receive the notification.
Add groups
-
Click the Groups tab.
-
Select the checkbox for all groups that you want to receive the notification. These groups are set up on the Accounts page on the Groups tab.
Add notification groups)
-
Click the Notification Groups tab.
-
Select the checkbox for all notification groups that you want to receive the notification. These groups are set up in Contacts.
Add organizations
-
Click the Organizations tab.
-
Select the checkbox for all organizations that you want to receive the notification. Organizations are set up in Contacts.
Add recipients by location
-
Click the Location tab.
-
See Create Alerts by Location for details.
Add fields (to send the notification to a user, position, or group designated in a board field)
-
Click the Fields tab.
-
In the Channel list, select an option.
-
In the Recipient Type list, select an option. This identifies what information is added into the field, whether user, position or group, or board.
-
In the Board Field list, select an option.
-
Click + Add. The results are added below.
To send a notification to multiple users, positions, or groups, repeat the steps above.
Add multiple email addresses for external recipients to receive the board notification
Use this method when the notification must be sent to multiple recipients who do not have an account in WebEOC Nexus or a Contact account.
-
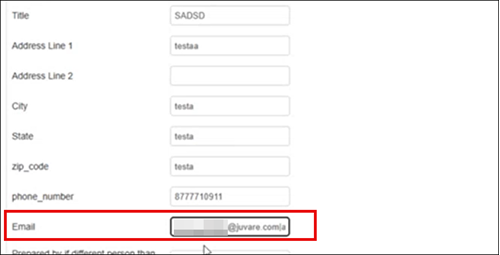
Before creating the board notification, create a text field on the board labeled Email.
-
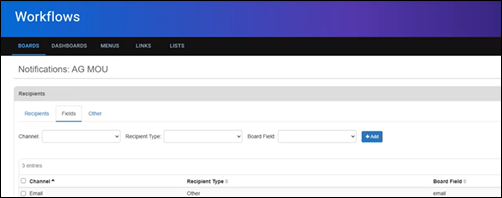
In the Recipients section of the wizard, click the Fields tab.
-
In the Channel dropdown, select Email.
-
In the Recipient Type dropdown, select Other.
-
In the Board Field dropdown, select the Email text field.
-
Click Add.
When using the board to send multiple emails to external recipients, you must enter multiple emails in this Email field separated by a pipe (|) character, for example: testa@test.com|testb@test.com. If you use a comma or semicolon to separate the email addresses, an error results.
Add a single email or phone number for an external recipient to receive the board notification
Use this when the notification must be sent to a recipient who does not have an account in WebEOC Nexus or a Contact account.
-
Click the Other tab.
-
In the Channel dropdown, select an option.
-
In the Phone/Email field, enter the phone number or email address.
-
Click + Add. The results are added below.
-
-
-
Click Next. The Message page opens.

-
In the Short Message field, enter the subject line for the message.
-
In the first entry box, enter the message to be sent to channels that only support plain text (for example, text and voice messages).
-
You can use board fields as placeholders in these messages. Placeholders that contain date and/or time information are updated using the system or user time zone (depending on the setting that is selected in the user’s account).
-
To enter a placeholder:
-
In the plain text editor, click the location where you want to insert the placeholder
-
From the Board Field list, select the board field you want to insert.
-
Click Add Placeholder. The placeholder appears and is automatically updated when the message is sent.
-
-
-
In the rich text editor, enter the message for channels that support rich text messages (for example, emails and the WebEOC Nexus Inbox).
-
Use the standard editing tools in the toolbar.
-
You can paste rich text content into the editor.
-
You can use board fields as placeholders in these messages. Placeholders that contain date and/or time information are updated using the system or user time zone (depending on the setting that is selected in the user’s account).
-
To enter a placeholder
-
In the plain text editor, click the location where you want to insert the placeholder.
-
From the Board Field list, select the board field you want to insert.
-
Click Add Placeholder. The placeholder appears and is automatically updated when the message is sent.
-
-
-
If the selected input view has attachments, you can include one or more attachments with the notification.
-
If you want to create and send a PDF of the board’s display view, perform the following actions, and then click Save.

Fields used to create and send a PDF Field Description Valid Values Create and Send PDF Indicates if the PDF should be created and sent. -
Selected = Enabled
-
Cleared = Disabled
Display View Identifies the display view that will be captured and sent as a PDF. Available board display views. Orientation Direction of the PDF page layout. -
Portrait
-
Landscape
File Name Name of the PDF attachment. 200 alphanumeric characters Enable Media Query Checks to make sure the PDF generation option is also enabled on the display view for correct styles. -
Selected = Enabled
-
Cleared = Disabled
-
If you want to create a configured notification, but do not want to send it yet, you must disable it.