Set up Webhook Notifications
Webhooks are available with the Alerts plug-in.
After entering the webhook license key, you must set up the webhook in the third-party solution and WebEOC Nexus.
Microsoft is deprecating Office 365 connectors in late 2025, so the procedure for saving the webhook URL in WebEOC Nexus 10.12.1 and later has changed. You must update your configuration outside of WebEOC Nexus, transferring the logic that was set up in Office 365 webhooks to Microsoft Teams workflows. Then, you must update the Url field for the webhook in WebEOC Nexus. Until the webhook format is updated, this error displays on the Webhooks tab.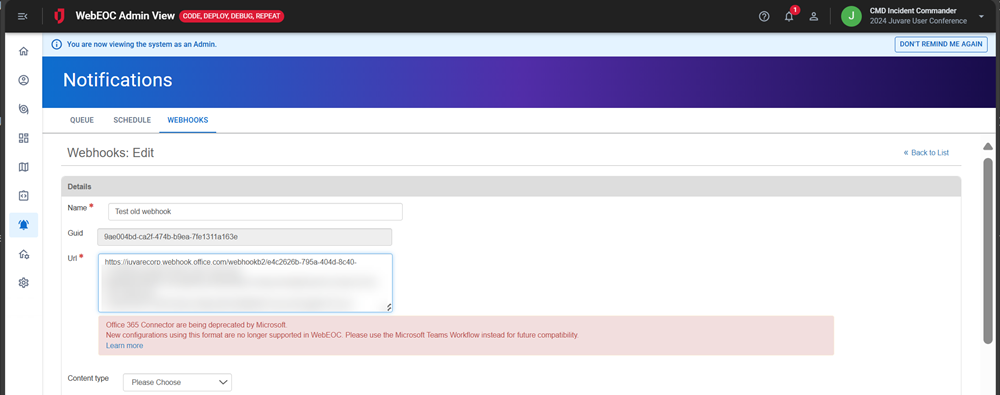
This procedure uses Microsoft (MS) Teams as an example to walk you through the third-party set up. If these steps do not match your solution, or if you are using a different collaboration solution, consult the documentation provided by the solution’s company to configure the incoming webhook.
To set up the webhook in Microsoft Teams and WebEOC Nexus
In WebEOC Nexus 10.12.1 and later, you must update the Url field using the proper format. Perform these steps in Microsoft Teams and WebEOC Nexus to update the Url field for all existing connectors with a URL in the updated format.
-
In Teams, on the left, click Channels. Your teams and channels appear in a list.
-
For information about creating or joining a team, see Microsoft's help center.
-
To view team's existing channels, click the name of the team.
-
-
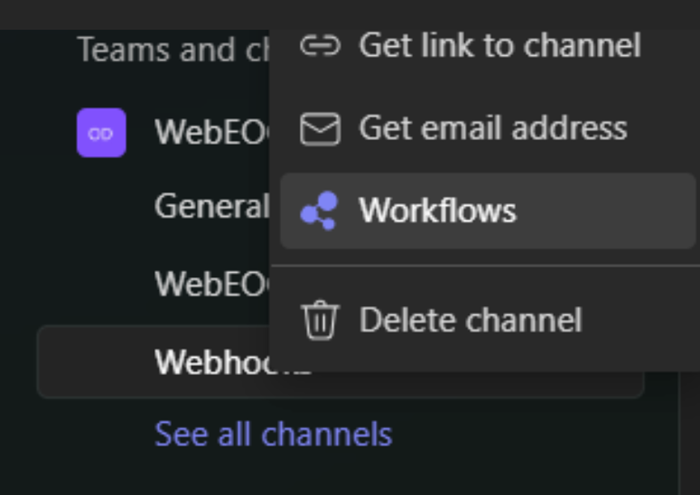
Right-click the channel that will receive notifications from WebEOC Nexus and select Workflows.
-
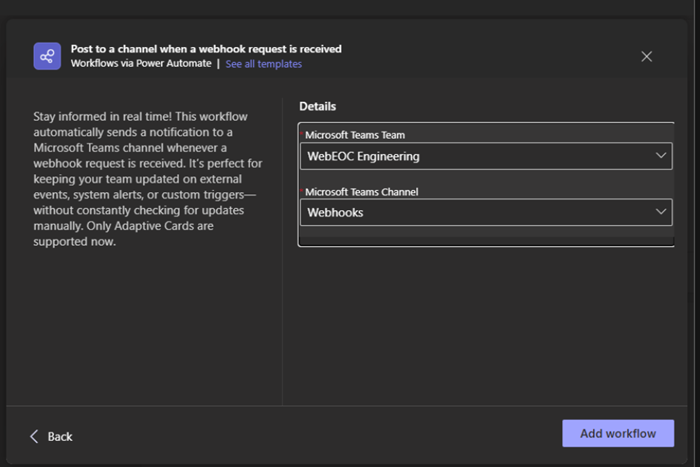
Under Templates, select Post to a channel when a webhook request is received.
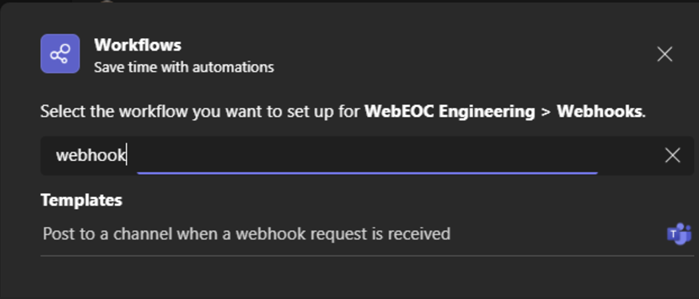
Depending on your organization type, the webhook template Post to a chat when a webhook request is received may not be available. In this case, contact your organization’s IT administrator for assistance.
-
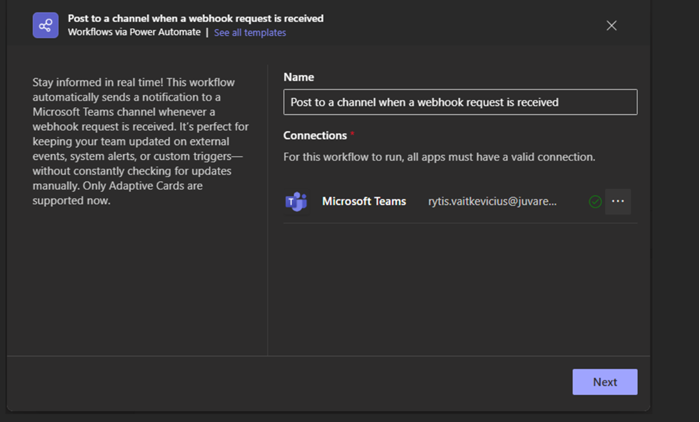
On this window, click Next.
-
On this window, click Add Workflow.
-
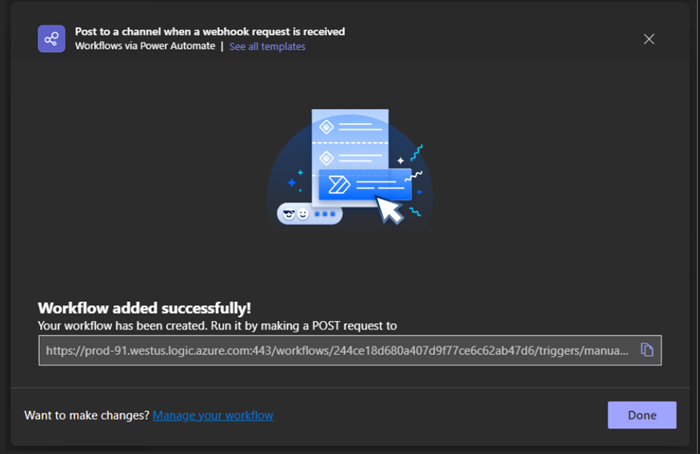
In the next step, the URL for the workflow displays. Copy that URL to add to WebEOC Nexus.
-
Click Done.
-
In WebEOC Nexus, Access the Admin View.
-
In the main menu, click the notifications icon
 . The Notifications page opens.
 - Click the Webhooks tab.
-
On the upper right, click Add Webhook. The Webhooks: Add page opens.
-
In the Name field, enter the name of the webhook in WebEOC Nexus.
Juvare recommends that you use a descriptive name (for example, Teams – Road Closures) because this name will be visible throughout the solution.
- In the Url field, enter the URL for the webhook, copied from the third-party solution in step 6 above.
With WebEOC Nexus 10.12.1 and later, this URL must follow the updated format. If the format is incorrect, an error message displays, and a link to information from Microsoft about configuring the updated webhook is provided.
-
In the Content type dropdown, select the format of the notification. Options are:
-
application/json: This is the default selection, used with Microsoft Teams workflows webhooks. Select this option to update to the latest version of webhooks.
-
text/plain: For backward compatibility, select this option if you want to continue to use Office 365 webhooks.
-
- In the Default templates dropdown, select the default short or long message template associated with the configured board notification.
This message can be a default Slack or MS Teams message, or the Event Reporting MS Teams template.
By default, WebEOC Nexus uses the Default MS Teams Message template.
The name of the template identifies the intended webhook. For example, the Event Reporting MS Teams template retrieves information from the MS Teams channel and delivers it into the Event Reporting Board.
When you use the default templates, the message content is only a suggestion. Modify it as needed by following the third-party instructions in the Template field.
- In the Template field, update the template if needed. The content in this field determines how the notification appears. Placeholders for data that will be received from the WebEOC Nexus board should be enclosed with double curly brackets (for example, {{example}}).
- In the Description field, enter additional information about the webhook.
The Description is optional; however, Juvare recommends you enter a description because it assists other people with understanding the purpose of the webhook.
- Click the Enabled checkbox to turn the webhook notifications on and off. Only enabled webhooks are available to choose as a notification channel in the solution.
-
Click Save. A Globally Unique Identifier (GUID) appears in the Guid field. The GUID is a unique identifier that helps WebEOC Nexus deliver data to the correct integration.
The next step is to configure the board notifications, one-time notification, or recurring scheduled notifications to send to a third-party solution using a webhook.