Configure the Incident Action Plan Solution
Audience: WebEOC Nexus administrators responsible for deploying and configuring the Incident Action Plan (IAP) Solution for their organization.
Goal: Deploy and configure the Incident Action Plan Solution so incident management teams can create, manage, and publish Incident Action Plans for each operational period.
What You'll Learn
In this guide, you'll learn how the Incident Action Plan Solution is organized, how information flows between the ICS forms, how to deploy and configure the IAP boards, assign Feature Groups and permissions, and verify that the solution is ready for operational use.
What You'll Accomplish
By the end of this guide, you'll have the Incident Action Plan Solution deployed and configured, understand how data flows between the included ICS forms, and have the board set ready for your planning staff.
Introduction
The Incident Action Plan (IAP) Solution provides a collection of standard WebEOC Nexus boards that support the creation, coordination, publication, and archival of Incident Action Plans. The solution automates data movement between many FEMA ICS forms, reducing duplicate data entry and helping planning teams prepare complete Incident Action Plans more efficiently.
Follow these steps
1. Review the Incident Action Plan solution.
Begin by reviewing the overview of the Incident Action Plan Solution to understand its capabilities and the planning process it supports.
Become familiar with features such as:
-
Working, Template, and Published IAPs
-
Automated ICS form population
-
Publishing and archiving plans
-
PDF generation
-
Supporting attachments
-
Dark mode support
2. Understand the Incident Action Plan data flow.
Before configuring the boards, review how information moves between the ICS forms. See Incident Action Plan Data Flow.
The data flow diagram illustrates how information entered once can populate other forms.
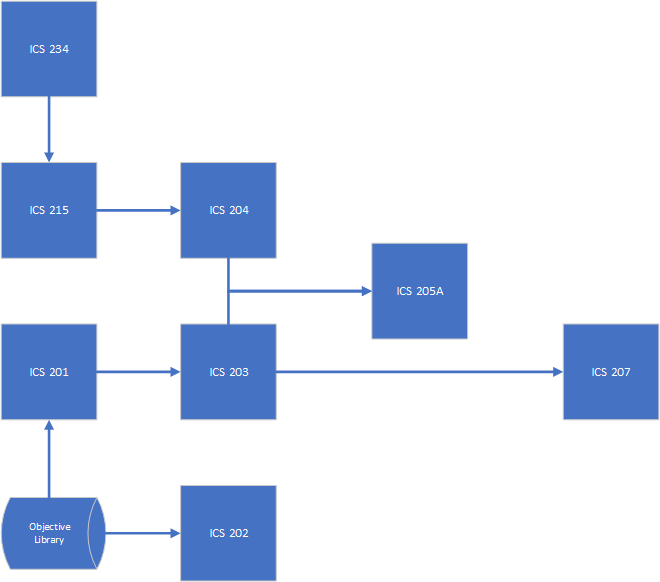
Understanding these relationships will help you configure and use the solution more effectively.
3. Download and import the Incident Action Plan boards
Deploy the Incident Action Plan Solution into your WebEOC environment.
Download and import the boards.
Follow the import order documented in the setup guide.
4. Configure the Incident Action Plan boards.
Review the configuration requirements for each board included in the solution.
See Set Up the Incident Action Plan Board.
The setup guide explains how to configure:
-
IAP Working
-
IAP Template
-
IAP Published
It also explains the appropriate display views, device types, and board permission tags.
5. Assign feature groups and permissions
Assign the Incident Action Plan boards to the appropriate feature groups.
Review the documented board permissions and ensure planning personnel have the appropriate access to:
-
Create plans
-
Update plans
-
Publish plans
-
Manage templates
-
Archive completed plans
6. Verify the workflow.
Review the configured solution and verify that information moves through the planning process as expected.
-
Confirm that users can:
-
Create a new IAP
-
Work from templates
-
Update working plans
-
Publish completed plans
-
Archive completed Incident Action Plans
Additionally, verify that data is shared between ICS forms according to the documented data flow.
7. Test the solution.
Create a test incident and walk through the planning process.
Verify that:
-
Users can access the appropriate boards.
-
Display views are assigned correctly.
-
Permissions function as expected.
-
Data transfers correctly between ICS forms.
-
Published plans generate successfully.
Information about how to use the boards is available in the Incident Action Plan Use Guide.