eICS follows the national framework for Incident Command Systems (ICSs), and as such, setting up the system properly is important. There are four main user roles in eICS, the Domain Administrator, Facility Administrator, Facility Staff, and Facility Staff Limited, who each play a vital role in setup.
In brief:
-
Domain Administrators structure and organize eICS. They also create facilities when necessary, and maintain the system's automated notifications.
-
Facility Administrators set up the Emergency Operations Plan (EOP) for their facility, including ICS positions and depth charts, incident response guides (IRGs), internal and external contacts, and library materials.
-
Facility Staff enter contact and availability information and fill ICS positions in the event of an emergency. Users with the Facility Staff role can create incidents. Those with the Facility Staff Limited role cannot create incidents.
Setup Check List
Facility Administrators can edit multiple plans the Domain Administrator has made available to accommodate varying standards, command requirements, and to meet the needs of their organization's hierarchy. However, only one EOP can be active at any given time.
eICS plans offer flexible organization chart features that allow an administrator to construct the hierarchy appropriate to their facility, agency, or organization, specify the appropriate incident response guides, and add to or change positions in the plan.
The following table lists the high-level steps to take in setting up your facility's eICS environment.
Located in Planning > Plan Summary.
For the initial setup, you must create a plan. You can choose to base your plan on any of the plan templates that are available to you via your domain. When you first access this page in eICS, you are prompted to set up a plan.

-
Choose the template from Create Plan from.
-
Select the library and incident response guide options. By default, all are selected. We generally recommend that you leave all checkboxes selected.
-
Click Create Plan for (facility name).
It may take a few moments for the system to create the facility. When it is done, the plan opens in eICS.
The Create initial plan summary window also contains a View Instructions link to a quick reference guide that walks you through each step of creating and configuring a plan.
Refer also to Plan Summary.
Located in Planning > Plan Summary > ICS Chart.
The plan you copied comes with a default ICS Chart and positions.

Your next task is to identify the ICS positions for the plan. This can involve renaming positions and changing the chain of command, as appropriate. You may also decide to use the chart as is.
-
On the left, click a position name. The right side shows its details.
-
In the Chain of Command drawer on the right, rename the position, add subordinates, change the supervisor, or delete the position.
-
Click the Position Contact Information drawer and enter the appropriate information.
After creating contacts and working with the library, you will likely return to the Plan Summary to continue defining ICS position details.
Refer to ICS Chart and Incident Response Guides (IRGs).
Located in Planning > Library.
The plan you copied comes with a library containing numerous EOP-related files. You can add to this library structure for your plan. You can store documents that are not related specifically to the plan in the Resource Documents folder.

As administrator, you can rename existing folders and files, add new ones, and more.
-
To add a folder, select its "parent" folder on the left and click Add Folder. Give it a name.
-
To add a file, select the folder and click Add File. Upload the file to the library.
-
To specify ICS positions with which this file should be associated, locate and select the file on the left and click the Associations to ICS Positions on the right. Select the checkbox for each appropriate position and save your work.
-
To specify IRGs with which this file should be associated, locate and select the file on the left and click the Associations to Incident Response Guides on the right. Select the checkbox for each appropriate guide and save your work.
Refer also to Library.
Located in Planning > Contacts.
You must add contacts to your facility. Your Domain Administrator set you up as a contact so that you have access to eICS. You can now add Facility Staff as users of eICS, some of whom you may assign to ICS positions. You can add external contacts who need to be notified when an incident occurs, but may not need to use eICS directly.

To add an individual contact
On the left, click Add New Contact. Enter the individual's first and last name, organization, and department/title. Specify at least one phone number and select the notification order. You can also add a phone number for text notifications and information on email address/pager/other. Click Save when you are done.
To upload a group of contacts
You can also upload multiple contacts at one time. This is especially handy during this phase, when you are setting up your system.
On the right, click Upload Contacts. In the Upload Contacts window, download the template. The template is a spreadsheet you can fill in with the appropriate contact information for each individual, such as name, resource type, contact information, and more. When completed, access this window again, browse for the spreadsheet, validate the records, and import the contacts.
Refer also to Contacts.
Located in Planning > Contacts.
To ensure the contact receives the appropriate notifications, assign the contact to one or more ICS positions.

-
On the left, select the contact. The details appear on the right.
-
Click the ICS Positions drawer.
-
Click add/remove positions.
-
In the Select Contact Depth Chart window, select one or more positions.
-
Click OK. The selected positions appear in the drawer.
Refer also to Contacts.
Located in Planning > Facilities.
You can specify Command Center contact information and set up custom tabs to appear in the Incident Dashboard. Only two tabs appear in the dashboard. However, you can set up multiple websites for these tabs, and users can then select from the available options.

-
On the left, select your facility's name. Its details appear on the right.
-
Click the Details drawer.
-
Fill in the Command Center Details as appropriate.
-
Scroll down to the Incident Dashboard Tabs section, and edit or replace the existing (default) tab values.
-
Click Add Tab to add a website and specify its name and URL (website address).
-
Repeat this step to add more tabs.
-
Save your changes.
Refer also to Facilities.
Located in Planning > Plan Summary > Incident Response Guides:
The plan you copied comes with the Incident Response Guides (IRGs) that you specify should be copied into the plan. You can also add IRGs and copy an IRG to create a new one.

-
On the left, select Incident Response Guides.
-
On the right, click Create a new response guide.
-
In the Create Response Guide window, enter the name of the new guide.
-
Select its type, which assigns an appropriate icon to the IRG.
-
Click OK. The window closes and the new IRG details now appear in multiple drawers.
Working from the top drawer down, enter the appropriate information for the IRG.
Refer also to Incident Response Guides (IRGs).
Located in General:
If you want to specify details that are included by default in a new incident of this type, select Use canned information when incident is created, and provide a name and description. The canned information appears in the dashboard when an incident is created from this IRG. Users can add to or change this information.
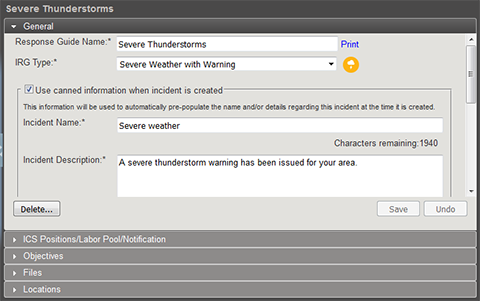
In addition, keep in mind this is the text the eICS notification system uses for the initial incident notification. It appears in emails, and the system converts this text to voice for notifications sent to phones.
You can also specify an incident mission statement for this guide.
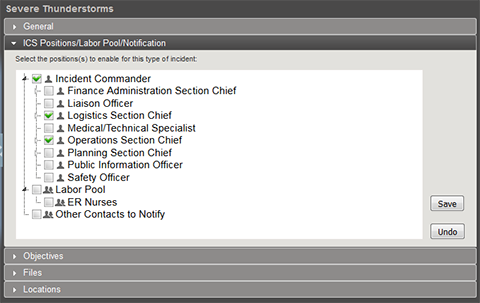
Located in ICSPositions / LaborPool / Notification:
Specify the positions that should be notified immediately when this type of incident occurs. When an incident is created, the contacts appearing in the depth charts for these positions appear as the contacts to be notified.
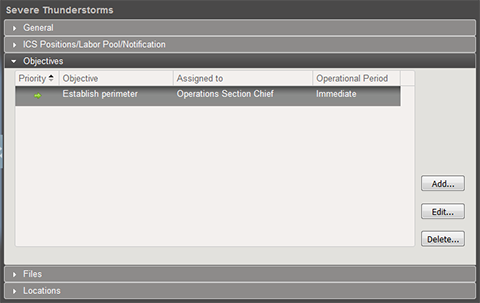
Located in Objectives:
Add objectives to the guide. You can specify an objective at the incident level or assign it to a specific ICS position. You can add a description and specify the priority and operational period for the objective.
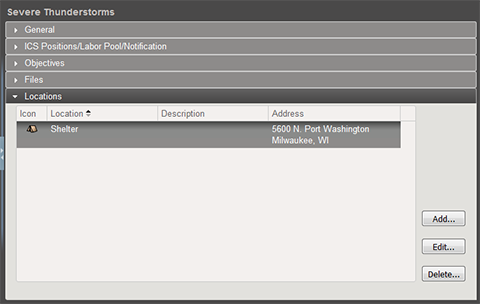
Located in Locations:
As appropriate, add locations that could assist during an incident, such as hospital locations, supply trailers, and evacuation shelters. These appear in the Map tab of the Incident Dashboard. Provide a name for each location, select the appropriate icon, and specify the location's address and coordinates.