Create Scheduled Reports
If you have the correct permissions, you can add a scheduled report, which is a scheduled email with a dashboard attached. This email can be sent to any stakeholders who have accessed Juvare Analyze and is an efficient method of providing automatic updates to data at a frequency you configure.
To create a scheduled report
-
On the Dashboards tab, click the Schedule icon for the dashboard that you want to send as a scheduled report.

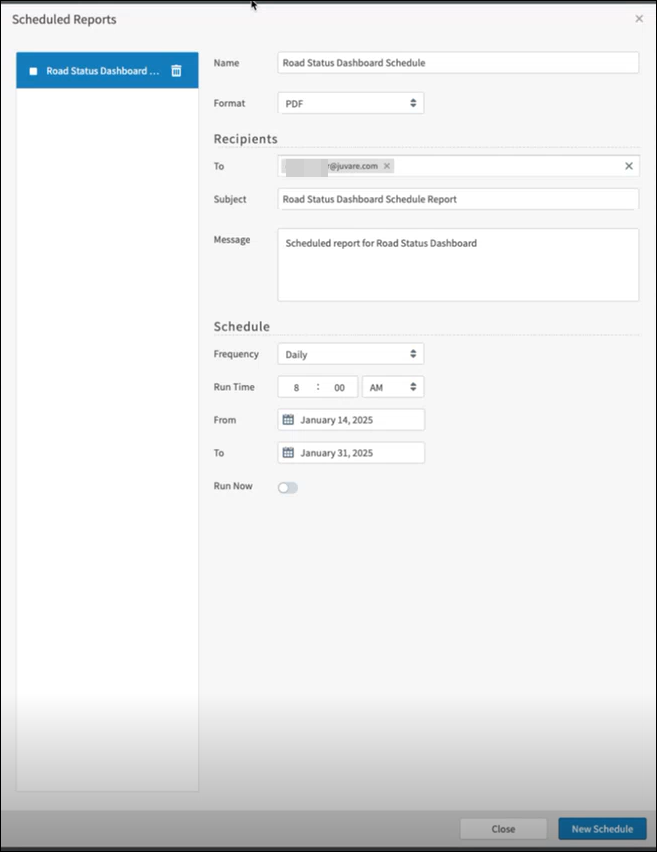
The Scheduled Reports page opens.
-
In the Name field, enter the name of the report. If you do not update this field, it displays [dashboard name Schedule] by default.
-
In the Format dropdown, select the format of the dashboard attachment, either PDF or PNG.
-
In the Recipients section, in the To box, enter the names of users who have accessed Juvare Analyze and who should receive this scheduled report.
-
In the Subject field, enter the subject line of the scheduled report email. By default, this field is populated with [Dashboard name] Schedule Report.
-
In the Message box, enter text that should display in the body of the email.
-
In the Schedule section, in the Frequency dropdown, select how often the scheduled report is sent.
Options are:
-
Run Once
-
Daily
-
Days
-
Weekly
-
Monthly
Different settings display based on the option you select to further configure the frequency.
-
In the Run Time fields, set the time of day the scheduled report is sent. The dashboard data is captured at this time.
-
In the From and To boxes, select the start and end dates for sending the scheduled report.
-
Optionally, click Run Now to send the report immediately.
-
In the bottom right, click New Schedule.
After the scheduled report has been set up, its recipients receive an email with the dashboard attached at the scheduled frequency. The dashboard displays data based on the run time.