Create Source
Juvare Analyze is configured with the source and connections. You can create additional sources if you are a WebEOC Full Admin or belong to JX User Groups with Dashboard Builder permission enabled.
Sources must be defined before you or self-service users can create visuals and dashboards.
Juvare will set up sources to connect to databases, though you can also create sources.
Sources define what data you and your users can access through a data connection. You can create a source from multiple tables as joins or hierarchical data, and you can adjust the available content by selecting specific tables (entities) and associated table schemas or providing custom SQL.
When defining a data source you can use:
-
A table or view
-
A limited set of columns from a table
-
A JOIN expression, used when the source requires multiple tables
To create a source, you must have a deep understanding of the underlying data model of that source. To define a source, you must label the table and field names exposed to the user who builds the visuals and dashboards based on the source. Align these labels with the business domain and name them so that the user can easily understand what data they represent.
To create a source
-
In the main menu, click Juvare Analyze. The Dashboards page opens.
-
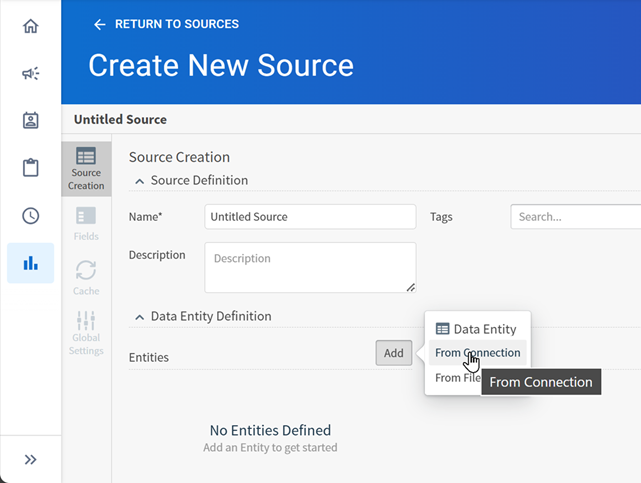
Click the Sources tab and click Create Source. The Create New Source page opens.
-
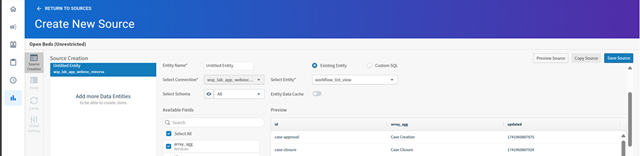
For Name, enter the data source name.
This name displays to the user when building visuals and dashboards. Ensure this name is meaningful. Examples of source names are EMR Bed Census SQL, Lab Boards, or Maintenance History.
-
In the Data Entity Definition section, next to Entities, click Add.
-
Select From Connection, which adds an entity based on a pre-configured data connection. The fields on the tab update.
-
In the menu, select either the connection name.
-
Do one of the following:
-
To create a source based on a table or view, ensure the Existing Entity option is selected and select the physical table or view name from the Select Entity menu.
-
-
To create a source based on multiple tables, select the Custom SQL option, and enter the JOIN statement in Custom SQL.
-
Under Available Fields, select the fields to display for the user when creating visuals and dashboards based on this source.
Hide unnecessary or private fields from the user’s view. Include only those fields relevant to the business user. After saving the source, you can change the display names of the fields on the Fields tab.
Analyze supports adding maps to dashboards. To allow visuals based on this source to use a map, ensure the Latitude and Longitude fields are included.
-
Click Save Source.
-
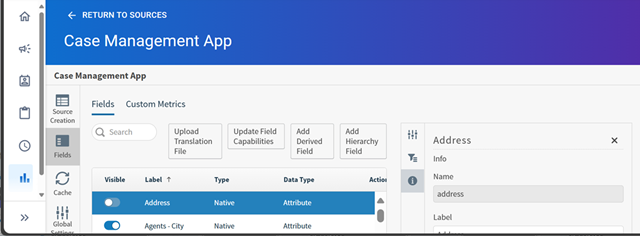
On the Fields tab, review the Labels for each field. Update them as needed so that they are relevant to the business user.
-
Highlight the row containing the field.
-
Click Visible to select or deselect fields to display to the user.
-
If needed, update the field name displayed to the user for this field in the Label field on the right.
-
Click Save.
-
-
Click Return to Sources in the top left.
-
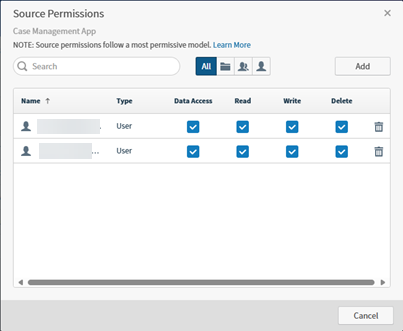
On the Sources page, click the Permissions icon for the newly created source.
-
Select the Data Access checkbox for all groups or users that should be able to view visuals based on this source.
-
Select the Read, Write, or Delete checkbox for all groups or users that can view, edit, or delete this source configuration.
-
Click Save.
Users will not see the table or view name selected in the Entity Name menu when working with visuals and dashboards.
The icons to the right of the Search box can be used to filter search results by All, tenant (which is your instance), groups, and users.
The Data Access permission is automatically assigned to any users who have Read permissions set for a visual that uses this source.
Two common additions to a source setup are creating a custom field or a custom metric, both added on the Fields tab.
-
You can add custom fields to any data source. See Maintain Derived Fields for more information.
-
You can add custom metrics. See Maintain Custom Metrics for more information.