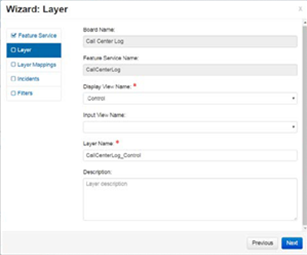
Add a Layer to a Feature Service
To add a layer to a Feature Service
-
In the Wizard: Layer window, for Display View Name, select a Display view.
-
If you plan on enabling bi-directional data syncing, for Input View Name, select an Input view, as it is required.
-
For Layer Name, leave or update the default text as appropriate.
-
Optionally, in Description, enter a description of the layer.
-
Click Next.
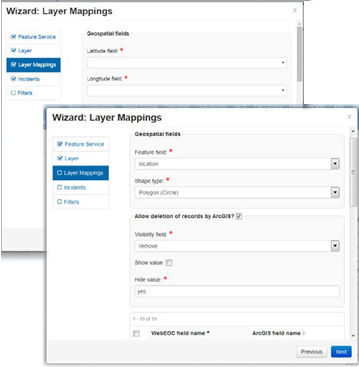
To apply field mapping to a layer
Only records containing valid latitude and longitude or valid feature values are synced between the applications.
-
In the Wizard: Layer Mappings window, in the Geospatial fields section, select values:
-
For the Latitude and Longitude fields for Mapper-enabled boards.
-
For the Feature field and Shape type fields for Maps-enabled boards.
-
The Latitude and Longitude fields or Feature field and Shape type fields may automatically be selected for you as well.
-
For Maps-enabled boards, you can select a single Shape type for each Feature Service. Only records having the selected Shape type are synced with ArcGIS. Polygon and Circle are treated as the same Shape type.
-
-
-
If you want the option to hide records deleted in ArcGIS so they do not appear in WebEOC Nexus, select the Allow deletion of records by ArcGIS? check box. When selected, additional configuration options open.
The values available in the following fields depend on the board’s configuration. Select or enter the appropriate values for the default board filter used to filter deleted records.
-
For the Visibility field, select the field you want to add the delete value to.
-
If you only want records with the Remove field set to No to display in the board, select Show value and enter No.
-
For Hide value, enter the value that triggers a record to be hidden (using board view filters) when such a record is deleted in ArcGIS, for example, Yes.
-
Now, field mapping must be completed. By default, the checkboxes associated with the required fields listed below are preselected and automatically mapped when applying field mapping to a layer:
-
Entrydate – contains the last update date for records.
-
IncidentId – contains the name of the incident.
-
PositionId – contains the position name.

-
-
In the table section, select the checkbox next to each WebEOC Nexus field name you want mapped to the layer.
Data will only be sent to ArcGIS for the selected fields. Selecting the checkbox automatically populates your selection’s ArcGIS field name. Field names can be renamed by modifying the name of the ArcGIS field name column. The field labels in ArcGIS will reflect the names defined in this column.
These mapping selections can be changed at any time.
-
Click Next.
Next, select an incident.