Add Feature Service
Adding a Feature Service involves adding layers, mapping those layers, associating incidents, and, optionally, applying filters. You can also opt to allow the extension to pull an existing Feature Service instead of creating a new one.
To add a Feature Service
-
In the main menu, click the integrations icon
 . The Integrations page opens.
 -
Click the ArcGIS Extension tab. The ArcGIS Extension page opens.
-
Click the Feature Services tab.
-
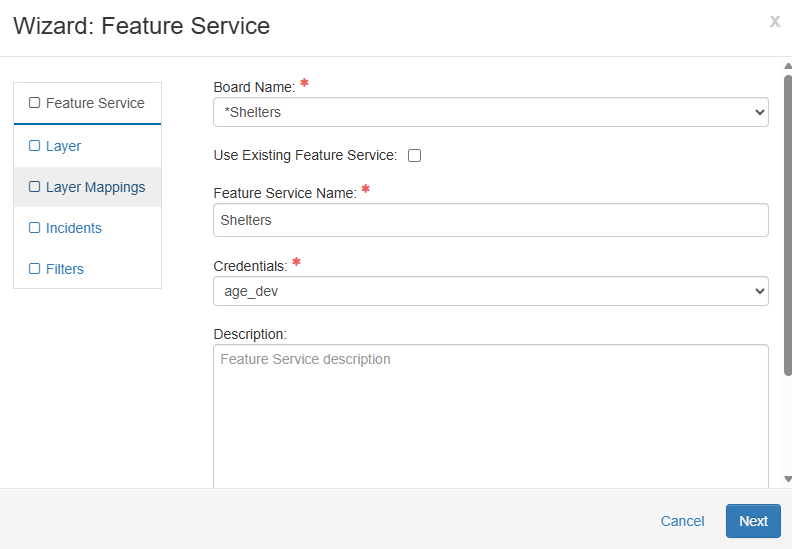
Click Add Feature Service. The Wizard: Feature Service window opens.
-
From the Board Name dropdown list, select an existing WebEOC Nexus board.
- (Optional) If you want the extension to pull an existing external Feature Service instead of creating a new one, you must:
Ensure a board exists that has the same fields as the existing feature service.
Ensure the board uses the <feature> tag.
Select the Use Existing Feature Service checkbox on the Wizard Feature Service window.
-
In the Feature Service Name field, enter a name if you are creating a new Feature Service, or select an existing name if you are using a previously created Feature Service.
-
For Credentials, select the appropriate ArcGIS user.
-
Optionally, enter a description of the Feature Service, and then click Next.
Only Maps- and Mapper-enabled boards are available for selection. If the appropriate board is unavailable, ensure the board has <feature> tags or is enabled for Mapper. The names of Mapper-enabled boards have “(Mapper)” included in the name.
The name chosen for the Feature Service must start with a letter, be unique to your ArcGIS organization, and contain only alphanumeric symbols without any spaces.
If the name you entered for the Feature Service already exists in ArcGIS, an error message appears upon clicking Next. You must enter a unique Feature Service name before you can continue.