Apply a Filter for the Feature Service
Applying a filter to a Feature Service is not required, but allows you to filter records, limiting the information shared with ArcGIS to only the required or most applicable data. Filtering can also help reduce data storage size in ArcGIS as only necessary records are sent.
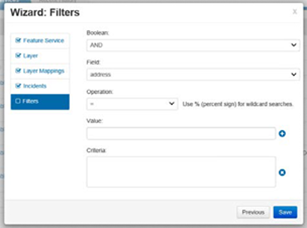
To apply a filter for the Feature Service
-
In the Wizard: Filters window, for Boolean, if the filter is configured with multiple criteria, select either AND or OR. This operation is applied between filter criteria.
-
For Field, select the field by which you want to filter records.
-
Select the applicable operation for the filter to apply when records are searched.
-
For Value, specify a value for the criteria by clicking the add icon.
-
For Criteria, click the add icon to add applicable criteria.
-
You cannot assign criteria without selecting a value in the Value field.
-
You cannot click Previous or Save if Value is populated but Criteria is not; therefore, either clear the Value field or click the add icon to add new criteria.
-
Click Save.
You can have zero, single, or multiple criteria. If criteria are not specified, however, data filtering will not occur.
When the Feature Service configuration is successfully saved, a green success message appears above the Feature Services table. If bidirectional sync was enabled, a two-way arrow icon appears in the Sync column.
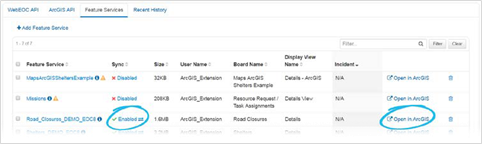
Upon a successful sync process, the Feature Service is created in ArcGIS. The Open in ArcGIS link appears after at least one successful sync process has completed. It allows you to quickly link to the Feature Service in ArcGIS.
The Size column indicates the size reported by ArcGIS. This helps track storage, especially when ArcGIS Online is used.
If you encounter synchronization problems, go to the Recent History tab. This tab contains high-level synchronization information and lists issues that may be preventing proper syncing.