Manage Report Data
As an administrator, you can manage report data for individual reports. Navigate to the Reports page then click the report you want to manage. This opens the report data page. Perform any of the actions below to manage report data elements:
If your report data is presented as a Bar, KPI, Line Trend: Multiple Metrics, Arc Gauge, Bars: Multiple Metrics, Donut, or Pie chart, then you can set up report data alerts.
-
Click the manage alerts button
 on the actions bar. The Alerts dialog opens.
 -
Click Create Alert.
-
Select one of the supported visuals from the list to create your alert.
-
Enter the alert details:
-
Name - the name of the alert.
-
Description - the description of the alert function, criteria, and so on.
-
Condition - the metrics and threshold that must be met to trigger the alert.
-
Schedule - the schedule for how often and when the alert is sent. For more information on the schedule settings, refer to Schedule reports.
-
Notification - the details for what is sent and to whom when an alert is triggered.
-
-
Click Save.
-
Click the manage alerts button
on the actions bar. The Alerts dialog opens. -
Search for an alert or browse the list of alerts in the list.
-
Click the toggle in the Enabled column to enable or disable the appropriate alerts.
-
Click anywhere in the alert row to open the alert details for editing.
Be sure to click Save to retain any changes you make to the alert details.
-
Click the delete button
 for the appropriate alert to remove it from the list permanently.
To export all data for a report, follow these steps:
-
Click the export button
 in the actions bar.
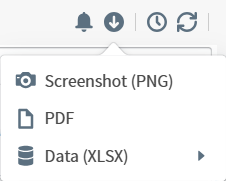
-
Select an export option from the menu:
-
Screenshot (PNG) - exports the report data as an image. This downloads to your computer automatically.
-
PDF - exports the report data as a PDF file. This opens an export details dialog.
-
Data (XLSX) - exports the report data to Excel as either visual data or raw data. This downloads to your computer automatically.
-
-
If you selected PDF, enter the export details in the resulting dialog.
-
Enter a Header and Footer to appear in the PDF.
-
Toggle the Add Username and Add Timestamp options to include this information in the PDF.
-
Click Export.
-
To export the report data presented in a single widget in the report, follow these steps:
-
Click the export button
in the more actions  menu for the appropriate widget.
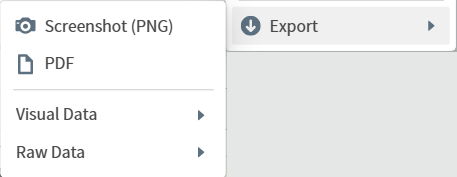
-
Select an export option from the menu:
-
Screenshot (PNG) - exports the widget data as an image. This downloads to your computer automatically.
-
PDF - exports the widget data as a PDF file. This opens an export details dialog.
-
Visual Data - exports the visual widget data to Excel (CSV or XLSX). This opens an export details dialog.
-
Raw Data - exports the raw widget data to Excel (CSV or XLSX). This opens an export details dialog.
-
-
If you selected PDF or Data, enter the export details in the resulting dialog.
-
Export as PDF:
-
Enter a Header and Footer to appear in the PDF.
-
Toggle the Add Username and Add Timestamp options to include this information in the PDF.
-
Click Export.
-
-
Export Visual Data as XLSX or CSV:
-
Enter the File Name.
-
Click Export.
-
-
Export Raw Data as XLSX or CSV:
-
Enter the File Name.
-
Specify the Number of Records to export and the Sort By method.
-
Click Export.
-
-
Scheduling a report sends the report data by email to recipients you specify at regular intervals.
-
Click the schedule reports button
 on the actions bar. The Scheduled Reports dialog opens.
 -
Click New Schedule.
-
Specify the following information:
-
Name - the name of the report as it will be sent in the email.
-
Format - the format the data will be presented in from the format options PDF, PNG, and XLSX.
-
To - the email addresses or the recipients you want to receive the report.
-
Subject - the subject line for the report email.
-
Message - the text you want in the body of the report email.
-
Frequency - the frequency with which you want the report email to be sent from the options Run Once, Daily, Days, Weekly, and Monthly.
-
Run On - specify the day(s) of the week or which day of the month when the report should be sent. If you chose Run Once or Daily,
-
Run Time - the time of day when the report email will be sent for the frequency you specified. If you chose Run Once, this option does not display.
-
From and To (or Date, if you selected Run Once) - the dates between which this schedule applies.
-
Run Now - toggle this option if you want to send the report when you first set up the schedule.
-
-
Click Save.
You can refresh the report data at any time to bring in updated data by clicking the refresh button ![]() in the actions bar.
in the actions bar.
Some buttons on the report data page, such as widget comments and published filters, are placeholders and are not yet active.