Board Workspace

From the Gallery, you can access the Board Workspace in Design mode by:

  • Clicking Design on a board card In the Grid Layout format or

  • Clicking the Design link In the List Layout format.

Board Workspace

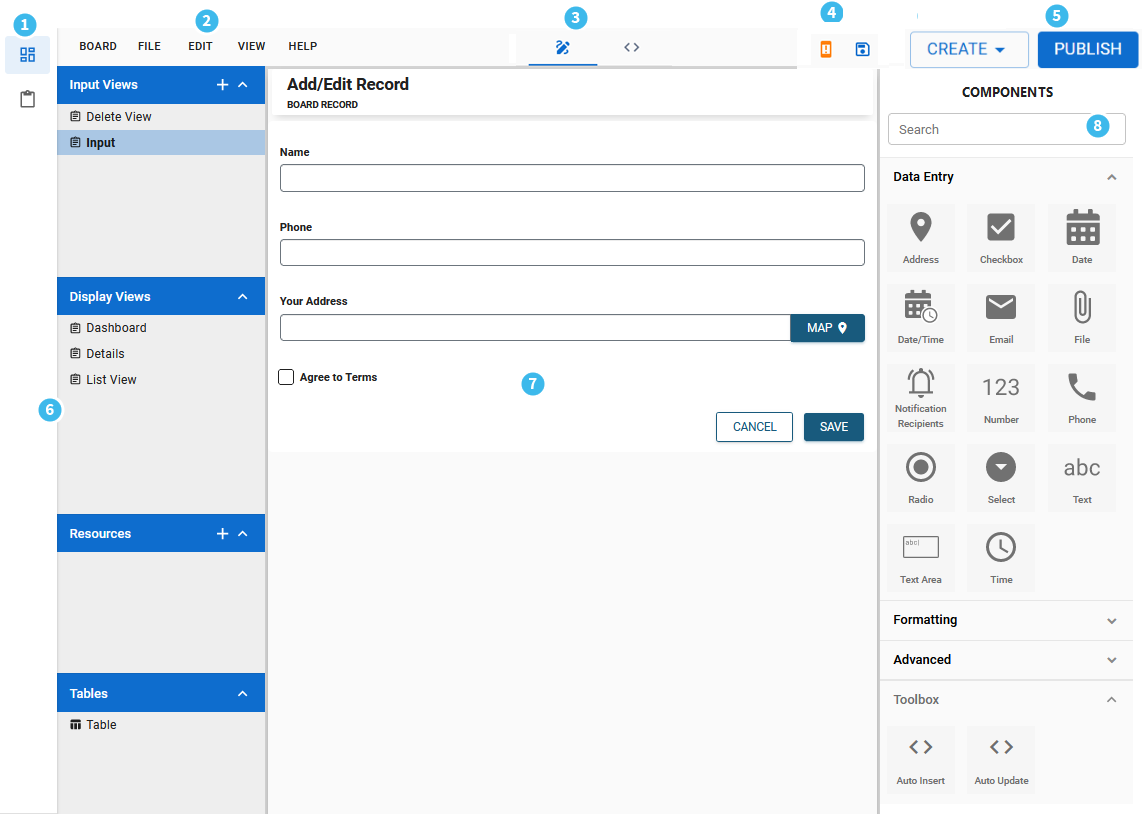
The Board Workspace contains the following options and elements.

Board workspace elements and descriptions
Number Description

1

The main menu contains the DesignStudio Board and Form Gallery options. For information about the main menu, see Gallery.

2

The Board menu contains the following options:

  • New Board: Opens the Create Board Wizard that guides you through the process of creating a new board. See Create a Board Workflow.

  • Clone Board: Creates and opens a copy of the current board. The current board is not affected. See Copy a Board.

  • Rename Board: Modifies the board's name.

  • Export Board: Exports the board. See Export a Board.

  • Delete Board: Deletes the current board. All associated views and board resources are deleted from DesignStudio. A confirmation window appears before the board is deleted. See Delete a Board.

The File menu contains the following options:

  • Save View: Saves the current view.

  • Rename View: Renames the current view.

  • Copy View: Copies the current view. See Copy a View.

  • Delete View: Deletes the current view. A confirmation window appears before the view is deleted.

The Edit menu contains the following options:

  • Undo: Resets the last action.

  • Redo: Repeats the last action.

The View menu contains the following options:

  • View Mode: Opens the corresponding workspace.

    • Design: Allows you to drag-and-drop components to design your board or form. This is the default page.

    • Code: Allows you to design the board through HTML coding.

    • Configure: Allows you to access the view settings. The view settings can be configured in WebEOC too, but have been included in DesignStudio for ease of use. For example, you can decide if the table is mobile ready, or you can lock the user or position view. You can also add view filters that determine the information that is visible on the corresponding view. See Configuration Mode for details.

  • Preview Mode: Shows a preview of the board as it will appear on the device. The following previews are available:

    • Desktop

    • Tablet

    • Mobile

    • Mobile Landscape

  • Details: Opens the board's Details page. See View Board Details, or Form Details Page.

  • Hide/Show Explorer: Hides/shows the left pane. The Explorer is visible by default. After you change this setting, it remains in that state for future sessions.

  • Hide/Show Components Tray: Hides/shows the Components tray. The tray is visible by default. After you change this setting, it remains in that state for future sessions.

  • Show History: Hides/shows the board's version history on the far right.

  • Code Theme Mode: Active in Code mode, sets the viewing preference to Light, Dark, or High-Contrast Black. See Code Mode.

  • View Theme Mode: Active in Design mode, sets the viewing preference to Light or Dark, See Preview Boards in Light and Dark Modes for details.

  • Hide/Show Grid Lines (Dashboard view only Pro); Hides/shows grid lines on the canvas.

  • Grid Margin (Dashboard view only Pro icon): Determines how much of the grid is visible between the components. The following grid spacings are available:

    • No Margins

    • Default Margins

    • Large Margins

The Help menu contains the following option:

  • View Help Documentation: Opens the DesignStudio Help Center in a new tab.

  • Submit Feedback: Opens the Ideas Portal, where you can provide feedback to Juvare on ways to improve our products. Use your DesignStudio credentials to log in.

3

Icons that do the following actions.

  • Undo: Resets the last action that you made.
  • Redo: Repeats the last action that you made.

  • Save: Saves your work.

  • Publish: Publishes the board. See Publish a Board.

4

The Search for View list provides a search option that you can use to quickly search for a view. This search option remains visible regardless of whether the Explorer is hidden.

5

The Create menu displays a list of board elements that you can create.

6

The Explorer pane allows you to create and modify the board structure. The structure is the framework that includes views, resources, and tables.

The Explorer pane that contains the following items.

  • Views: Every board has an input view and a display view. In WebEOC, data is entered and updated in the input view and displayed in the display view. For more information, see Views.

  • Resources: Resources, typically reserved for more advanced coders, allow you to use CSS, HTML, or JavaScript to style the views. Resources must be imported into the views after they have been created. See Add a Resource to a Board.

  • Tables: Tables offer information about the schema for a corresponding board. You can view the fields, along with the field type and length, but more importantly, you can determine if the board is form, static, or incident independent. See Configuration Mode.

7

The canvas on which you can drag components to create your board.

8

The Components tray that contains tools that you access to create your board. Components are grouped by view type. See Add Board Components.

A search field, at the top of the tray, allows you to search for components in the Components tray.