Manage Badges
As an administrator, you can view, manage, and edit badges and badge details by clicking on any of the badges in the Badge Management tab of the Badges page. Clicking the arrow button ![]() for the badge details.
for the badge details.
![]()
Editing badge information applies to editing badge details that are not specific to a user account, such as the badge name or description.
-
Click the more button
 for the appropriate badge, then select Edit Information from the menu. The Edit Information for Badge dialog appears.
 -
Edit the Badge Documents Name and the Description.
-
Click Save.
User details for badges can be edited as long as the badge distribution status is Not Printed. Any other status prohibits you from editing the badge without first changing the distribution status.
-
Click the arrow button
 for the appropriate badge. The badge's Assigned Accounts page opens.
 -
Click the account name, then select the edit button
 for the Badge Elements. The Badge Elements editing dialog appears.
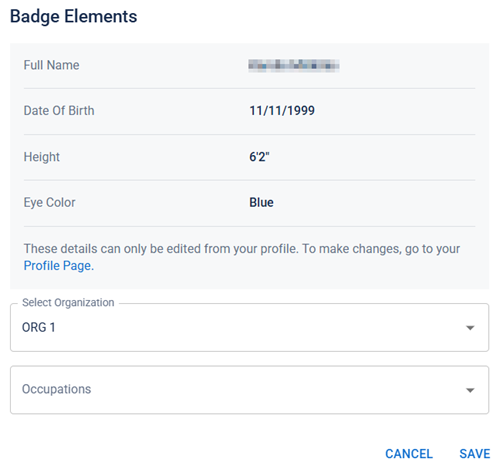
-
Edit the selected organizations and occupations.
-
Click Save.
-
Click the more button
for the appropriate badge, then select Duplicate from the menu. -
Follow the steps in Create a Badge to fill in the details for the duplicated badge.
-
Click the more button
for the appropriate badge, then select Assign Organizations from the menu. The Assign Organization dialog appears. -
Toggle the Set availability to administrators of organizations option, then click Add Organizations.
-
Click Save.
-
Click the arrow button
for the appropriate badge. The badge's Assigned Accounts page opens. -
Click Add Account.
-
Select all the accounts you want to add to the badge then click Add.
-
Review the badge preview and specify occupations, if necessary.
-
Click Add.
-
Click the arrow button
for the badge you want to print. The Badge Details page appears. -
On the Assigned Accounts tab, to print a single badge account:
-
Locate the account, then click the Print button for the entry.
-
Click Download.
-
-
To print multiple badge accounts:
-
Select the checkboxes for the accounts you want to print.
-
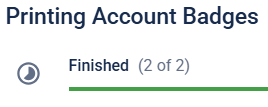
Click the Print button in the blue bulk action bar at the top of the list.
If any of the selected badge users cannot be printed due to their distribution status, they do not appear in the badge download. The number of account badges actually printed displays in the dialog when finished.
-
Confirm your print selection.
-
Click Download.
-
This moves the badge's distribution status to Processing.
-
Click the arrow button
for the appropriate badge. The Badge Details page appears. -
Click the History tab.
-
View or search the history list of activities associated with this badge.
You can search and filter by action, date, and search keywords. You can also sort the list by any of the headings at the top of the list, for example, to view all actions by role.
-
Click the arrow button
for the appropriate badge. The Badge Details page appears. -
On the Assigned Accounts tab, to change the distribution status of a single badge account:
-
Locate the account, then click the Reissue button. The Reissue Badge dialog appears.
-
Assign the organization and occupation for the badge account.
-
Click Reissue Badge.
-
-
To change the distribution status of multiple badge accounts:
-
Select the badge accounts that you want to reissue a badge for, then click Reissue. The Reissue Badge dialog appears.
If any selected account badges are invalid for reissue, they do not appear in the dialog list.
-
Assign the organizations and occupations for all listed badges.
-
Click Reissue.
-
-
Click the arrow button
for the appropriate badge. The Badge Details page appears. -
On the Assigned Accounts tab, to change the distribution status of a single badge account:
-
Locate the account, then click the more button
for the entry. -
Select Change Distribution Status from the menu.
-
Select the status you want to update the account to:
-
Not Printed - this badge has been created and assigned to the account but no other actions have been taken and can be considered in a draft state, where changes can still be made.
-
Processing - a print action has been taken on the badge but the physical badge has not yet been printed.
-
Printed - the physical badge has been printed but has not yet been given to the volunteer.
-
Distributed - the badge has been given or sent to the volunteer. This is the final state for valid badges that are in current use.
-
-
Click Save.
-
-
To change the distribution status of multiple badge accounts:
-
Select the checkboxes for the accounts you want to update.
-
Click the Change Distribution button in the blue bulk action bar at the top of the list. The Change Badge Distribution dialog appears.
-
Select the status you want to update the account to, then click Save.
-
-
Confirm your selection.
You can also change the status for any non-distributed badges by clicking the Mark as... link in the Distribution column. For example, if an account badge has a status of Processing, there is a label under the status that says Mark as Printed that allows you to quickly move the status to the next status type in the distribution workflow.
-
Click the arrow button
for the appropriate badge. The Badge Details page appears. -
On the Assigned Accounts tab, locate the account, then click the more button
for the entry. -
Select Change Expiration Date from the menu.
-
Modify the date by inputting the new date or selecting from the calendar widget.
-
Click Submit.
-
Click the arrow button
for the appropriate badge. The Badge Details page appears. -
On the Assigned Accounts tab, to revoke a badge for a single account:
-
Locate the account, then click the Revoke button for the entry.
-
Select a Reason for the revocation, and give details, if necessary.
-
Click Revoke.
-
-
To revoke badges for multiple accounts:
-
Select the checkboxes for the accounts you want to print.
-
Click the Revoke button in the blue bulk action bar at the top of the list.
-
Select a Reason for the revocation, and give details, if necessary.
-
Click Revoke.
-
-
Click the arrow button
for the appropriate badge displaying the invalid badge. The Badge Details page appears. A notification appears at the top of the Assigned Accounts tab, informing you of how many badges require review. -
Click the Review button in the notification bar. The Account Update Review dialog opens.
-
Click the drop-down arrow to review what updates were made to the profile, then:
-
click Reissue to create an updated badge to issue to the volunteer.
-
click Mark as Invalid if the updates invalidate the badge. This revokes it from the volunteer.
-
click Keep as Valid to update the badge status as valid without issuing a new badge.
-
-
Click Close to exit the dialog and return to the Badge Details page.