Use the Screenings Dashboard
As an administrator, you can view a summary of credential verifications and background checks on the Screenings Dashboard page. The page filters accounts based on a summary of credential verification and background check statuses.
To use the screenings dashboard
-
On the main menu, select Screenings Dashboard. The Screenings Dashboard page opens.
-
Perform any of these actions for Credentials:
 View the latest credential verifications
Click View Latest. The Credentials Verifications page opens with accounts listed in reverse chronological order of the date their verification was requested.
View the accounts filtered by the Credential Verifications statuses
Click the status. The Credential Verifications page opens with accounts filtered by the selected status.
Search for specific accounts/credentials
-
Click a status to open the Credential Verifications page.
-
Enter a search term in the Search field at the top of the filtered list.
-
To refine the search even more or change what credential status you are searching within:
-
Specify a job type in the Occupation filter.
-
Specify the credential type in the Credential filter.
-
Change or add status types in the Status filter.
-
Click All Filters to filter by even more specific information related to identity, occupation, and location, among other filters.
-
Show only expiring (but not yet expired) credentials
-
Click any credential status other than Expired to open the Credential Verifications page.
-
Toggle the Show Expiring only option at the top of the filtered list.
Notify accounts of credential issues
-
Click a status to open the Credential Verifications page.
-
Click the checkbox for all accounts that need to be notified.
-
Click Notify at the top of the filtered list.
-
Click New Notification or click an available Notification Template then follow the steps in Create a Notification.
Verify credentials
-
Click a status to open the Credential Verifications page.
-
Click the checkbox for all accounts that need to be verified.
-
Click Verify Credentials at the top of the filtered list.
-
Click Verify in the confirmation dialog.
Export credentials
-
Click a status to open the Credential Verifications page.
-
Select any of the filtered list then click the Export button or click Export All to export the entire filtered list.
-
In the Export completed dialog, confirm that you want to Download the file.
You can now open the CSV file, which shows the selected accounts and relevant information.
Review profile
-
Click a status to open the Credential Verifications page.
-
In the row for a specific account, click Review Profile. The user's profile opens.
Add an account/credential to a group
-
Click a status to open the Credential Verifications page.
-
Filter (if necessary) the credentials list to see the appropriate accounts/credentials.
-
Select the appropriate accounts/credentials then click Add to Group.
-
Specify whether to add them to a New Group or an Existing Group:
-
If a new group, enter the Name and Description of the group in the New Group dialog, then click Submit.
-
If an existing group, search and select the appropriate group in the Select Group dialog, then click Select.
-
Add an account/credential to an organization
-
Click a status to open the Credential Verifications page.
-
Filter (if necessary) the credentials list to see the appropriate accounts/credentials.
-
Select the appropriate accounts/credentials then click Add to Organization.
-
Search for and select the appropriate organization in the Select Organizations dialog, then click Select.
-
-
Perform any of these actions for background checks:
View the accounts filtered by the Background Checks status
Click the status. The Background Checks page opens with accounts filtered by the selected status.
Manually modify the background check status
-
Click the status under the Manual background check type. The Background Checks page opens with accounts filtered by the selected status.
-
Click Change Status. The Submit Background Check dialog displays.
Refer to the table of statuses under Background Check Statuses.
-
Click Save.
Submit ready checks for automatic background checks
-
Click the Ready status under the Standard or Super Search background check types. The Background Checks page opens with accounts filtered by the selected status.
-
Click Submit Check. The Submit Background Check dialog displays.
-
Click Submit.
Review failed background checks
-
Click the Failed status under the Standard or Super Search background check types. The Background Checks page opens with accounts filtered by the selected status.
-
Click Review Profile. The profile page for that account opens to the Background Check tab.
-
Review the History and Notes section and add notes, if necessary.
Download Background Check forms
-
Click Download Forms.
-
Click one of these options. The form downloads according to your browser's settings.
-
Report Copy Request Form: Download this form to send to any volunteers that request a copy of their background check.
-
Reinvestigate Request Form: Download this form to send to any volunteers that request a reinvestigation background check.
-
-
Click Ok.
Search for specific accounts
-
Click a status to open the Background Checks page.
-
Enter a search term in the Search field at the top of the filtered list.
-
To refine the search even more or change what background check status you are searching within:
-
Change or add status types in the Status filter.
-
Specify a date in the Last Update filter.
-
Click All Filters to filter by even more specific information related to identity, group or organization membership, contact methods, occupation, and location, among other filters.
-
Show only expiring (but not yet expired) credentials
-
Click any credential status other than Expired to open the Credential Verifications page.
-
Toggle the Show Expiring only option at the top of the filtered list.
Export background checks
-
Click a status to open the Background Checks page.
-
Select any of the filtered list then click the Export button or click Export All to export the entire filtered list.
-
In the Export completed dialog, confirm that you want to Download the file.
You can now open the CSV file, which shows the selected accounts and relevant information.
Add an account with a specific background check status to a group
-
Click a background check status to open the Background Checks page.
-
Filter (if necessary) the background checks list to see the appropriate accounts/statuses.
-
Select the appropriate accounts then click Add to Group.
-
Specify whether to add them to a New Group or an Existing Group:
-
If a new group, enter the Name and Description of the group in the New Group dialog, then click Submit.
-
If an existing group, search and select the appropriate group in the Select Group dialog, then click Select.
-
Add an account with a specific background check status to an organization
-
Click a status to open the Background Checks page.
-
Filter (if necessary) the background checks list to see the appropriate accounts/statuses.
-
Select the appropriate accounts then click Add to Organization.
-
Search for and select the appropriate organization in the Select Organizations dialog, then click Select.
-
-
Perform any of these actions for integration:
View licensing boards
-
Click the Integrations tab.
-
View the status, activity, and success of the licensing boards by referring to the information in the boards list.
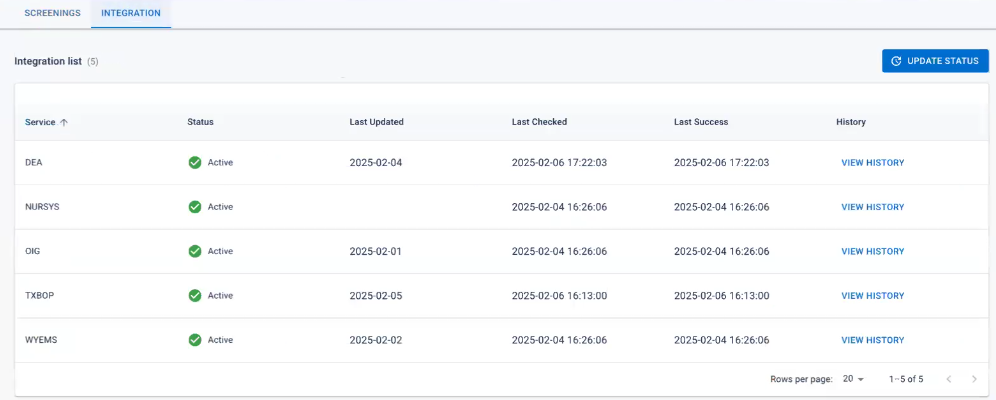
The licensing boards are setup between RMS and the client licensing board through Juvare Application Services (JAS) to verify medical state licenses automatically. This does not need to be configured and was automatically setup during RMS configuration.
-