Share a Board
Board Sharing is performed in Juvare Exchange (JX) in WebEOC Nexus 10.12 and later.
With board sharing enabled through JX, you can publish a local board to a network to share it with the organizations within the network. However, you cannot share boards that you are subscribed to or do not own. When sharing a board, you must choose whether to include its existing data; regardless of your choice, once an organization subscribes to a shared board, all future board data is shared.
If you share an incident-dependent board, you must also share the associated incident to ensure the organization can access the board's data. For information on incident sharing, see Share an Incident.
If you publish a board to multiple networks, the data you create is sent to all networks. However, the data you receive is only shared within the network that shared the data. For this reason, we recommend grouping all organizations you want to share the board with into a single network.
Once a board has been published, it cannot be unpublished; however, you can stop sharing the board with networks by following the steps in Stop Sharing a Board with a Network.
If you share a data-only board, that board’s subscribers must then map the data to their local board. See Map Data for a Shared Board for details.
The JX chat feature is a convenient way to notify the other organizations in a network that you have shared a board with them. For information on using chat, see Manage Chat Topics.
To share a board with one or more networks
-
In the main menu, click the JX Networks icon
 . The Networks page opens.
 -
Click the row containing the network that has the board to share. The networks detail page opens.
-
Click the Shared Boards tab.
-
Click Share a Board.
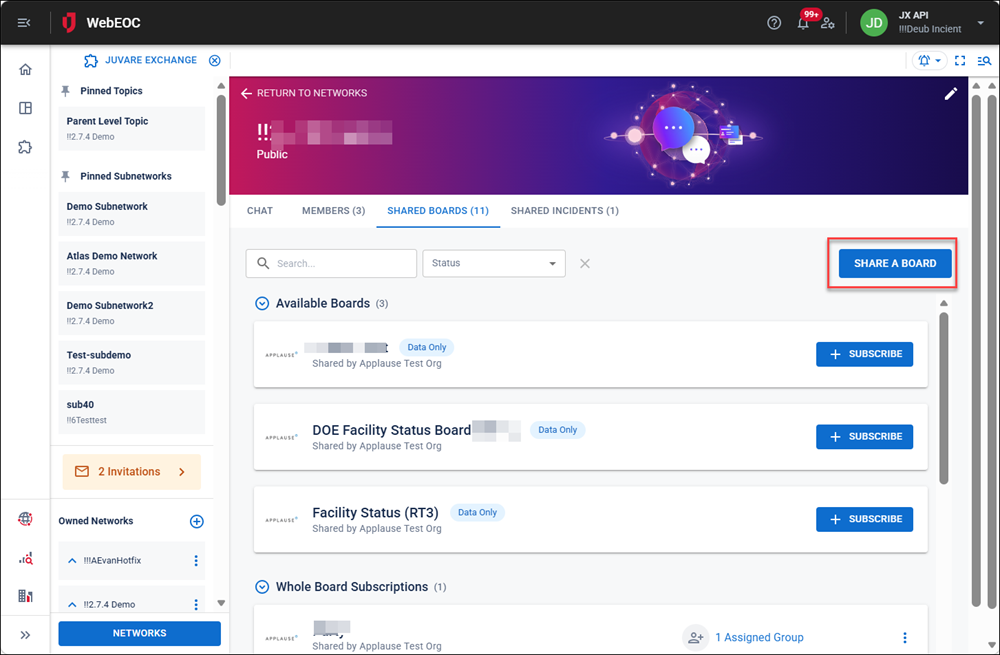
The Share a Board to Network Name page opens.
-
In the Board drop-down list, select the board to share.
-
Click Next. The Share Options page opens.
-
Select one of these options:
-
Whole Board: Allows network member administrators to assign board views, filters, and permissions to groups in their organization as they deem relevant.
-
Data Only: Allows you to define which data in your boards you would like to share.
If you share a data-only board, that board’s subscribers must then map the data to their local board. See Map Data for a Shared Board for details.
-
-
Click Next.
-
If you selected Whole Board, on the Board Details page, click the checkbox next to views that you want to mark as Assignable Views for subscribers. All views will be available via viewlinks.
-
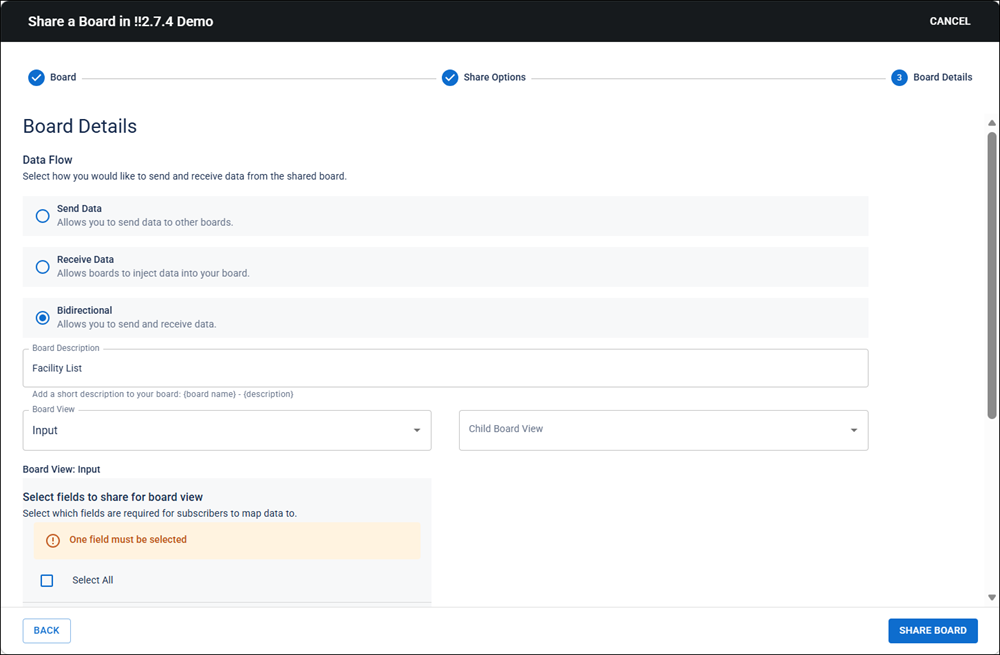
If you selected Data Only, on the Board Details page, select a checkbox to indicate how you would like to send and receive data from the shared board. The following options are available:
-
Send Data: Allows you to send data to other boards.
-
Receive Data: Allows boards to inject data into your board.
-
Bidirectional: Allows you to send and receive data.
-
-
In the Board Description field, enter a brief description of the board that stores this data.
-
In the Board View drop-down, select the view that stores the data.
The page updates with fields on the view.
-
Select at least one field to share.
-
Select the Required checkbox if the field is required.
You must select at least one field, and it must be marked as Required.
-
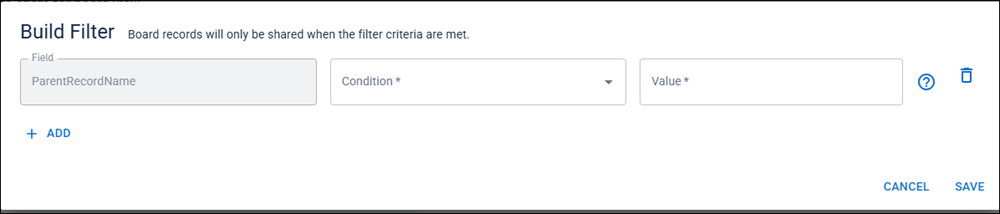
If you only want to share board data if filter criteria are met, click the Add Filter button. The Build Filter dialog opens.
-
In the Condition drop-down, select the filter’s condition.
-
In the Value field, enter the filter value.
You can build more complex filters by clicking Add. Multiple filters use AND logic.
-
Click Save.
-
In the bottom right, click Share Board.
After you have shared the board, you can share it with additional networks using the Networks page or the Data Management tab.
To share a board with additional networks on the Networks page
-
In the main menu, click the JX Networks icon
. The Networks page opens. -
Click the row containing the network that has the board to share. The networks detail page opens.
-
Click the Shared Boards tab.
-
Under Owned Boards, click the more icon
 and select Share with Another Network.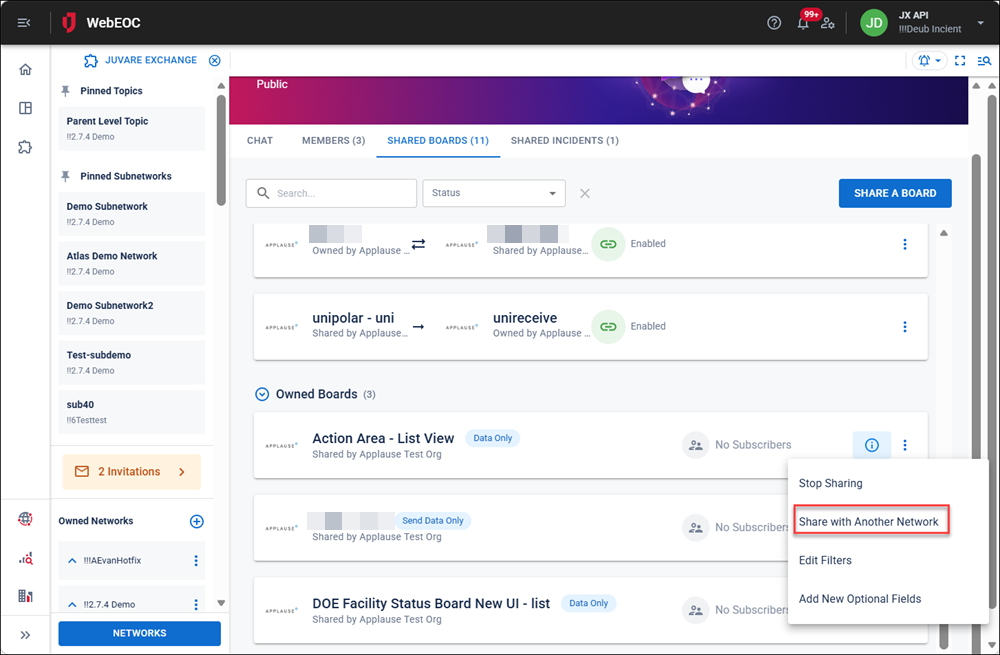
The Share Board with Additional Networks dialog opens.
-
In the Network drop-down, select the network.
-
Click Submit.
To share a board with additional networks on the Data Management tab
-
In the main menu, click the JX Networks icon
. The Networks page opens. -
Click the Data Management tab and select Shared Boards.
-
Locate the board to share.
-
Click the more icon
on the row and select Share with Another Network. The Share Board with Additional Networks dialog opens. -
In the Network drop-down, select the network.
-
Click Submit.
If you shared an incident-dependent board, you must also share the associated incident to ensure the organization can access the board's data. For more information, see Share an Incident.
For information on subscribing to a board that has been shared with you, refer to Subscribe to a Shared Board.