Plan and Create User Accounts
Before creating a user account, determine what information and permissions are necessary for the account. To do this, answer the following questions:
-
What is an appropriate primary email or username and password for the account?
-
Users with all account types except Service or Service as Administrator use their primary email to log in. A user will receive a welcome email at this primary email with instructions for setting up their own passwords after the user account has been created.
-
User accounts with the account type of Service or Service as Administrator require administrators to enter a username and password as part of setting up the account.
-
-
What position or positions will the user be assigned to? Does the position already exist?
-
Will the user be a WebEOC Nexus administrator? If so, do they need access to all administrator areas, or only particular ones?
Partial Administrator rights and permissions are assigned via an Admin Profile.
-
Will the account be used only by the WebEOC Nexus API?
Create this type of user account with a Service or Service as Administrator account type.
When you have this information, you are ready to create a user account.
To create a new user account
-
In the main menu, click the accounts icon
 . The Accounts page opens.
 -
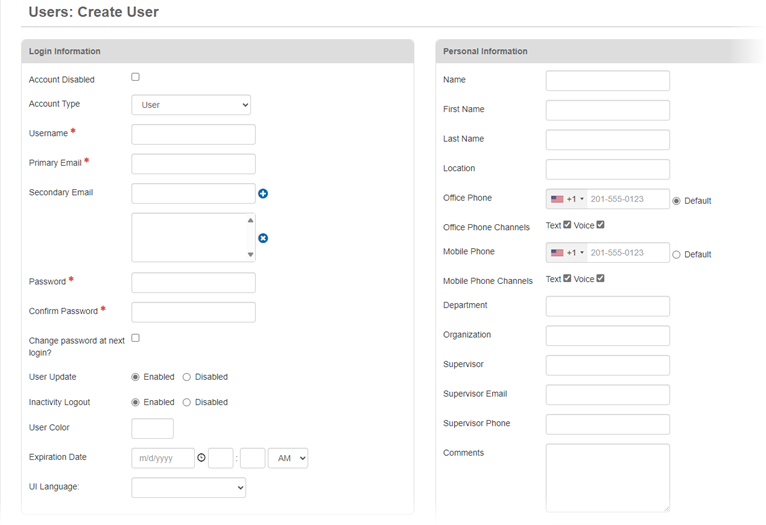
On the Users tab, click Create User. The Users: Create User page opens.
-
On the left, in the Login Information area, enter the following information.
Fields used when adding an account Field Description Account Disabled Security option that enables or disables the user's account.
Account Type Type of account and associated permissions you want to grant the user.
-
User
-
Full Administrator
-
Partial Administrator
-
This option only displays if there are existing Admin Profiles.
-
If you select Partial Administrator, then, in the System Access section at the bottom of the page, the Admin Profiles tab displays. Specify account administration settings by assigning one or more Admin Profiles.
-
-
Sub-Administrator
If you select Sub-Administrator for Organization to Administer, select the organization this sub-administrator is responsible for managing. For information about organizations, see Organizations.
You must have an Enterprise license to use organizations. Contact your Client Success Manager (CSM) for information.
-
Service
-
Service as Administrator
If you select Service or Service as Administrator, you must complete the Username, Password, and Confirm Password fields. These fields do not display for any other account type.
See Account Types for details about each type.
The Account Type options visible in this list depend on whether you have full administrator permissions.
Account Organization Organization which the user with the Sub-Administrator account type will manage. See Organizations for more information.
This dropdown only displays for the Sub-Administrator account type.
You must have an Enterprise license to use organizations. Contact your Client Success Manager (CSM) for information.
Username Name or email address that the user with the account type of Service or Service as Administrator uses to log in.
This field only displays for account types of Service or Service as Administrator.
Authentication ID Additional field for authenticating employees using external authentication.
This field is not available in all versions.
The Copy Primary Email button appears to the right of the Authentication ID field. Administrators can click this button to automatically insert the user's Primary Email into the field.
Primary Email Email account used to log in to WebEOC Nexus and where the user can receive notifications. For example, aaa@aa.com.
After the user account is created, a welcome email is sent to this address that explains how to set up the password and access WebEOC Nexus. See Access Your Juvare Account for the First Time for more information.
Secondary Email Additional email account. For example, aaa@aa.com.
Click the add icon to add the address to the list of emails. Repeat this step if you want to add more email addresses to the account.
To remove an email from the list of additional emails, click the email address and then click the delete icon.
Password Password that the user with the account type of Service or Service as Administrator needs to enter to log in.
-
Passwords are case sensitive.
-
This field only displays for account types of Service or Service as Administrator.
Confirm Password Repeated entry of the password to confirm accuracy.
This field only displays for account types of Service or Service as Administrator.
Change password at next login? This checkbox is not used.
User Update Allows the user to update their own account information on the User Account edit window.
If you select Enabled, all allowed updates the user makes are saved to the user’s account.
The Allow users to edit their accounts checkbox must be selected on the System Settings > General tab. If this checkbox is not selected, the User Update setting has no effect. See Allow Users to Edit Their Accounts for more information.
Multiple User Login Allows multiple users or one user with multiple devices to access WebEOC Nexus simultaneously through this account.
This field is not available in all versions.
Inactivity Logout Automatically logs the user out of WebEOC Nexus after 20 minutes of inactivity. See Reset Logout Events for a list of events that reset the timer for being logged out due to inaction.
For additional information, see WebEOC Nexus Session Timeout.
User Color The color of the user’s background in WebEOC Nexus.
Background colors can help users distinguish between usernames that are displayed on a status board.
Expiration Date Date and time on which to terminate the user’s privileges in WebEOC Nexus. Once this date and time are reached, the user's account is locked until an admin unlocks it.
mm/dd/yyyy hh:mm AM or PM
UI Language Language in which the default user interface content appears for the user.
This field is removed in WebEOC Nexus 10.12. International users set their language in their profile. See Update Your Profile Information for details.
-
-
On the right, in the Personal Information area, enter the following information.
-
During the login process, information entered in this area is used to auto-fill the Additional Login Information window. You can change the information that is displayed by default.
-
If a phone number is not entered in the Office Phone field, the user must enter the phone number each time they log in.
-
Phone numbers that do not include the country code are automatically assigned a +1, which is the code for the United States, Canada, and several Caribbean nations.
Fields used when adding an account Field Description Name User’s first and last name.
Location User’s assigned work location.
Office Phone Phone number at the user’s work location.
Office Phone Channels
Select Text or Voice as your preferred notification method. You can also select both options to receive notifications from each of them. If you do not make a selection, the notification defaults to voice.
Mobile Phone User’s mobile phone number.
Mobile Phone Channels
Select Text or Voice as your preferred notification method. You can also select both options to receive notifications from each of them. If you do not make a selection, the notification defaults to text.
Department User’s department at work.
Organization User’s work organization.
Supervisor User’s supervisor (first and last name) at work.
Supervisor Email Email address of the user’s supervisor.
Supervisor Phone Phone number of the user’s supervisor.
Comments Additional information about the user or their work situation.
Attachment Any file related to the user that you want to attach to their account.
Attach files up to 10 MB.
-
-
To assign a position to the user account, do the following actions.
-
In the System Access area, if it is not already selected, select Positions.
-
Click Add Position.
-
Select one or more positions.
-
Click Add.
-
-
To view mobile devices that have been configured to access WebEOC Nexus, in the System Access area, click Mobile Devices.
-
Click Save. The new account appears in the list on the Users page.
Related Concepts
Related Tasks