Create a Map
As an administrator, you can create an unlimited number of maps to meet your organization's needs. When you create a map, you decide what board data should be displayed on the map, as well as specify map characteristics (for example, 2D or 3D map, topography, clustering, and heat maps). If needed, you can edit or delete the map at any time and as incidents evolve.
After you create a map, you assign it to WebEOC Nexus users. Only positions in groups you identify can view the map.
Creating a map involves three steps:
-
Add map layers (available with the Maps add-on)
Enter Map Information and Characteristics
To enter identifying information and specify map characteristics
-
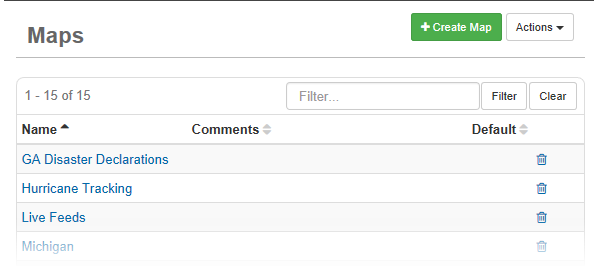
In the main menu, click the mapping icon
 . The Mapping page opens.
 -
On the Maps tab, click Create Map.

-
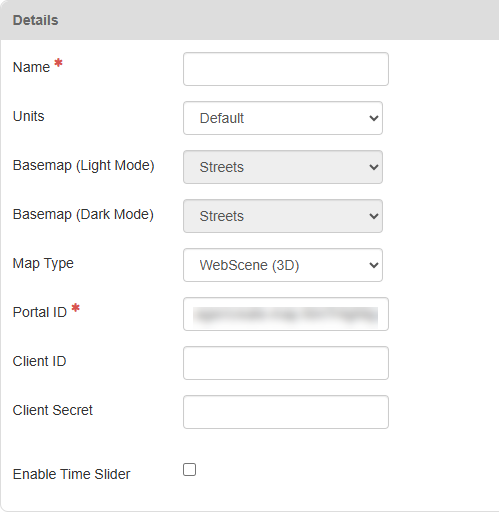
On the Create Map page, enter the following information for the map:
-
For Name, enter a name for the map.
-
For Units, select the unit of measurement to be used in the map.
-
For Basemap (Light Mode) and Basemap (Dark Mode), select the basemap that should display when the map opens in each mode. WebEOC Nexus provides a standard set of basemaps to choose from.
-
For Map Type, select any of the following preconfigured types:
-
Default
-
WebMap (2D)
-
WebScene (3D)
-
-
-
If you selected WebMap (2D) or WebScene (3D), enter the appropriate Portal ID. To import a WebMap (2D) or WebScene (3D) that requires authentication, you also need to enter the Client ID and Client Secret.
-
Click Save. The Edit Map page opens.
-
Enter the following information for the map. information that you entered in the Create Map page auto-populates in the corresponding fields with the information you entered, but you can change it if necessary. As you select options, the image at the bottom of the window displays a preview of the map.
-
For Comments, enter one or more comments about the map.
-
If you want this map to be the default map that users see, select Is Default. If you do not select the checkbox, users can still access the base map manually in Maps.
-
If you do not want points that are in close proximity on the map to appear in clusters (available in 2D maps only), select Disable Clustering.
-
When a user selects a cluster, they can zoom on any single item when they select it.
-
-
If you want the map to display in 3D, select 3D Map.
-
If you want to use a 3D scene map layer on your map, ensure that you select this option.
-
-
To enable topography (available in 3D maps only), select Topography Enabled.
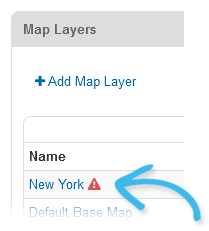
If you want to use a 3D scene map layer on your map, ensure that you select this option. Three-dimensional scenes may require 3D elevation data to properly render. If you select a 3D scene map layer without enabling this option, WebEOC Nexus displays a warning icon beside the map layer name.

-
-
To specify the default view of the map when it opens, on the map preview, do any or all of the following:
-
Use the tools to manipulate the view (zoom, pan, and rotate). See Navigate Maps in the WebEOC Nexus User Help Center for information about using the zoom, pan, and rotate tools.
-
In the search field, enter a location or point of interest (POI). See Search in Maps in the WebEOC Nexus User Help Center for information about searching in Maps.
-
Click Save.
You are ready to add map layers and board layers.
Add Map Layers
Adding a map layer is available with the Maps add-on. See Mapping.
If you are not continuing this procedure from To enter identifying information and specify map characteristics, in the Admin View, go to Mapping > Maps, and then select the map from the list of maps.
This procedure adds an existing imported map layer. To import or create a new map layer, see Create a Map Layer.
-
In the Map Layers section, click Add Map Layer.
A Default Base Map layer is already added to your map. You can delete this layer if you have an alternate base map layer to use.
-
In the Select Map Layer window, select the map layer you want to associate with your new map, and then click Next.
-
In the Choose Layer Settings window, accept the defaults or modify the following information, as needed:
-
For Name accept the auto-populated name, or modify it as needed.
-
For Enabled, verify that the checkbox is selected if you want the layer to be visible when a user opens the map. Otherwise, clear the checkbox if you want this layer to be hidden when a map is opened. Users can manually turn on the layer.
-
For Opacity, drag the slider left or right until you reach the desired default transparency level for the layer. The default opacity is set to 50%. Users with access to the base map can modify this setting within Maps.
-
For Refresh Rate, enter a time in minutes that, after which, the layer refreshes data even if the user does not interact with the map. If you do not specify a Refresh Rate, the map layer does not refresh until the user moves to a new part of the map.
-
-
Click Save.
-
Repeat steps 1 to 4 for each map layer you want to be available when a user opens the map.
-
To set a preferred order in which the map layers appear, in the Map Layers list, click a layer's associated up or down arrow under the Move column. Continue moving the layers until they are arranged as desired.
-
Click Save.
Add Board Layers
If you are not continuing this procedure from To enter identifying information and specify map characteristics, in the Admin View, go to Mapping > Maps, and then select the map from the list of maps.
-
In the Board Layers section, click Add Board Layer.
-
In the Select Board window, select the board associated with the data you want shown on your new map, and then click Next.
Only boards enabled with the maps <feature> tag are available.
-
In the Select View window, select the display view of the board you want to associate with the map, and then click Next. The available view options depend on the board you selected.
-
If filters are associated with the selected display view, the Select View Filters window opens. Select the applicable filters that define which records display on the map, and then click Next.
-
In the Choose Layer Settings window, accept the defaults or modify the following information, as needed:
-
For Name accept the auto-populated name composed of the board name followed by the display view name, or modify it as needed.
-
For Enabled, verify that the checkbox is selected if you want the layer to be visible when a user opens the map. Otherwise, clear the checkbox if you want this layer to be hidden when the map opens. Users can manually turn on the layer.
-
For Opacity, drag the slider left or right until you reach the desired default transparency level for the layer. The default opacity is set to 50%.
-
If you want this layer to include heatmaps, select the Heat Map checkbox. Heat maps are used to visualize and display a geographic distribution of data. They represent different densities of data points on a geographical map.
-
-
Click Save.
-
Repeat steps 1 to 6 for each board layer you want to be available when a user opens the map.
-
Click Save to save this map.
After you add a new map, you need to set access privileges to it using the Groups Manager. As a recommended best practice, to give users access to the map, assign the map to a feature group.
