Manage Shifts
As an administrator, you can edit, duplicate, and promote shifts. When you promote a shift, the solution advertises the shift on the homepages to all volunteers that meet the shift's requirements.
To manage shifts
-
On the main menu, click Missions. The Missions page opens.
-
Locate a mission and click it. The mission details page opens.
-
Perform any of these actions.
 Promote shifts
This allows you to alert qualified volunteers that you are still in need of volunteers, and to provide them a link to review the open shifts for which they qualify.
-
Locate a shift and click it to expand the details.
-
Click the Promote Shifts link within the details. A confirmation window opens.
-
Click Promote Shifts.
This can only be done for current or scheduled shifts.
If you want to promote all current and scheduled shifts on the page, click Promote Shifts at the top of the page.
Edit an active shift
-
Locate a shift in the Active Shifts tab, and click the edit button
 . The Edit Shift page opens.
 -
Update any of the information and click Next until you reach the last screen.
-
Click Submit.
If you modify the date of a scheduled shift so that it ends before the current date/time, the shift moves from the Active Shifts tab to the Inactive Shifts tab.
Edit an inactive shift
-
Locate a shift in the Inactive Shifts tab, and click the edit button
. The Edit Shift page opens. -
Update any of the information and click Next until you reach the last screen.
You are not able to remove existing positions or reduce the number of volunteers needed.
-
Click Submit.
If you modify the date of an inactive shift so that it starts or does not expire until a future date/time, the shift moves from the Inactive Shifts tab to the Active Shifts tab.
Duplicate a shift
-
Locate a shift and click the duplicate button
 . The Duplicate Shift page opens.
 -
Update any of the information and click Next.
-
Click Submit.
Shift duplication is useful when the mission requires similar shifts with only slight changes. Examples of this may include:
-
Creating a morning and an afternoon shift at the same location.
-
Creating multiple shift times running at more than one location.
End a shift
If the shift has been mobilized, you can end an active shift that is currently in progress.
-
Locate a shift and click the end button
 . The End Shift dialog opens.
 -
Select a reason for why you are ending the shift before it's scheduled time.
-
List any information in the Details field you may want to include for administrative purposes.
-
Click Yes, End Shift. The shift is moved from the Active Shifts tab to the Inactive Shifts tab.
The shift details in the Inactive Shifts tab show who ended the shift and the reason. Volunteers are automatically notified that the shift has ended.
Cancel a shift
If a mission has been mobilized, you can cancel an active shift that has been scheduled but has not yet started.
-
Locate a shift and click the cancel button
 . The Cancel Shift dialog opens.
 -
Select a reason for why you are canceling the shift.
-
List any information in the Details field you may want to include for administrative purposes.
-
Click Yes, Cancel Shift. The shift is moved from the Active Shifts tab to the Inactive Shifts tab.
The shift details in the Inactive Shifts tab show who canceled the shift and the reason. Volunteers are automatically notified that the shift has been canceled.
Delete a shift
If the mission is still in a draft status and has active shifts that you want to delete, follow these steps:
-
Locate a shift and click the delete button
 . The Delete Shift dialog opens.
 -
Confirm that you want to delete the shift by clicking Delete. The shift is removed.
Import hours
-
Click the Inactive Shifts tab.
-
Locate and click a shift then click Import Hours. The Import Hours dialog opens.
-
Click Select CSV File, then choose a previously exported file, which has been edited with updated information.
-
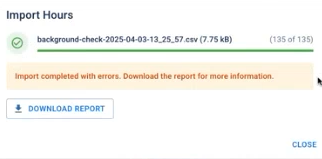
Click Import. The file undergoes validation to ensure that it was formatted correctly.
If you haven't exported a file and you want to use a fresh CSV file as a basis for the import, click Download in the Import Hours dialog to download the CSV template.
If the file was imported but had validation errors, the completion dialog notifies you. Click Download Report to review the errors.
Export hours
-
Click the Inactive Shifts tab.
-
Locate and click a shift then click Export Hours.
-
In the Export completed dialog, confirm that you want to Download the file.
You can now open the CSV file, which shows the exported hours and relevant information.
-
To view shifts by volunteer
Instead of viewing past shifts grouped by shift, you can choose to group past shifts by volunteer. This is especially useful if you are trying to view, manage, or add shifts for specific volunteers.
-
On the main menu, click Missions. The Missions page opens.
-
Locate a mission and click it. The mission details page opens.
-
Click the Inactive Shifts tab, then select the Volunteers button on the right.
-
Click on a volunteer to view details about their shifts and hours.
For more information about managing shift volunteers, refer to Manage Shift Volunteers.